Chapter 26: Kankiryo Saddle
BETWEEN New Year’s Day and 3rd January 1944 Brigadier Chilton’s 18th Brigade was flown to Dumpu in aircraft which back-loaded the 25th Brigade. By the 4th the relief of the 21st Brigade in the main sector was completed, the 2/2nd Pioneer Battalion remaining under Chilton’s command. The veteran 18th Brigade, which had served in England and fought in North Africa at Giarabub and Tobruk, was now beginning its second campaign in New Guinea. Behind it were the battle for Milne Bay and the long and costly fighting round Buna. Now reinforced and fresh, the brigade had long been anxious to join the rest of the 7th Division in the fighting area.
The men of the 15th Brigade on the other hand were surprised at being called forward again so soon – less than four months after their withdrawal from action in the Salamaua campaign. Brigadier Hammer had been told in November that, as far as could be forecast, it was unlikely that his brigade would be required for operations before the end of January. When orders for movement came, the units were not fully equipped, and such important administrative items as emplaning tables did not exist. Hurried issues of equipment were made, orders for movement issued and the first unit moved within five days of receipt of the warning order. Such surprises were to be expected in war, however. In this brigade the 24th and 58th/59th Battalions had gained much in experience and confidence during the Salamaua campaign, but the 57th/60th, which had provided the garrison for Tsili Tsili, had not yet been in action.
At this time the American landing at Saidor placed them not only on the line of withdrawal of the 20th and 51st Japanese Divisions from the east of the Huon Peninsula, but endangered the rear of the 78th Regiment and other units of Nakai Force that were opposing the 7th Division. To assist the Saidor operation New Guinea Force had instructed on 27th December that the 7th Division would “contain hostile forces in the Bogadjim-Ramu area by vigorous action of fighting patrols against enemy posts; major forces will not be committed”.
General Vasey had instructed both his incoming brigade commanders about their new roles when he had been at Port Moresby late in the old year. On 4th January his senior staff officer, Lieut-Colonel Robertson, began a new operation instruction to the two brigades: “Owing to the threat of our repeated progressive landings along the north coast of the Huon Peninsula it is considered likely that the enemy may attempt to withdraw his main forces from the 7 Aust Div front, leaving only covering troops.” To the division’s role of preventing enemy penetration into the Ramu-Markham valley from Madang and protecting the Gusap airfield and the various radar installations the instruction added that the division would “create the impression of offensive operations against Bogadjim
Road by vigorous local minor offensive action”. This was to be done by holding in strength with two brigades a “line of localities” from Toms’ Post on the right to the Mene River on the left, the boundary between the 18th on the right and the 15th on the left being a line from Bebei through Herald Hill to Kankiryo Saddle. In addition the 18th Brigade would “by raids and harassing tactics ensure that no major Jap withdrawal takes place undetected” and, finally would “occupy the Mindjim–Faria divide and the high ground to the north and south of it as the administrative position permits”. The 15th Brigade would hold the Yogia–Mene River area, delay any enemy advance up the Ramu from the Evapia River, patrol to the Solu River, and deny the 5800 and 5500 Features to the enemy.
It is interesting to note that although there had been no change in instructions from Port Moresby, Vasey had yet managed to include in his instructions to the incoming brigades a hint of more aggressive action forward from Shaggy Ridge. The occupation of the Mindjim-Faria divide (Kankiryo Saddle) would place the 7th Division in a good position for any further advance towards the north coast of New Guinea.
On the far left flank the 2/2nd Commando Squadron, based on the Faita strip, would continue to protect the radar installations at Faita and in the Bena–Garoka area, and would patrol into the Orgoruna–Uria area “with the object of providing adequate warning of Jap movement in the area or crossing to the south bank of Ramu River from incl Sepu to incl Inomba”. At long last the Papuan company was to be relieved. On 3rd January these men, who had played so notable a part in operations from Salamaua to the Ramu, were flown out and rejoined their battalion headquarters at Bisiatabu near Port Moresby.
By the 3rd the entire 18th Brigade was in position with the 2/9th forward on Shaggy Ridge, the 2/10th on the right from Johns’ Knoll to Mainstream, the 2/2nd Pioneers on the left and the 2/12th in reserve.1 On the left flank were the 24th Battalion of the 15th Brigade and the 2/14th Battalion of the 21st Brigade. Back in Port Moresby the 57th/60th Battalion had time to win the final of the Australian Rules Football Competition, beating the 15th Field Ambulance by 12 goals 12 behinds to 8 goals 16 behinds, and so winning the Hammer Cup, before it was flown into Dumpu on 6th January. The inter-brigade relief was finished on the 7th when the 58th/59th Battalion flew in from Port Moresby to take over from the 2/14th. The smooth and efficient manner in which two brigades were flown in and two flown out over the towering New Guinea ranges was indicative not only of the ability of the American airmen but of the efficiency of the New Guinea Force staff headed by Major-General Milford.
From the beginning of the year the main interest of Vasey and his commanders was in preparing for the assault on Kankiryo Saddle. Planning for this operation began on 2nd January, the day after Chilton’s arrival and two days before the distribution of Vasey’s written operation

Capture of Kankiryo Saddle by the 18th Brigade, 19th January-Ist February 1944
instruction. Chilton outlined his tentative plan to his staff and commanders on the 4th: the brigade would improve its tactical position, worry the Japanese, divert their reserves from the coast, and provide battle experience for the inexperienced members of the brigade. In the war diary of the 18th Brigade on 4th January it was written: “Essentially the operation ... was to be an attack on Mount Prothero from the south preceded by a diversionary local attack in the direction of Cam’s Saddle2 designed to draw his reserve from Kankiryo area and to deceive him as to ultimate direction of the main attack.” Chilton and his staff, led by his brigade major, Jackson,3 and his staff captain, Seddon, realised that the chief problem would be supply and that a period of some weeks must be anticipated for detailed reconnaissance and planning. He was happy in the knowledge that he would have good air support, subject to the weather being favourable, strong artillery support and probably enough native carriers. One surprising feature at this stage was the lack of good aerial photographs. Although good obliques of the east side of Shaggy Ridge were subsequently produced no adequate vertical coverage was yet available.
The problem confronting the 18th Brigade was described as follows in its report:
The enemy was holding strong natural positions at the junc of Faria R and Mainstream, along the main spur east of the Faria R and on Shaggy Ridge. ... He had had ample time to dig in, and his positions on Faria [Ridge] were known to be wired. On the enemy’s left flank the only practicable approach appeared to be via Cam’s Saddle, although little infm was available, and existing maps were known to be unreliable. On the enemy’s right flank only two possible routes up the precipitous slopes of Shaggy Ridge had been found, namely up the steep, narrow spurs leading to Prothero 1 and McCaughey’s Knoll respectively.4
Chilton, whose task it would be to launch the assault on Kankiryo Saddle, was well qualified for the task. Modest and self-effacing but with a keen sense of duty, Chilton had already proved himself a resolute leader and careful planner. Now 38, he had originally been commissioned between the wars in the Sydney University Regiment which had produced a number of notable AIF leaders. On the outbreak of war in 1939, Chilton, then a solicitor in Sydney, was appointed as a major in the 2/2nd Battalion. In Libya and in Greece he had commanded that battalion. After Greece, he was for a while a staff officer in I Australian Corps with which he returned to Australia in 1942. He was then promoted to GSO1 at New Guinea Force headquarters and was General Clowes’ senior staff officer during the Milne Bay fight. In March 1943 he succeeded his former commanding officer, General Wootten, in command of the 18th Brigade.
From the beginning of his new task on Shaggy Ridge, Chilton realised that frontal attacks along Shaggy Ridge or Faria Ridge or both, while
presenting no serious administrative problems, would not achieve surprise, and would probably encounter a series of strongly-defended positions back along the ridges. Even if these ridges could be cleared, the enemy would undoubtedly fall back to his natural fortress at Kankiryo Saddle and strongly reinforce it. Perhaps a flank attack by way of Cam’s Saddle might divide the enemy force on Faria Ridge, but the Australians would then still have to fight their way up the remainder of the ridge to Kankiryo Saddle and their supply route would be most vulnerable. “The third alternative was to attempt a wide encircling movement on our left flank via Mene R and Canning’s Saddle, and direct the main attack on the Prothero feature which appeared to dominate Kankiryo Saddle and the NW end of Shaggy Ridge. If practicable it was considered that this course was most likely to achieve quick and decisive results.”5
This third course was the one which most commended itself to Chilton and he set out to prove whether, in fact, it would be physically possible to move his troops to Prothero 1; whether he could concentrate a battalion in the Canning’s Saddle area without enemy observation; and, most important, whether it would be administratively possible, with the available native carrier resources, to maintain this isolated force of, say, a battalion in the Canning’s Saddle area until a supply route along Shaggy Ridge could be cleared. Assuming the Prothero attack were possible Chilton thought that “appropriately timed subsidiary and diversionary attacks might be launched across Cam’s Saddle on the enemy’s left flank, and along Shaggy Ridge. In other words a three-pronged attack on the Kan-kiryo feature.”
The possibility of occupying Prothero from Canning’s Saddle had been suggested to Chilton by Lieut-Colonel Lang of the 2/2nd Pioneers as the result of Captain McInnes’ patrol, which, it will be recalled, had succeeded in finding an approach along a steep, razor-backed spur to within a short distance of the summit of Prothero where Japanese were heard. While patrols from the 2/2nd Pioneers and the 2/12th Battalion were being used to obtain additional information about this area the 2/9th Battalion found a possible track from McCullough’s Ridge via Geyton’s Hill to the Mene River, thence up the river bed to Canning’s Saddle. Two companies of the 2/12th subsequently spent some days constructing this track west to the Mene River. Special precautions were taken to prevent the enemy suspecting an attack on Prothero from Canning’s Saddle. Reconnaissance patrols were carefully regulated and were instructed to avoid any contact with the enemy on Prothero. The guns of the 2/4th Field Regiment were dragged up to the Lakes area to give more effective support, but Chilton ordered Lieut-Colonel Blyth to ensure that there should be no obvious artillery registrations. The jeep track was hurriedly pushed to Guy’s Post, existing tracks were improved and shorter and better tracks constructed to improve the supply routes to Shaggy Ridge and Mainstream; reserves of supplies in forward areas were built up, thus enabling a concentration of as many natives as possible to carry for the attacking
battalion on the left, and arrangements were made for a limited air dropping at Canning’s Saddle at an appropriate time.
The patrols carried out by the 2/2nd Pioneer Battalion while the 18th Brigade was settling in were of great importance. On 2nd January Captain Connolly6 of the brigade staff followed up McInnes’ work by leading eight men out on a reconnaissance of the area from Canning’s Saddle to Prothero. Other patrols from the Pioneers were looking for the best routes to the Mene River whose bed was to be so important a supply line. On the night of 5th–6th January Connolly reconnoitred Prothero and observed enemy positions. Next day he had another look round Canning’s Saddle and linked up there with a patrol from the 24th Battalion under Captain Duell – the first important patrol by the 15th Brigade in their new area.
During these early days of January the 15th Brigade, under Hammer’s energetic direction, was engaged in “active defence with offensive patrolling”. On the left flank even more extensive patrols were being carried out by the 2/2nd Commando Squadron. On New Year’s Day Captain Dexter and Lieutenant K. S. Curran’s section left on the longest patrol yet from Faita through Topopo to Jappa, where no patrols had yet ventured, and back. The patrol reached Topopo on the 3rd, Jappa next day, and returned to Topopo on the 5th. During the night of the 5th–6th a Japanese force, perhaps led by natives who had been seen in the area, surrounded the Australians who were on a slight knoll at Topopo commanding all approaches. At dawn when the patrol was about to stand to the Japanese opened heavy fire from a distance of about ten yards. As usual, their shooting did not measure up to the standard of their field craft. All the encircled men escaped with their weapons by doing a “back-flip” over the side of the ledge, through the Japanese and into surrounding jungle, where several fired on the Japanese from vantage points. Sergeant Cash,7 who had been in charge of the native carriers on a knoll farther back along the main track, fired his Bren gun into the Japanese. The Australians then rendezvoused at Damaru, except for five who were missing for some days.8 The Japanese had achieved complete surprise, point-blank range and overwhelming fire power, yet they had mortally wounded only one man and slightly wounded four others. The patrol reported: “The distance we had to travel to Jappa and the fact that we had to use the same track coming back enabled the kanakas to inform the Japs who sweated on us.” This patrol which opened new territory showed that the enemy was still extremely sensitive to any deep probing on his vulnerable western flank.
The 18th Brigade spent the early part of January finding out more about each known enemy position for there were no new positions for them to discover in their various areas. The 2/9th patrolled as much as possible and slightly widened its “front” by occupying McLachlan’s Spur9 which gave good observation of Green Sniper’s Pimple, McCaughey’s Knoll, and the ridge running back through Prothero to Kankiryo Saddle. Both sides, however, knew one another’s positions so well that there was little point in losing men by exposing them to fire from enemy strong-points. Warfare here was static and in the forward Shaggy Ridge positions where there was not more than 80 to 100 yards between the forward dug-in posts, the Australians were using periscopes.
Particular attention was being paid to security. As the enemy were known to be using native spies any native on whom the slightest suspicion fell was held for questioning by Angau and those wearing red lap-laps were arrested. All units were warned to make every attempt to capture prisoners. In the war diary of the 2/10th Battalion on the 9th it was stated, “£5 reward is offered for the first enemy PW captured alive.” On the 10th Chilton conferred with his brigade staff who had been round the area, and with Lieut-Colonel Bourne10 of the 2/12th, to discuss the progress of the planning. Details decided on this day were that the artillery support for the 2/12th (making the left-flank attack) would consist initially of a “creeping concentration” up the spur running North-east on to Prothero; the attack would be silent until contact was made, the battalion would be built up to a full scale with wireless sets; and the water problem should be investigated as it was unlikely that there would be any on top of the ridge.
Work was started on a better line of communication for the 2/12th Battalion from McCullough’s Ridge to Canning’s Saddle via Geyton’s Hill along a route reconnoitred by Lieutenant Hart’s11 patrol of the 2/9th Battalion. This route was essential to the plan to concentrate the 2/12th as close as possible to Prothero unseen. As a result of further reconnaissances and the arrival at last of a vertical air photograph, it was decided on the 12th that the peak previously known as Prothero would now be called Prothero 1 and that the high ground about 100 feet lower than Prothero 1, and 1,000 yards to the South-east, forming the south shoulder of Kankiryo Saddle, would be known as Prothero 2.
On the 13th Vasey and Chilton went forward on the right flank and, after discussion with Lieut-Colonel C. J. Geard of the 2/10th, decided to include in the operation a full-scale attack by the 2/10th from the direction of Cam’s Saddle (the high North-eastern feature). This attack would be a diversionary one until the capture of Prothero 1 by the 2/12th when the 2/10th would exploit north to Kankiryo and south to the Mainstream area. On the 14th Chilton issued an operation instruction
for the attack. The information available was that one enemy battalion was holding Kankiryo Saddle and forward from there along Shaggy Ridge, that there were believed to be three enemy guns in the area, and that it was considered unlikely that he would reinforce his forward positions; the intention was to capture Kankiryo Saddle. The operation was to be carried out in five phases, but these would be discussed on the eve of the operation; the order merely gave the units a background from which to prepare their detailed plans. D-day was not to be before 20th January.
The 4,000-yard track to Geyton’s was completed on the 18th. Thence it followed the bed of the Mene. On the 16th the 2/4th Field Company reported that the jeep track to Guy’s Post was almost finished and they could get 16 jeep and trailer loads forward daily.
On the 18th while Mitchell bombers were using cannon against enemy positions at the junction of Mainstream and the Faria and on Shaggy Ridge, the 18th Brigade was regrouping for the coming operation. D-day was definitely fixed for the 20th and the leading elements of the 2/10th on the right and the 2/12th on the left moved off. One company of the 2/10th moved to Grassy Patch and, on the left, an advance party of the 2/12th, under the battalion’s second-in-command, Major Fraser,12 moved ahead to prepare the way for the coming of the battalion.
Preliminary moves were completed on the 19th when Captain Gunn’s13 company of the 2/10th moved out from Toms’ Post for Sprogg’s Ridge via the Japanese mule track and was followed later by Captain Kumnick’s14 company. On the left the 2/12th Battalion, with a company of the 2/2nd Pioneers attached, moved out along the new line of communication to Geyton’s.
Chilton held a last coordinating conference on the 19th and gave his final instructions. The first of his five phases – the occupation of Sprogg’s Ridge by the 2/10th Battalion – had already taken place on the 19th. The second phase would be the capture on 20th January by the 2/10th of Cam’s Saddle, with subsequent exploitation to Faria Ridge and thence south to the junction of Mainstream and the Faria River. The third phase, on 21st January, would be the attack by the 2/12th on Prothero 1 with exploitation South-east along Shaggy Ridge and north across Kankiryo Saddle. Then the fourth phase would begin – an attack by the 2/9th Battalion North-west along Shaggy Ridge to join with the 2/12th Battalion. The fifth and final phase would entail the capture of the feature commanding the northern side of Kankiryo Saddle, but no firm timing could be set for this phase as it was dependent on the progress of the initial phases. Nine long and two short 25-pounders of the 2/4th Field Regiment were in support and about 7,000 shells were available. The guns had been dragged forward and were now concentrated in the Lakes-Guy’s
Post area. Colonel Blyth established his artillery command post beside Chilton’s headquarters, and a battery or troop commander was attached to each battalion commander as an adviser and to control the FOOs attached to forward sub-units. A detailed schedule of air strikes by medium and dive bombers was drawn up.
Meanwhile the 15th Brigade was patrolling deeper into enemy territory. By 7th January one company of the 24th Battalion was on the 5800 Feature and had linked up with the 2/2nd Pioneers. On the 10th a patrol from the 24th Battalion led by Captain Cameron15 was ambushed at a position later known as Cameron’s Knoll, North-east of the 5800 Feature. The two forward scouts, Privates Geraghty16 and Filcock,17 had just turned a corner of the track and had moved about 40 yards into the clearing on the crest when Geraghty saw a Japanese standing by a bush. Geraghty called out to Filcock who dived back to cover when the Japanese opened fire with their machine-guns. Both Geraghty and Filcock fired their Owen guns into the machine-gun nest, but they were forced to withdraw under heavy fire. It was this patrol which gave Hammer the idea for a diversionary attack at the time of the 18th Brigade’s main operation.
On the same day aircraft of No. 4 Squadron were flying over Orgoruna and could see no enemy movement. On the 11th Lieutenant Anderson18 of the 24th Battalion led out a small patrol from the Koropa area to see if Orgoruna was occupied. The forward scout was allowed to reach some barbed wire before the enemy opened fire. Under heavy fire the patrol extricated itself. It now occurred to Hammer that a raid on Orgoruna would be a good way of giving the 57th/60th Battalion experience, and his staff, led by his brigade major, Travers, and his staff captain, Molomby,19 therefore set about building up a reserve of supplies in the Koropa and Kesawai areas.
Hammer’s operation instruction of 12th January claimed that there were 3,000 enemy in the Kankiryo-Shaggy Ridge area and 1,000 in the Orgoruna–Mataloi area. This was an over-estimation and was possibly deliberate. From captured documents the Australians knew that Japanese units were less than half strength. They also now thought that only one battalion (the II/78th) was facing them because the other two battalions of the 78th Regiment had been withdrawn to meet the Americans’ threat at Saidor. (Actually only five companies of the 78th were withdrawn.) Hammer allotted the “outpost locality” to the 24th Battalion, the Yogia feature position to the 58th/59th, and the Mene Hill area to the 57th/60th Battalion and the 2/6th Commando Squadron. By the 16th the 57th/60th
Battalion had established an observation post overlooking Ketoba and Hammer obtained permission for the two attacks.
Farther west a patrol of the 2/2nd Commando, led by Lieutenant Denman,20 set out on 8th January to try to capture a prisoner in the strong Japanese area of Kulau. The patrol (six in all) reached the area surrounding the Kulau ridge on the 10th. They had been there before and knew the positions of huts and most defences. They hoped to be able to sneak in, grab a prisoner without creating an uproar, and drag him away. Under cover of darkness they stealthily climbed the ridge and lay low until midnight on the 10th–11th January. Seeing and hearing no movement, with muffled boots and blackened faces, they advanced towards the main buildings north along the ridge, which was no more than 30 yards wide. They reached almost the centre of Kulau before they heard a number of thumps, which turned out to be not the beating of their hearts but probably the Japanese jumping into their weapon-pits, for suddenly the Japanese attacked with grenades, heavy and light machine-guns and rifles, and mortared the ridge behind. Denman’s men fought back in the dim moonlight and fired about 10 Owen gun magazines and about 30 rifle rounds in the direction of the flashes from enemy weapons. Trooper Ramshaw21 was wounded and as Denman dragged him towards the side of the large hut Lance-Corporal Carey22 dashed over to help; under heavy fire the two men carried their companion down the slope of the ridge into the scrub where he died. Fire from the other men, Lance-Corporal Moloney23 and Troopers Wilson24 and McKinley25 had assisted Denman and Carey during their arduous task, but when the patrol re-assembled at their rendezvous – a near-by re-entrant – Moloney was missing.
Vasey had been urging all his units to do their utmost to capture a prisoner, but the period had been a particularly sterile one, not only for prisoners but for documents, mainly because the Japanese security measures were at length improving. All units had tried their hardest to capture a prisoner but without success. It is doubtful whether there had been a more gallant attempt than this effort by six men who, after a four-day march, crawled into the very midst of a strong Japanese base.
D-day for CUTTHROAT as the 18th Brigade’s attack was named – the 20th January – had arrived. The 2/10th Battalion was the first to move, when, at 8.45 a.m., Captain Gunn’s company moved from Sprogg’s Ridge to attack Cam’s Saddle. Half an hour later Captain Kumnick’s company followed. At 9.30 a group of Mitchells attacked the Protheros and
Kankiryo Saddle with 1,000-lb bombs while another group of Mitchells strafed the area and a squadron of Vultee Vengeances dive-bombed Shaggy Ridge and the Protheros. By 11 a.m. Gunn was 300 yards from an enemy position on Cam’s Saddle. The artillery shelled this position and at 12.30 p.m. the Australians found that the enemy had withdrawn. Farther on the company was pinned down by fire from a Japanese position at the western end of the Saddle. At the same time a Japanese patrol ambushed the signal line party 500 yards behind. After trying to outflank the enemy position Gunn withdrew 200 yards and dug in for the night astride the mule track which zig-zagged up the feature held by the enemy.
The 2/12th Battalion had reached the bank of the Mene River at nightfall on 19th January. It was then raining heavily and Colonel Bourne had noted with some dismay that the river, along whose bed he must advance next day, was rising. It was still raining early on the 20th when the 2/12th set out from Geyton’s Hill but after seven hours of hard going the battalion reached Canning’s Saddle at 3.30 p.m. For the night Major Cameron’s26 company, which was to lead the assault next day, was just below the Saddle with the rest of the battalion behind.
At 8.30 a.m. on the 21st the 2/12th moved forward to the start-line which was at the false crest below Prothero 1. The approach was so steep that ladders had to be used to enable the men to cross the start-line by 9.20 a.m. The plan provided for a silent attack, with one company forward, along the steep razor-back ridge which was the only possible way to Prothero 1. A second company would then pass through and secure the saddle between Prothero 1 and Prothero 2 while a third secured the northern slopes of Prothero 1. Two companies of the 2/2nd Pioneer Battalion were to protect the 2/12th’s left flank by securing the western slopes of Prothero 1 and holding Canning’s Saddle. Artillery concentrations would be fired only if surprise was lost. The advance up the steep and rugged ridge was very quiet and surprise was almost achieved. About 100 yards below the summit of Prothero 1 the leading men met a small enemy party who had prepared a large demolition charge on the razorback approach; the Japanese had no time to blow the charge but were able to warn others on the summit Cameron’s men, however, raced towards Prothero 1 and captured it at 1.20 p.m. After reaching the summit the companies fanned out and prepared to attack towards Prothero 2. At 3 p.m. a Japanese 75-mm gun which had been shelling the 2/9th Battalion switched to the 2/12th from less than 100 yards, inflicting serious casualties, including Bourne badly wounded. Major Fraser now took command and called up a platoon under Lieutenant Braithwaite27 from one of the reserve companies to destroy the gun.
It was 4 p.m. when Braithwaite set out. Twenty minutes later the guns of the 2/4th Regiment, directed by Captain Stirling,28 shelled the Japanese
gun area on Prothero 1. At the same time Braithwaite reported that he was within grenade-throwing range of the gun, but that heavy machine-gun fire from supporting positions prevented any nearer approach. The platoon was forced back and at 4.40 p.m. the artillery again hammered the area. Stirling was with the forward troops during the fierce exchanges of artillery fire. His success in directing his own guns on to such a small target was to a great extent due to the efforts of Signalman Green29 who laid the telephone line under fire, three times went forward to repair breaks and stuck to his tasks although wounded. The enemy shells, bursting among the tree tops, scattered shrapnel over a wide area and the casualties mounted as Braithwaite, now reinforced by a second platoon, approached the gun position on a narrow, two-man front. With frontal assault impossible, the enemy gun position was gradually surrounded although an almost sheer ridge had to be scaled to do so.
At 5.30 p.m. Braithwaite rushed the gun. Foremost in the rush was Private Lugge,30 a Bren-gunner. Leaping from an embankment overlooking the gun and falling fiat on his stomach within six feet of the entrance, Lugge opened fire on the enemy gunners. Then, rolling on his side, he fired at a Japanese pill-box where a Woodpecker on the flank was giving supporting fire to the gun. The occupants of the pill-box were killed and wounded and the cessation of their covering fire enabled the rest of Braithwaite’s men to rush up and finish off the Japanese gun crew with grenades. The gun crew of 16 men fired defiantly until the end when they were all killed. The gun was captured intact and with it, in an excellently constructed gun-pit, were about 50 rounds of ammunition.
This spirited action completed the capture of Prothero 1, and the 2/12th Battalion dug in round it for the night. Fraser expected the Japanese to the south of him, or to the north, to counter-attack because Prothero 1 was such vital ground. For the less of 11 killed and 44 wounded, including 5 officers, the 2/12th had captured the key point in the Japanese defences of Shaggy Ridge. During the night there was much firing and the Japanese attacked Captain Thomas’31 company South-east of Prothero 1, but were repulsed leaving 9 killed.
The dominating feature confronting the 2/9th on Shaggy Ridge was McCaughey’s Knoll. The battalion’s objective on the 21st was Green Sniper’s Pimple, a small but commanding eminence on the South-east end of the knoll only about 80 yards from the forward posts of the 2/9th. Lieut-Colonel C. J. Cummings’ plan was to attack the knoll from his left up the very steep but wooded slopes, using one company. He planned a frontal diversion to distract the enemy’s attention from the flank and drown the noise.
About 10.30 a.m. the forward platoon was led out by Sergeant Mc-Dowell32 who had already taken part in three night patrols to Green Sniper’s Pimple. The leading section got right among the Japanese pits before the Japanese had recovered from the air strike preceding the attack. As soon as the Australians were established on the pimple about 2 p.m., the Japanese began firing into them with a field gun and mortars, and a counter-attack began to develop. Major Loxton33 made his way forward under this heavy fire and, by walkie-talkie, ordered McDowell to hold the position at any cost. While speaking from a very exposed position Loxton was killed by a shell. The Australians held on, and when the gun ceased fire a second platoon joined McDowell’s. The only satisfactory mortar observation post for the 2/9th was in an exposed position under heavy fire from the enemy. Despite this, Sergeant Henricksen34 remained there for five hours directing his mortar fire on to the Japanese. Soon after midday he was knocked unconscious by the explosion of a shell but he recovered five minutes later and continued to direct his mortars. About 2 p.m. a shell hit Henricksen’s observation post burying his companion. Henricksen continued with his vital job but managed to dig out his companion.
Lieutenant Stephenson35 was sent to take command of the forward company, and Captain J. A. Cumber, one of the officers from India, was delighted when he found himself with a job as Stephenson’s second-in-command. During the night the enemy worried the two forward platoons with grenades and mortars but there were no casualties. For the loss of 7 men killed, including the company commander, and 17 wounded, the company had captured a vital position; it had advanced only 100 yards, but possession of the pimple gave the Australians a toehold on Mc-Caughey’s Knoll, the position commanding the whole of the Shaggy Ridge area.
On the right flank the artillery had fired a heavy concentration early on the 21st on the position which had held up the 2/10th Battalion on the previous evening. In the morning patrols investigated this position and one returned at 2.30 p.m. to report that there had been no reply when they had thrown two grenades. Gunn moved his company through the enemy position and went north along Faria Ridge until just on dusk he saw the enemy digging in ahead. The 2/10th then dug in for the night.
By the end of 21st January the main enemy force on Shaggy Ridge was between the 2/9th on the south and the 2/12th on the north. The Japanese still held two miles of Shaggy Ridge between the Australians on Green Sniper’s Pimple to the south and Prothero 1 to the north, but they were in a serious position and could not overlook the threat on the east where
the 2/10th was now established about a mile from the main Japanese defences on Kankiryo Saddle.
On the 22nd Captain Thomas’ company of the 2/12th set off at 8.30 a.m. to capture Prothero 2. An hour later, after a watchful advance against snipers in trees, the company occupied the saddle between Prothero 1 and Prothero 2. At 10.40 the artillery shelled Prothero 2 and at 11.15 a.m. Thomas’ forward platoon advanced but was held up by sniper and machine-gun fire. A Bren gunner, Private Bugg,36 immediately dashed forward and fired on the Japanese positions from a distance of 30 yards. Bugg’s Bren gun magazines were set on fire by enemy bullets but he threw off the webbing and kept on firing. Sending his section round to a flank under his covering fire, he killed the Japanese machine-gun crew, and his section then rushed Prothero 2 and captured it. Captain Geason’s37 company now passed through Thomas’ and continued south along Shaggy Ridge until, at 3.30 p.m., after an advance of about three-quarters of a mile, they were held up by machine-gun fire. From this position Geason reported that he could see the 2/9th Battalion through binoculars. Both battalions were then ordered to remain where they were in readiness for the 2/9th to attack with artillery support next day. Meanwhile another patrol from the 2/12th had penetrated 1,000 yards North-west from Prothero 1 without seeing any enemy. Later in the afternoon Lieutenant Coles led a small patrol from the 2/2nd Pioneer Battalion along the track from Prothero 1 to Kankiryo, brushed aside light opposition from an enemy patrol, and established himself almost on Kankiryo Saddle.
The 2/12th counted 40 dead Japanese on the way from Prothero 1 to Prothero 2. Despite the fact that the Japanese were being attacked from both sides, they were still fighting doggedly and on the 22nd inflicted 21 casualties on the 2/12th Battalion.
A reconnaissance patrol from the 2/9th at dawn on the 22nd found pill-boxes 20 yards ahead occupied by the enemy with several machine-guns. At 10.45 a.m., when the artillery was bombarding Prothero 2 for the attacks from the north by the 2/12th, Captain R. Taylor’s company of the 2/9th was standing by ready for the attack on the battalion’s next objective – McCaughey’s Knoll. At 1.15 p.m. Cummings received a report from Fraser: “Prothero 2 captured, battalion pushing along Shaggy.” During the afternoon Taylor’s company moved to a forming-up place down the precipitous western side of Shaggy Ridge, ready to try a flanking attack on McCaughey’s Knoll. Zero hour was set for 6 p.m., and for half an hour before that time artillery and mortars pounded the knoll. Taylor’s company was only about 40 yards from the top of McCaughey’s Knoll at 6.25 when the enemy discovered them. Despite a heavy and sudden storm of fire the Queenslanders assaulted and captured McCaughey’s Knoll, cleaning up one pill-box after the other. The battalion’s diarist noted on this day: “This flanking move by ‘D’ up heavily timbered and
precipitous western slopes must have been a complete surprise to the enemy who had begun to withdraw in panic.” Once again the enemy had been deceived by the Australians’ ability to clamber up almost perpendicular slopes which the defenders regarded as unscaleable. After advancing to a position about 600 yards from Green Sniper’s Pimple the advance of the 2/9th was held up by two enemy machine-guns about 30 yards ahead.
For the loss of 8 men wounded, the 2/9th Battalion had played its part in smashing the last hold of the Japanese on Shaggy Ridge. More than 100 enemy dead had been counted in the Prothero-Shaggy Ridge area and documents captured this day by the 2/9th showed that a platoon of the 78th Regiment had held Green Sniper’s Pimple. By dark the forward elements of the 2/9th and 2/12th Battalions were only about 900 yards apart, both being held up by sporadic machine-gun and artillery fire from the area ahead of the 2/10th Battalion.
During this successful push by its two sister battalions the 2/10th had made advances on the right flank both north and south from the spot where Cam’s Saddle joined Faria Ridge. All day on the 22nd Gunn kept up the pressure on the enemy position to the north of his foothold on Faria Ridge and, by late in the afternoon, the enemy had had enough and left the position known as Cam’s Hill, which was occupied by the 2/10th at 5.20 p.m.
As well as pushing north Colonel Geard decided to wipe out the troublesome enemy position on the southern tip of Faria Ridge opposite the Australian positions at Mainstream, thus opening a direct line of communication from the Faria River-Mainstream junction. The task of clearing this position on the 22nd was given to Captain Bray’s38 company. From the junction of the two spurs the company pushed south passing through several deserted enemy positions and approached the southern tip of Faria Ridge. The approach to the enemy position was down a ridge so narrow that the men had to move in single file. Bray planned that one platoon would attack down the ridge, covered on the left flank by supporting fire from a second platoon with all Brens from both platoons. When the artillery finished firing Bray’s machine-guns opened up to cover the advance, but the leading section was pinned down within 25 yards of the enemy position under heavy fire, apparently from two Woodpeckers and three light machine-guns. Bray then tried unsuccessfully to send sections round on either flank and finally committed his entire company. When it too was stopped by heavy fire Bray decided to withdraw; the Japanese defences seemed to extend for at least another 100 yards. Enemy casualties were probably not severe; Bray lost 5 killed and 7 wounded. The evacuation of the wounded in darkness up the steep spur was an extremely difficult task and was not completed until midnight. One of the runners, Private Baggaley,39 had crawled forward to help a wounded man before the withdrawal. As it was impossible to get the man out before
dark, Baggaley remained with him (although his steel helmet was shot off his head), tended his wounds and, after dark, assisted him to safety.
During the night and early in the morning of the 23rd two mild counter-attacks were repulsed by the 2/12th. Early on the 23rd also patrols from the 2/12th and the 2/9th were converging. There was only slight opposition and after midday the forward patrols of both battalions joined up. The whole of Shaggy Ridge was thus in Australian hands and the way was open to Kankiryo Saddle.
About this time Captain Haupt’s40 company of the 2/12th moved down the track from Prothero 2 to Kankiryo Saddle. By 6 p.m. the company was at the Saddle near the foot of Crater Hill. They found a gun position containing 150 rounds of 75-mm ammunition and half an hour later they met opposition from enemy positions on the slopes of Crater Hill. As it was late the company withdrew to Kankiryo Saddle for the night.
While finally capturing Shaggy Ridge and gaining a foothold on Kankiryo Saddle the 18th Brigade had killed over 100 Japanese and captured many weapons and documents; the guns firing on the Australians from the Shaggy Ridge area had been a 75-mm, a 70-mm and a 37-mm.
Facing the Japanese positions at the southern tip of Faria Ridge, Bray’s men on the 23rd were tired, for they had worked most of the previous night cutting steps into the feature to evacuate their wounded. At midday they found the position unoccupied. It extended for about 120 yards along a sharp ridge, was surrounded by barbed wire, and as usual was extremely well dug with some shelters up to 15 feet deep and connected by communication trenches. It could accommodate about 40 men.
While the fact that the Japanese had abandoned the position opposite Mainstream was being established, Captain Kumnick’s company was advancing North-west along Faria Ridge from Cam’s Hill. After about 1,500 yards, it encountered a strongly entrenched enemy position about half way to Kankiryo Saddle. An artillery bombardment, however, caused the Japanese to leave it hurriedly and to dig in on the reverse slope. The company attacked again about 6.20 p.m. but the enemy was prepared, and the leading platoon commander and his sergeant were wounded. Private Bloffwitch,41 in charge of the leading section, now took command of the platoon and, although under heavy fire, managed to withdraw it and remove his casualties.
All that now remained of the Japanese forces south of Kankiryo Saddle was the rearguard opposing the advance of the 2/10th along Faria Ridge. As the Australians had occupied Kankiryo, the Japanese on this spur were threatened with the same fate as those who had been on Shaggy Ridge. Kumnick’s company probed the enemy position all day on the 24th and late in the afternoon it was found to have been abandoned; the 2/10th established itself in a position about 1,200 yards South-east of Crater Hill whose crest was about 800 yards North-east of Kankiryo.
Already, from captured documents, Chilton knew that Crater Hill had been Japanese regimental headquarters and that it was supposed to be occupied by an enemy company. Although small patrols from the 2/12th reached almost to the top of Crater Hill on the 24th, strong enemy positions were found on the southern slopes. Despite artillery bombardments no progress was made against these by either the 2/10th or the 2/12th. Actually the Japanese had re-occupied some of the positions which they had abandoned the previous evening in the face of Haupt’s advance.
Despite the enemy’s loss of Kankiryo Saddle and Shaggy Ridge, it seemed obvious by the 25th that he intended to put up a last ditch fight for Crater Hill. On the 25th the 2/10th and 2/12th probed the enemy defences on all sides of Crater Hill seeking the most suitable way for attack. There were several skirmishes in which both sides suffered casualties, and during the day linking patrols joined the two battalions, now stalled on the southern slopes of the feature. A patrol led by Lieutenant Coles of the 2/2nd Pioneers, reconnoitring the Paipa mule track along the valley of the Mindjim, fired on small bands of retreating Japanese and saw numerous empty buildings and ammunition dumps which had been deserted.
Chilton determined that the pause would be no longer than necessary and, when he learnt that the main thrust was held up on the southern slopes of Crater Hill, decided again to try encirclement. While the 2/10th and 2/12th held the enemy on the southern slopes and tried to push their way forward or round the flanks, the 2/9th was to assault the feature by sending two companies in a wide outflanking movement to the north across the tip of the Mindjim Valley and round the enemy’s right flank.
Captain A. Marshall’s company led off at 10.35 a.m. on the 26th, passing from Shaggy Ridge through Kankiryo Saddle and then to the north, with Captain Taylor’s company following to provide flank protection. By midday Marshall reported that he had advanced some 600 yards and passed through several old positions although he had seen no enemy. Cautiously but steadily he pushed on; at 5 p.m. he reached the summit of 4100. The main enemy position was now to the south between Marshall and the 2/10th and 2/12th Battalions. Leaving Taylor to occupy the summit of 4100 Marshall moved south towards Crater Hill in an attempt to surprise the enemy from the rear. He met them about 300 yards South-east from the summit just on dusk. The leading platoon attacked along the usual razor-back but withdrew because of heavy machine-gun fire. At 7 p.m. Marshall sent Lieutenant White’s42 platoon round the right flank but approach from this flank was also very difficult and White was killed.
As had been the case with their comrades on Shaggy Ridge and Faria Ridge, the Japanese on Crater Hill were now surrounded. However, they evidently intended to fight it out; possibly they did not know that they were surrounded and, indeed, the Australians themselves did not know exactly where they were. Chilton reported later:–
It was apparent at this stage that the existing 1/25,000 map was very inaccurate, and considerable difficulty was experienced in determining the relative positions of the fwd elements of the three bns and the nature of the ground. In particular, great difficulty was experienced in controlling the arty; when an FOO attempted to register targets to his immediate front, fire would be stopped by FOOs with other bns. It became obvious therefore that we had closed in on the enemy along three very narrow ridges, which all met at a “pimple” ... called Crater Hill. The relative positions of our tps were later established by Contact R, fwd tps firing 2-inch mortar flares. The enemy was holding along these three ridges radiating from the pimple. The sides of each ridge were extremely steep.43
Chilton was convinced that, although his battalions were now occupying the three ridges leading towards Crater Hill and although they had really captured their objective – the vital ground of the Mindjim–Faria divide – the Japanese would try to hold on to Crater Hill. The ground was very difficult and the defences were exceedingly well prepared with a large number of automatic weapons deployed. Chilton decided to use siege tactics. His brigade would sit close round the Japanese, harass them and make sure that they did not withdraw undetected. By means of heavy artillery bombardments, mortar fire and dive-bombing, Chilton hoped to destroy the Japanese defences, inflict crippling casualties and “generally soften up the position for a final assault”.
The siege of Crater Hill continued until the end of January. During the first two days – the 27th and 28th – Chilton redisposed his brigade so that the 2/9th Battalion took responsibility for the southern slopes of 4100 as well as for the feature itself and for Kankiryo Saddle, while the 2/12th held the Protheros and Shaggy Ridge, and the 2/10th maintained pressure on the South-eastern slopes of Crater Hill. On the 27th and 28th there were minor skirmishes but the main activity was the artillery bombardment. Captain Whyte of the 2/4th Field Regiment used 2,000 shells in the bombardment, shattering the trees. Unfortunately the mass of fallen timber added yet another obstacle to the approach.
At 9.30 a.m. on the 29th 19 Kittyhawks dive-bombed Crater Hill. The bombs seemed to be in the target area and were followed by ten minutes of artillery fire. At 1.30 p.m. the artillery laid down a barrage and machine-gun fire covered an assault on Crater Hill from the west by Captain Daunt’s44 company of the 2/9th. The leading platoon attempted to rush the enemy position up a very steep and open slope but the Japanese, entrenched on a razor-back, were too strong and drove back the platoon. The Australians also had the bad luck to be shelled by their own artillery – an increasingly rare accident. Among the 14 casualties suffered in this attack and from the shelling were two of the officers from India, Captains D. A. Wright and A. J. Stanton, the latter being mortally wounded.
There was no change on the 18th Brigade’s front on the 30th January when the 15th Brigade raided Orgoruna successfully. It was raining heavily
in the Kankiryo area and the weather was cold and misty so that the intended air strike had to be cancelled. In a message to his troops Colonel Cummings said: “It is the intention to reorganise in the next few days, using aircraft and arty to soften up before our next move. Patrolling must be very active and all possible information gained of the enemy positions.”
Continually harassed by patrols and hammered by aircraft, artillery and mortars, the Japanese on Crater Hill were coming to the end of their endurance. Just after dawn on 31st January a patrol from Marshall’s company of the 2/9th found four bunkers unoccupied on the slope of the 4100 Feature forward from the company’s position on Kankiryo Saddle. The defensive fire from the enemy positions seemed much weaker than usual and there had been reports during the last few days from Australian patrols that bands of the enemy were retreating from the battle area towards Paipa. In an advance of 600 yards Marshall occupied the empty Japanese positions. About 10.30 a.m. the Japanese held any further advance for a while by hurling down grenades from a high ledge. A Bren gunner, Corporal Berrell,45 managed to move into a position whence he could silence the enemy post. The Japanese then withdrew, leaving behind at least 16 dead, while the Australians followed for about another 100 yards. Confronted by heavy enemy fire the company would have been in danger of counter-attack but for the accurate fire from the wounded Berrell’s gun. The ground was held and his successful attack placed the company forward at the base of a steep rock face within 100 yards of the summit of Crater Hill.
Both to the north and to the South-east the country was exceedingly rough and difficult and the advance of the troops was handicapped by the timber felled by the artillery bombardment. While Marshall’s company pulled back to Kankiryo Saddle, Taylor’s took over the forward area and managed to kill another 12 Japanese.
For four days Gunn’s company of the 2/10th pressed towards Crater Hill from the South-east. On 31st January Lieutenant Meldrum’s46 platoon reached a position about 40 yards from the crest. Gunn went forward to observe the enemy’s positions and was wounded by a grenade. Lieutenant Mallyon47 took command.
The siege of Crater Hill ended on 1st February when Mallyon’s company of the 2/10th and Taylor’s of the 2/9th closed in and found it unoccupied.48 By 10.20 a.m. the whole ridge from Crater Hill to the 4100 summit was in Australian possession. Crater Hill was a ghastly mess. At least 14 dead were found and evidence of many burials; a 75-mm and a 70-mm gun, a grenade discharger, and the usual quantity of diaries, documents and equipment lay around. The diggings were
connected by a maze of communication trenches, all built with infinite care. The area had been devastated by air and artillery bombardment. The defended position itself was about 500 yards long by 60 yards wide with about 40 pill-boxes and foxholes on Crater Hill and 110 on the razor-back leading to it.
After the occupation of Crater Hill on the 1st, Chilton signalled Vasey: “Task completed. Awaiting further instructions.” All that now remained was to mop up in the general area of Kankiryo Saddle, Shaggy Ridge, Faria Ridge and Crater Hill. Between the 1st and 6th February the battalions took up new positions in preparation for another period of static warfare. The 2/10th was on the right in the area from the 4100 Feature to Crater Hill, including Kankiryo Saddle; the 2/9th on the left holding from the North-west of Shaggy Ridge to the two Protheros; and the 2/12th holding the line from McCullough’s Ridge to Lake Hill.49
The mopping up was done mainly by patrols down the Mindjim Valley and to the rugged areas on the flanks of the brigade position where there were still a few stray Japanese, who were killed in the succeeding days. On the 1st the 2/12th’s observation post on the Paipa Track had seen several parties of Japanese moving north along the Mindjim Valley and probably escaping from Crater Hill. Kumnick’s company of the 2/10th was sent down the valley of the Mindjim to catch them. Patrols from the other battalions moved along the ridges north and south of the Mindjim Valley to guard the advance of the larger patrol from the 2/10th. Kum-nick reached Paipa 2 on the 2nd. When approaching Paipa 1 on the morning of the 3rd, the leading platoon came under sporadic fire. After keeping up the pressure all day and after a bombardment by the 4th Field Regiment (which was relieving the 2/4th) the patrol occupied the position, which was found to be in a village 200 yards South-east of Paipa 1. Next morning a patrol found Paipa 1 clear. Another patrol reached Amuson on the 6th and found it unoccupied; a native said there were many Japanese farther along the Mosa River.
Thus by 6th February the 18th Brigade was firmly astride the Mindjim–Faria divide. Between 19th January and 6th February the brigade had lost 46 killed, including 3 officers, and 147 wounded, including 9 officers. It had buried 244 dead Japanese and had found several mass graves containing many bodies which could not be counted. Chilton concluded that, of an enemy force of about 790 holding the area on 19th January, at least 500 had been either killed or wounded. The brigade had captured three 75-mm guns, one 70-mm, one 37-mm and one 20-mm.
It will be recalled that Brigadier Hammer on 19th January had got permission for a company of the 24th Battalion to create a diversion by
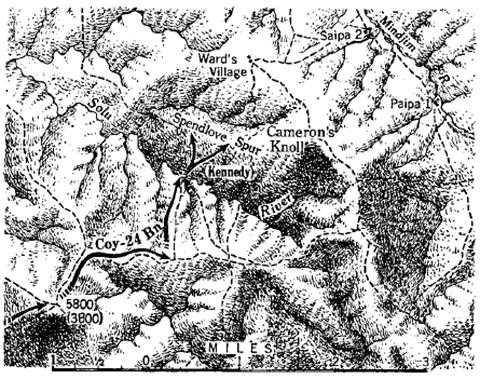
24th January
attacking Cameron’s Knoll and for the 57th/60th to raid the Orgoruna–Mataloi area. Colonel Smith of the 24th Battalion gave the task of capturing Cameron’s Knoll to Captain Kennedy’s company. The Pioneer platoons of the three battalions made a jeep track from the Evapia to Kesawai to shorten the long supply line. This made it possible also to have artillery support; previously the guns could not be dragged into this western area. Vasey allotted Hammer two guns and 1,000 rounds of ammunition for the attack. After nine days of preparation, in which 527 boy-loads of ammunition, rations, heavy weapons, medical and signal stores were carried forward, the 24th was ready to launch the attack.
West of Cameron’s Knoll was a spur – later known as Spendlove – where also the enemy was thought to be in position. To divert the enemy’s attention during the main attack of the 18th Brigade, Kennedy, on 21st January, led a feint attack on Spendlove Spur. The enemy replied with heavy fire and in so doing disclosed previously unsuspected positions. For the next two days patrols probed the area.
Kennedy planned that one platoon would move round the left flank and attack up Spendlove Spur, with another giving covering fire along the main track and the third in reserve. At 6.30 a.m. on 24th January the company was ready. Directed by Lieutenant Agar,50 the two guns opened up at 9.25 a.m. and, in an hour, fired 150 shells into the Japanese position. As Lieutenant Laughlin’s51 platoon moved round to the left flank to get ready for the attack, the leading men could see that the artillery fire was to the right of the target but, because of a breakdown of communications, they were unable to tell the artillery observer. At 11.10 a.m. the attacking platoon, with Corporal Warner’s52 section in the van, was just below Spendlove Spur. Five men had actually clambered on to the spur when Warner saw a Japanese standing up on the track about ten yards away. He killed the Japanese, but heavy enemy fire and a grenade rolled down the slope wounded two of Warner’s men and caused Laughlin to withdraw.
Soon after the start of Laughlin’s attack, Sergeant Spendlove’s53 platoon moved into thinner timber along the steep track about 50 feet below the Japanese-held spur. The platoon poured in a heavy volume of fire but it was answered just as heavily and, for interest, the Japanese rolled down grenades. Kennedy decided not to batter away at the enemy position without further artillery fire, but first he wished to know the whereabouts of Laughlin’s platoon which had been out of communication since its abortive attack. Corporal Goodwin54 volunteered to find the missing platoon but nothing further was heard from him and his body was found two days later 25 yards from the top of the enemy position – he had fired off a magazine from his Owen gun. When Goodwin did not return, Sergeant McLennan55 moved out also to search for the missing platoon but, like Goodwin, he must have stumbled into the enemy camp and his body was found next day. A third attempt was made by the commander of the mortar detachment, Corporal Carney,56 who set out with a telephone and trailing line behind him. About 10 minutes after Carney left, however, Warner reported in from the missing platoon and said it was back on the main track. A runner went forward rapidly and managed to find Carney as he was climbing the side of the spur.
Kennedy then withdrew his company and arrangements were made with Agar to bombard the enemy again. Carney stayed forward with his phone during the shelling from 3.25 to 4 p.m. and passed back messages to Agar which enabled the artillery to be more accurate. Near the end of the shelling, Spendlove’s platoon began to move forward to make a direct assault. Unfortunately, just at that moment one of the last of the artillery shells fell shorter than the rest wounding two of his men and giving a number of others a severe shaking. The company’s 2-inch mortars then laid a smoke screen in front of the advancing troops but the wind blew it back on the men, once again holding up the advance.
Encouraging his men and brushing aside these mishaps, Spendlove advanced yet again and put his platoon into a position behind a small bank. For five minutes the platoon fired on the Japanese but there was no answering fire. With Lance-Corporal Metcalf,57 Spendlove then cautiously moved forward. They were five yards from the top of the spur when the enemy opened up. Metcalf was killed but Spendlove managed to get back and report to Kennedy, suggesting that another platoon should be sent to try from the right flank.
Lieutenant Mason’s58 platoon was then sent up a spur on the right. Under covering fire from the rest of the company, it advanced up a
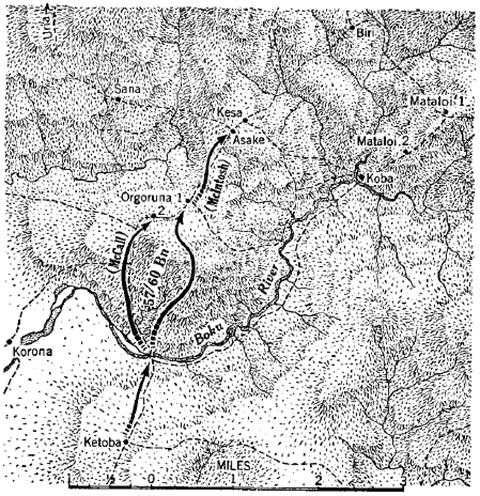
The 57th/60th Battalion in the Orgoruna–Kesa area, 30th January
steep slope and four men, scaling a final steep rock face, actually reached the top of the main spur and were in the midst of the enemy position. Here the Japanese opened up from a range of about five yards with at least three machine-guns and many rifles. The Australians in supporting positions answered but the four men were in an untenable position. Three of them were killed and the fourth jumped over the edge; Mason also was killed during this fighting.
The enemy’s position seemed impregnable, but it had several times been proved in New Guinea warfare that a pounding by artillery allied with dogged and persistent attacks would eventually force the enemy to leave dominating positions which he should have been able to hold. It was so on this occasion. The Australians had tried thrice and each time had been driven back. Towards dusk there was no reply to the company’s small arms fire. Spendlove’s platoon therefore advanced straight up the main precipitous track and without opposition reached the top of the spur named after the gallant platoon commander. The company then occupied the spur and rapidly dug in expecting a counter-attack, but the enemy had had enough.
On the 26th a patrol moved out along the track up the spur in an easterly direction about 1,000 yards east of Spendlove Spur and found a recently-vacated Japanese position. It had about 50 slit trenches with underground sleeping quarters and, from an observation post in a 40-foot tree, a perfect view of all approaches to the position could be obtained. Practically all the Australians’ movements during the attack on Spendlove Spur could have been observed from this tree. As this position – Cameron’s Knoll – was more suitable for defence the company occupied it.
Meanwhile Colonel Marston of the 57th/60th was concentrating his battalion in the Ketoba area ready to attack Orgoruna 1 and 2 and raid Kesa and Koba. The battalion started off at 12.30 p.m. on the 30th. Major McCall’s59 company found
Orgoruna 2 unoccupied, and by 7 p.m. Captain McIntosh’s60 company had found Orgoruna 1 and Kesa unoccupied, although in Kesa there were extensive defences. All indications pointed to a hasty Japanese withdrawal during this day. From the Asake–Kesa area on 31st January McIntosh patrolled to Sana and Biri but found no signs of the enemy.
Marston then ordered Major Barker’s61 company to Kesa whence a patrol entered Koba on 1st February and pushed on towards Mataloi 2. There were signs of very recent occupation and, 200 yards along the track, the patrol was ambushed. Barker brought heavy fire down on the Japanese ambush position and occupied Koba that night.
On the morning of the 3rd, about 400 yards east of Koba, Barker again struck a Japanese ambush position which was, however, outflanked, the
enemy withdrawing through Mataloi 2 towards Mataloi 1. By the time Mataloi 2 was occupied at 6.30 p.m., there was not enough time to exploit to Mataloi 1 nor to allow adequate consolidation in Mataloi 2 before dark. At 9.30 p.m. the Japanese counter-attacked from the direction of Mataloi 1, preceding the attack with a heavy mortar bombardment. As Mataloi 2 could be commanded from three sides, Barker decided that he could hold the area best from high ground to the south which would also be out of range of the enemy mortars. Accordingly he ordered a withdrawal and departed with his headquarters and one platoon. Apparently the orders did not reach the other platoons who were encircled while the remainder of the company was withdrawing to Koba. Long-range enemy machine-gun fire was directed at Kesa at the same time as the counterattack developed at Mataloi 2.
By the 4th there was no news of the two missing platoons although much heavy firing had been heard from the Mataloi 2 area. The depleted company was withdrawn and McIntosh’s was sent to the Koba area to patrol vigorously towards Mataloi 2 and make contact with the missing platoons. The patrols neither found the missing men nor discovered what was happening in Mataloi 2. At 7.30 p.m. on the 4th the commander of one of the missing platoons reported in. He had been stunned by a mortar blast during the counter-attack and, unable to find his platoon, had wandered back. It was not until the morning of the 5th that the two platoons reported in to Ketoba.
What had already been suspected was then confirmed – they had not received the order to withdraw. Soon after 9.30 p.m. on the 3rd Lieutenant Jacobs62 with both platoons – 29 men – had been encircled by an enemy force attacking from the right and from the front. When the Australians first occupied Mataloi 2 they used Japanese defensive positions near which the Japanese had fixed sticks with pieces of white paper attached. Later
the Australians dug new positions well away from the Japanese ones. Expecting them to use the old Japanese pits, the enemy directed most of his fire at them. The Japanese firing was wild and ineffective and caused no casualties. At very close range Jacobs gave the order to fire and estimated that about 30 of the enemy were hit. The attack lasted for 40 minutes before being beaten Off and although there was further sporadic firing up to 2 a.m. on the 4th the Japanese did not counter-attack heavily again and spent the night dragging out their killed and wounded.
Jacobs was still holding his position at 9 a.m. on 4th February but he was out of communication with the battalion. He knew that the battalion’s advance into this area was in the nature of a raid, and therefore decided to withdraw and try to regain touch with the remainder of the company or return to battalion headquarters at Ketoba. A previous patrol up the Boku on the 1st had found a practicable though difficult route to Koba. Without casualties and carrying all their weapons, except one 2-inch mortar which had been lost in the Boku during the night, Jacobs’ two platoons rejoined the battalion at Ketoba on the morning of the 5th.
The withdrawal of the 57th/60th then continued according to plan. By the evening of the 6th all troops were east of the Boku River and by the 10th the battalion was back in the Mene Hill area. The raid had given some experience to the 57th/60th Battalion. It probably also caused some consternation to the enemy when he found that so large a striking force of Australians could occupy his important flank positions with such apparent ease.
Vasey was troubled during this period by a large number of high-ranking visitors. Visits such as those from the commander and staff of New Guinea Force, from commanders of units training in Australia who had not yet had experience in such an area, from American and Australian pilots who were acting in cooperation with the 7th Division, and from British Commonwealth colleagues, were of course understandable, welcomed and necessary. On the other hand there were others whose visits could not be termed strictly necessary.63 Vasey himself exploded when writing of the matter on the day when CUTTHROAT began: “These visitors are a curse! We’ve had 280 of them – 16 Generals and 1 Admiral – cheap tour of the world – a lot of them being able to say they’ve been to the war.”
The Japanese force which had opposed the 18th Brigade in the fight for Kankiryo Saddle comprised a battalion group – Captain Yano’s II/78th Battalion. A captured ration statement dated 2nd January showed that there were then 787 Japanese in the battle area under Yano’s command. Captured documents referred to the movement of the other two battalions of the 78th Regiment to the coast to counter the American landing at Saidor. A company group from the III/78th Battalion was identified, however, in the Orgoruna area at the end of January and another company possibly from the I/78th Battalion was in the area from Cameron’s Knoll to the Bogadjim Road. This emphasised once again the piecemeal methods of the Japanese commanders. It also emphasised the lack of reserves. “Not one soldier
in the rear,” lamented a diarist who was a participant in the fight for Kankiryo Saddle.
Questioned after the war General Adachi and his staff said that the II/78th Battalion which defended Shaggy Ridge in December and Kankiryo Saddle in January consisted of only about 400 men. Five companies of the 78th Regiment had left for the coast before the Kankiryo Saddle fight in order to support the III/239th Battalion against the Americans at Saidor.64 In other interviews Adachi and his staff were quoted as saying:–
“As the result shows, one division of the Australian forces was nailed down by only three battalions of Japanese forces, and during the period Jan–Feb 1944, when the 7th Division was actively committed to the offensive at Kankiryo, there were only 7 Japanese companies in this area, the other 5 companies being employed at Saidor to hold off the American landings. From the point of view of supply, it cost a great number of jeeps and transport planes to keep in action such a big force as the division in the Ramu Valley where it could not be as effective as it could have been in other areas. In other words, it would have been much more advisable for the Australian forces to have employed about a brigade strength in the Ramu Valley, as a threat only to Madang, and use the bulk of the forces for the operations along the coastline. In New Guinea operations it is taboo for the raiding party to engage in inland actions. The operations should have been carried out along the coast. This is the doctrine to which the Japanese have always adhered rigidly.”65
These views and claims of the Japanese leaders are interesting but wide of the mark. With the capture of Kankiryo Saddle by the 7th Division, as with the capture of Sio by the 9th Division, a phase ended. In the four months since the great offensive began at Lae and Nadzab the enemy had been pushed back from areas necessary to the Allies for the building of bases to support the onward thrust against Japan. From early in 1943 when the enemy had been deluded into pouring troops into the Salamaua area against the 3rd and 5th Australian Divisions, he had been caught on the wrong foot. Sending units here and there piecemeal to plug the front line had availed General Adachi nothing either against the rugged fighting of the 3rd and 5th Divisions or against the veteran 7th and 9th. The 51st and 20th Japanese Divisions had been defeated and partly annihilated, and units of the third Japanese division in Australian New Guinea – the 41st – had shared in the defeat. Now the remnants of the 20th and 51st were fleeing in despair along the Rai Coast from the Australians and were apparently trapped by the American landing at Saidor; while the garrison in the Finisterres – the 78th Regiment – had lost the vital position astride the divide at Kankiryo Saddle to the 7th Australian Division, and was casting backward eyes and sending troops against the actual threat at Saidor and the potential threat at Madang. It was only a year since the Japanese had set out confidently from Salamaua to capture Wau.