Chapter 8: The Battle of Keren
The plan of operations, as outlined in the previous chapter provided for joint attack on Keren by the 4th and 5th Indian Divisions, the former to operate on the north and west of the road and the latter to the east of it. The initiative was to be taken by the 4th Indian Division, whose objectives included the series of hills from Mt. Sanchil to Mt. Samanna. The divisional plan was based on a two-brigade attack which was to be launched by the 11th and 5th Indian Infantry Brigades, and the date fixed was 15 March. In the paragraphs below the operations of the two brigades are narrated separately.
Attack by the 11th Indian Infantry Brigade
The 11th Indian Infantry Brigade was deployed for the attack with three battalions: on the right 2 Camerons was directed on Mt. Sanchil and Brig’s Peak, in the centre 1/6 Rajputana Rifles headed for Hog’s Back, and on the left 2/5 Mahratta Light Infantry was directed on Flat Top. On 14 April stores were carried to the dump. At 1900 hours, 2/5 Mahratta moved to the assembly area on the left of 1/6 Rajputana Rifles getting into position at 2130 hours. At this hour, 2 Camerons began its move up from the railway line to its assembly point and 1/6 Rajputana Rifles got into position. The assembly was carried out without incident or interference by the Italians. The night passed quietly and by 0600 hours, the next morning, the 11th Indian Infantry Brigade was in position according to plan. The attack was timed for 0700 hours on 15 March.
The attack went in as timed. The artillery bombardment opened at 0700 hours, but as the leading troops went forward the Italian defensive fire caused a number of casualties. Heavy artillery and machine gun fire from Mt. Sanchil and Brig’s Peak was directed against 2 Camerons, which nevertheless continued to advance slowly, with C Company directed on Brig’s Peak and B Company on Sanchil. By 0815 hours, C Company almost got to the top of Brig’s Peak but failed to drive out the Italians. However, B Company encountered very stiff opposition and failed to make much headway in securing Sanchil. At 0850 hours one company and at 1030 hours another company of the 1st Royal Fusiliers came under command of 2 Camerons. But, in spite of these reinforcements, 2 Camerons failed to capture Sanchil and Brig’s Peak, as
the Italian opposition was quite determined. Savoy Grenadiers poured machine gun fire, mortars and grenades down the slopes. In consequence, by 1600 hours, 2 Camerons had suffered heavy casualties and was unfit for further fighting. At that hour at Brig’s Peak only a few men of C Company (2 Camerons) had survived from the grim ordeal; the only survivors of the company of 1st Royal Fusiliers were the Commander and eight men. The Commander of B Company 2 Camerons with about eight men had reached the top of Sanchil but had been driven off. No further progress was possible with the depleted forces, hence it was decided to use the rest of the 1st Royal Fusiliers to complete the capture of Sanchil. The attack by the Royal Fusiliers on Sanchil passed the forward company positions of 2 Camerons at 1815 hours. At 2300 hours, this attack was reported to be going on slowly but little headway could be made against the strong Italian positions. Thus not much progress was made either at Sanchil or Brig’s Peak. The terrain in this area was very difficult, consisting of boulders and small trees and intersected by small Khors which made observation of movement at times impossible.
On the left of 2 Camerons, 1/6 Rajputana Rifles was directed on Hog’s Back. Its objective was from excluding Brig’s Peak to including Hog’s Back. The plan was for B Company to secure Hog’s Back, on the capture of which A Company was to pass through to capture Bich Hill on the right. C Company was to move approximately 400 yards behind A Company. It was to be ready to assist A Company on to its objective and to capture Saddle. D Company was to be in reserve. One section Mortar Platoon was to assist B Company on to its objective whilst the second detachment was to follow behind B Company and to be prepared to cover A Company on to its objective. The Carrier Platoon was placed under the command of A Company.
The battalion came under defensive fire, which the Italians put down when the British guns opened up. It suffered several casualties even before crossing the start line. However, by 0830 hours, it was able to capture Hog’s Back though not without suffering severe losses. Three companies had been committed to secure this objective. At this time the Commander of the 11th Indian Infantry Brigade felt that the battalion was not in a fit state to attack Bich Hill and Saddle. He, therefore, ordered the battalion to consolidate on Hog’s Back. A rough estimate showed that, of the three forward companies, most of one, half of the second and a good proportion of the third had been knocked out.
At 1030 hours, the Italians put in a counter-attack on Hog’s Back from the direction of Saddle but it was repulsed. At 1230 hours, G Company and one platoon of B Company 4/6 Rajputana Rifles were placed under the command of 1/6 Rajputana Rifles, which kept them in reserve and used up its fourth company to strengthen Hog’s Back. Throughout the early part of the night and again at 0430 hours next morning the Italians made repeated counter-attacks against Hog’s Back but were driven back by 1/6 Rajputana Rifles.
To the left of 1/6 Rajputana Rifles, 2/5 Mahratta attacked Italian defences on Flat Top. The objective of 2/5 Mahratta was from exclusive Hog’s Back to inclusive Flat Top. The plan was for C Company on the left to secure Flat Top (from including prominent tree to including boulder) and D Company on the right to secure Slab Rock (from including prominent tree to including Slab Rock). A Company was to advance behind D Company, pass Slab Rock on the west and secure the saddle of low ground between Hog’s Back and Flat Top (excluding prominent rocks to including prominent tree on the east edge of Flat Top). B Company in reserve was to move up immediately in the rear of the Battalion Headquarters to the area south of Slab Rock feature. Its role was to capture Mole Hill, about 400 yards north of Flat Top.1
The attack was launched in accordance with the plan at 0700 hours. Heavy defensive fire from the Italian artillery and mortars came down forward of the starting line and caused considerable losses in all companies advancing on the objectives. The Commander of D Company and some of his headquarters men were wounded but the company continued to advance and seized its objective, the Slab Rock feature, without much difficulty at 0720 hours.2 A Company advancing behind D, passed Slab Rock on the west and moved on towards its objective—the saddle of low ground between Hog’s Back and Flat Top. After hard fighting the company captured its objective by 1030 hours. It had to cross three belts of wire before it could get into the Italian positions. C Company, detailed as the left forward company with Flat Top as the objective, advanced at 0700 hours. It approached Flat Top from the southeast but was held up when only fifty yards from it. Further efforts were made to get into the position round the west flank but were unsuccessful. The company suffered heavy casualties in the process.
The battalion plan was based on saving the reserve company for the capture of Mole Hill, but when the situation deteriorated around Flat Top, D Company was sent in to attack that feature from the east. In this the company suffered severe losses, particularly from an Italian medium machine gun which opened up at twenty yards’ range as the company advanced towards the crest of Flat Top. This machine gun was, however, ultimately silenced and by 1440 hours, the objective had been captured. The casualties sustained by the two companies, engaged on Flat Top, were so heavy that the idea of advancing on to Mole Hill was given up and the companies were ordered to consolidate their position on Flat Top. At 1600 hours, the total strength of the two companies on Flat Top had been reduced to one British officer, two Viceroy’s Commissioned Officers and thirty-four Indian other ranks. Italian sniping from Mole Hill continued until dark. At dusk, considerable Italian artillery and mortar fire was opened up and caused more losses to the Indian troops.
At 1600 hours, the 11th Indian Infantry Brigade was informed that 3 Royal Garhwal Rifles was being put under its command forthwith, but that it could only be used in a static role. Hence the Brigade Commander ordered 3 Royal Garhwal Rifles to relieve 4/6 Rajputana Rifles which was then to come into brigade reserve. In addition, it was decided to use all available men from battalion and brigade B Echelons to thicken up the defences. They were sent up at 1730 hours and formed into two composite platoons (one British and one Indian). The British platoon was placed under the command of 1/6 Rajputana Rifles and occupied a feature to the south of Hog’s Back, called Near Feature. The Indian platoon came under the command of 2/5 Mahratta for a counter-attack on Flat Top. Thus at nightfall on 15 March, the 11th Indian Infantry Brigade had made some progress in the teeth of opposition. Though heavy casualties had been sustained, Hog’s Back had been captured and 1st Royal Fusiliers was on the move forward to attack Sanchil. Flat Top had also been taken and a way opened for further advance.
Attack by the 5th Indian Infantry Brigade
The 5th Indian Infantry Brigade detailed 4/11 Sikh to capture Mt. Samanna. The leading company advanced from Pt. 1710 at 0700 hours to capture Left Bump. This feature was secured without much difficulty for the attack was made before the Italians could recover from the artillery concentration. Then the other two companies moved on to their respective objectives—Middle
Operations of 7 Ind Inf Bde North of Keren, 12-27 March 1941
Bump and Right Bump which were held by 1st Alpini Battalion, 10th Savoy Grenadier Regiment. By about 0830 hours, the second company had reached within 200 yards from the crest of Middle Bump but was held up by determined resistance. Meanwhile the third company pushed on to Right Bump but was held up about 400 yards from the top. 1st Alpini Battalion, which held these features, offered stubborn resistance and held up the advance of 4/11 Sikh. Further efforts to capture Middle Bump were unsuccessful, although the reserve company was also committed. It was then decided to abandon the attack on Right Bump, which had been found to be very strongly held by about four hundred Italians. The company in front of Right Bump was withdrawn successfully and ordered to assist the attack on Middle Bump. This attack, supported by artillery, was put in at 1335 hours but failed. Plans were made to attack during the night using the reserve battalion, 3/1 Punjab. This proposal was not accepted by the Commander of the 4th Indian Division, owing to the necessity of keeping this flank secure. It was, therefore, decided to withdraw 4/11 Sikh from the area of Middle Bump. The situation at nightfall was that 4/11 Sikh had captured Left Bump, ‘but had failed to secure Middle Bump and Right Bump. It had suffered about 120 casualties during the day.
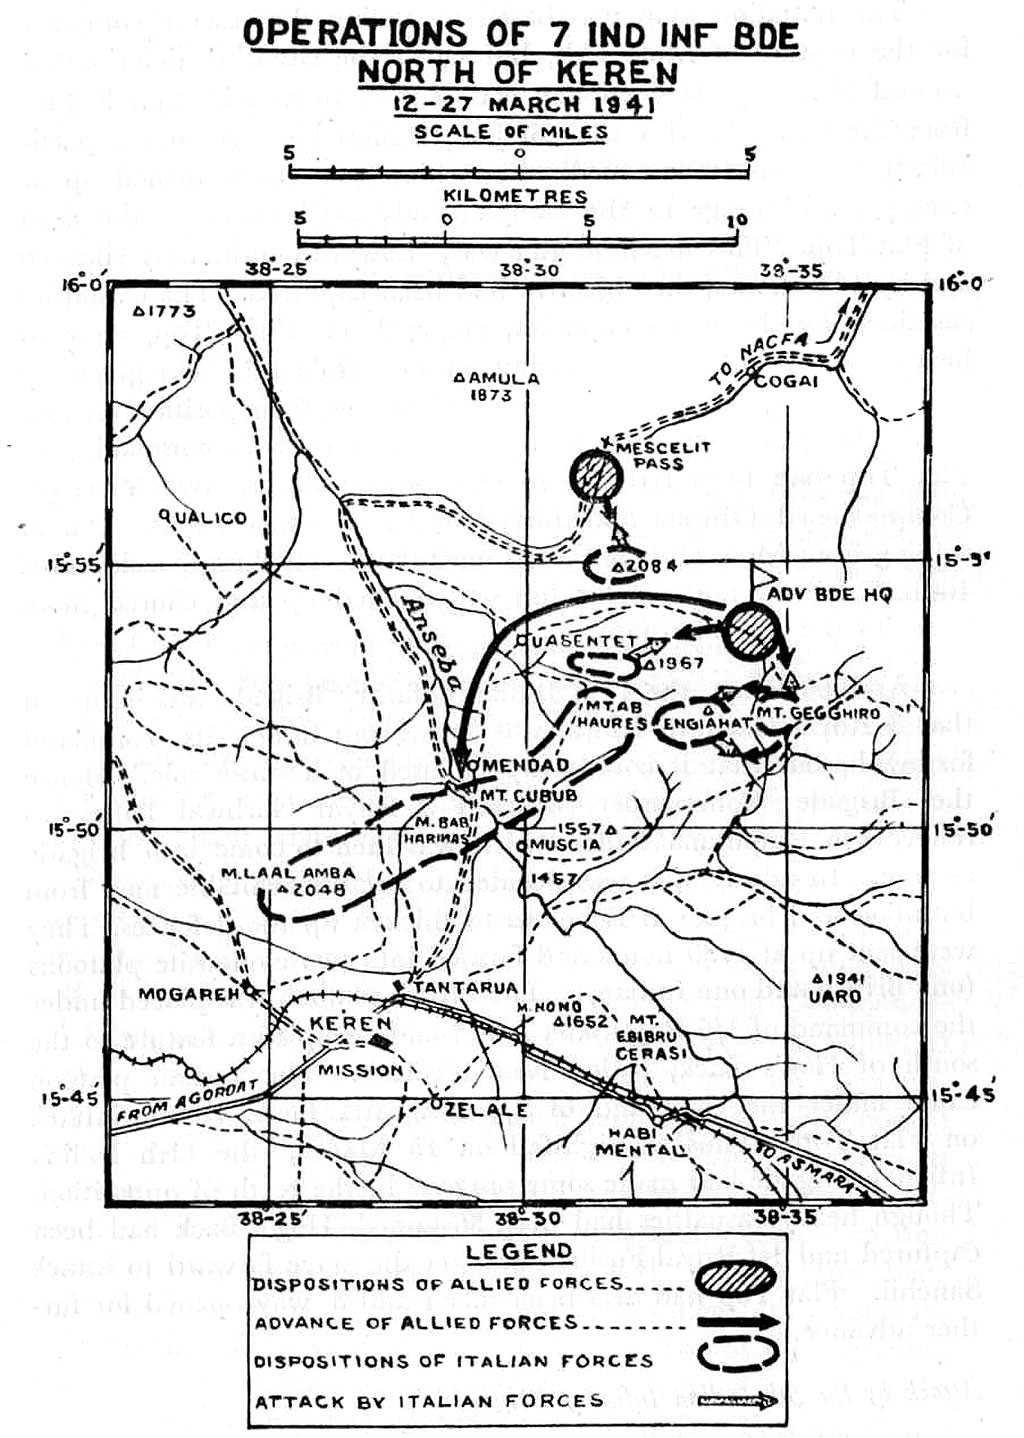
Diversionary Operations of the 7th Indian Infantry Brigade North of Keren
The leading troops of the 7th Indian Infantry Brigade had arrived south of the Mescelit Pass on 3 March. After that there lay between the brigade and Keren only the range of formidable hills covering the pass south of Mendad. At that time the Italians had six battalions in that sector. They were increased to seven by 12 March. The role of the brigade was to operate in the north to prevent the Italians from moving troops from that sector for use in the main battle in the south. Also it was to cut the line of Italian communications east of Keren and to interfere with their movements. The preliminary operation was the capture by the 1st Royal Sussex of Pt. 2084 ridge as far as the line of the water course running east and west to the south of Vasentet. This operation was to be completed by the evening of 13 March. Royal Sussex was then to patrol vigorously in the plain to attract Italian attention and to pay particular attention to the protection of its right flank. Then the main operation was to be carried out in two phases. In the first phase, 4/16 Punjab was to capture the line from Pt. 1557 to Pt. 1457 and to consolidate on this line and support further operations by fire. In the second phase, the Free French units (3rd Chad Battalion and 14th Battalion Foreign Legion) were
to capture and consolidate the line Mt. Hono (Pt. 1652) Mt. Ebibru, Cerasi. From this line they were to send patrols to the Keren—Asmara road and prevent the passage of Italian troops and vehicles along it.
On 12 March, Advanced Brigade Headquarters and 4/16 Punjab moved from the bivouac area at Cogai to an area two miles to the north-east of Mt. Engiahat. It was hoped to accomplish the task set for 4/16 Punjab by surprise. The next day, reconnaissance groups spotted from Mt. Gegghiro some Italian troops on Pt. 1967. An observation post party sent at 1200 hours from 4/16 Punjab to Mt. Gegghiro, ran into an Italian observation post, which had been established there and all the men of the Indian party were killed or captured. Thus surprise was lost. On the same day, the 1st Royal Sussex encountered Italians on the Pt. 2084 ridge. The advance was held up and all efforts to reach their objectives on the ridge during the day failed.
When the presence of the Italians on Mt. Gegghiro became known, D Company 4/16 Punjab was detailed to drive them from there. It reached a spur running north from the feature but could not get any further. 14th Battalion Foreign Legion was, therefore, ordered to capture the feature before first light on 14 March. After the capture of Mt. Gegghiro, the latter battalion was to continue the operations in the area and capture Engiahat, it was hoped, before the Italians could reinforce it further. Mt. Gegghiro was captured by 0100 hours on 14 March, but the attack on Engiahat was not successful. One company of the 14th Battalion Foreign Legion, which was sent round the south-east flank, came under fire from the Italians and suffered very heavy casualties.
A reconnaissance party of 4/16 Punjab found that the Italians were holding the ridge running west of Pt. 1967. In view of this it became vital for the security of the line of communication to hold Pt. 1967. A and C Companies of 4/16 Punjab were therefore sent up in the afternoon to occupy it. They went up the five-thousand-foot climb with good speed. A party of the Italians, which was trying to occupy a feature to the north-east of Pt. 1967, was surprised and withdrew to Engiahat. Pt. 1967 was then occupied by the Punjab troops.
15 March was D day for the main attack on Keren. The role of cutting the Italian line of communication, however, had to be abandoned until the opposition at Engiahat was overcome. 4/16 Punjab sent out a patrol during the day to locate the Italian positions on Engiahat and to ascertain their strength. It was found to be
strongly held with machine guns. The ground already captured was, therefore, consolidated. The Foreign Legion battalion occupied Mt. Gegghiro, while the artillery registered Engiahat.
At 1300 hours, on 16 March, A and C Companies 4/16 Punjab attacked Engiahat, preceded by artillery fire. The Italians put up a strong resistance. The attacking companies reached the lower slopes of Engiahat, but then ran out of ammunition and had to withdraw. Meanwhile 1st Royal Sussex had failed to make any progress on the Pt. 2084 ridge.
The capture of Engiahat became difficult. On its spurs the Italians had constructed a series of fortified positions nearly a mile in depth. The only approaches to it were along two narrow ridges not permitting more than six men to pass at a time. The Commander of the 7th Indian Infantry Brigade made the following appreciation of the situation:–
a. As Engiahat dominated the line of communication for the area of intended operations towards the Keren– Asmara road, its capture was essential before an advance in that direction was undertaken.
b. It was necessary to build camel tracks up the hill side to a height of five thousand feet above the valley and to dump supplies, rations and ammunition before starting operations for the capture of Engiahat.
c. Air photographs were required to enable definite objectives to be allotted to the different units. (This proved to be very difficult as, for many days, the air photos supplied seemed just to miss out the area required).
All these factors caused delay and further operations were not undertaken until 27 March.
5th Indian Division Operations
The plan of operations had allotted the capture of Mts. Dologorodoc and Zeban to the 5th Indian Division which had intended to execute it in four phases with the aid of two brigades, the third being in the reserve till these objectives had been secured. Accordingly, early in the morning of 15 March, the 9th and 29th Indian Infantry Brigades concentrated behind the lower slopes of Cameron Ridge. The assault on Fort Dologorodoc was to be carried out by 2nd Highland Light Infantry which was to approach its objective from a south-westerly direction. The attack was not to start until Mt. Sanchil and Brig’s Peak had been secured by the 4th Indian Division. It was calculated that these objectives would be taken
by 0900 hours. The exact time of attack depended on when the artillery supporting the 4th Indian Division might be spared to support the 5th Indian Division. By 0945 hours the situation on the 4th Indian Division front appeared to be sufficiently satisfactory for the 5th Indian Division to start its attack. At this time it was not known whether Brig’s Peak and Mt. Sanchil had been captured though it seemed that they would be taken shortly.
Attack by the 9th Indian Infantry Brigade
The 2nd Highland Light Infantry, leading the attack, crossed the start line (west bank of the water course south of bend at 368858) at 1030 hours in order to capture Pinnacle, White Rock Hill and Dologorodoc Fort. The leading company was unable to cross the road owing to very heavy Italian artillery and mortar concentrations, and also enfilade machine gun fire from the top and the eastern slopes of Sanchil. The remaining companies tried to capture Pinnacle and Razor Hill from the south. But no progress was made. At 1500 hours, it was decided that further progress by daylight was not possible. The 2nd Highland Light Infantry was ordered to consolidate the ground gained and a new plan was formed. Preceded by heavy artillery concentrations on Pinnacle, Pimple and Fort Dologorodoc, 3/5 Mahratta was to attack Pinnacle from the south. 3 Royal Frontier Force Regiment was then to pass through and capture Pimple. Finally, after the first two objectives had been secured 2nd West Yorkshire Regiment, preceded by a further artillery concentration, was to pass through 3 Royal Frontier Force Regiment and capture the Fort. The first phase of this attack was originally planned to start at 1630 hours, but was later postponed to 1700 hours.
Crossing the start line at 1700 hours, 3/5 Mahratta encountered strong opposition. Yet by 1800 hours, it had reached Pinnacle, where a dogged fight ensued and the objective was not finally secured until 2000 hours. 3 Royal Frontier Force Regiment, less two companies, then passed through and captured Pimple at 0005 hours on 16 March. Touch was lost with the two forward battalions at this stage. The Commander of the 9th Indian Infantry Brigade, however, ordered 2nd West Yorkshire Regiment to move up to the low ground between Pinnacle and Pimple, in preparation for the attack on Fort Dologorodoc. At 0400 hours, the Italians put in a strong counter-attack on Pinnacle and Pimple. This met the whole of the 9th Indian Infantry Brigade in line and was beaten off.
The plan for the final phase of the attack had been for 2nd West Yorkshire Regiment to go through 3/5 Mahratta and 3 Royal
Frontier Force Regiment and assault the Fort under cover of a timed artillery programme. In the confusion caused by the counterattack mentioned above, communications broke down and it was not possible to stop the artillery concentrations which came down on the Fort as planned. In fact, this proved to be most fortunate. The Italian counter-attacking forces found themselves between the small arms fire of the 9th Indian Infantry Brigade and the artillery fire falling on their own fort behind. They broke and were pursued by 2nd West Yorkshire Regiment into the Fort, which reached there at 0615 hours and immediately exploited for eight hundred yards beyond.
Subsequent 4th Indian Division Operations
On 16 March, on the 11th Indian Infantry Brigade front, 1st Royal Fusiliers and 4/6 Rajputana Rifles attacked Sanchil and Brig’s Peak respectively while the Italians launched strong counterattacks on 1/6 Rajputana Rifles at Hog’s Back and on 2/5 Mahratta at Flat Top. 1/6 Rajputana Rifles and 2/5 Mahratta were counterattacked a number of times during the night of 15/16 March. The forward positions had only been partially wired and the Italians managed to penetrate them many times and had to be ejected at the point of bayonet. A large number of high explosive grenades were used in repelling these attacks. The first counter-attack came simultaneously on both the battalions at 2230 hours on 15 March. Defensive fire was called for and the attack was repulsed by 2315 hours. The second counter-attack was on 1/6 Rajputana Rifles only. It lasted from 2315 hours on 15 March to about 0015 hours on 16 March, when it was driven back. At 0430 hours, on 16 March, there was a third counter-attack on 2/5 Mahratta and 1/6 Rajputana Rifles. In the Mahratta area, all the forward posts except one were recaptured by the Italians. This one post consisting of one officer and seventeen other ranks held on to the south-west edge of the position. A counter-attack by one Mahratta platoon was put in but was held up. Then a composite platoon from B Echelon under the command of an adjutant put in another counterattack and, by 0515 hours on 16 March, had cleared the Italians from Flat Top at the point of bayonet.3 The Italian counterattack on 1/6 Rajputana Rifles at Hog’s Back was less severe. The battalion held its ground until first light at 0500 hours on 16 March, when the Italians withdrew.
While 2/5 Mahratta and 1/6 Rajputana Rifles were busy in repelling strong Italian counter-attacks, 1st Royal Fusiliers, reinforced by 4/6 Rajputana Rifles, attacked Italian positions at Sanchil and Brig’s Peak. As mentioned earlier, the attack of 1st Royal Fusiliers on Sanchil had passed the forward company positions of 2 Camerons at 1815 hours on 15 March. At 2300 hours, on 15 March, this attack was reported to be progressing slowly but little headway could be made against the strong Italian positions. At 0245 hours, on 16 March, the Fusiliers were about two hundred yards below the top of Sanchil. At 0430 hours they launched a vigorous attack to drive out the Italians from Sanchil. The attack progressed slowly against strong opposition. By 0600 hours, the forward elements of the Fusiliers managed to get through the wire on to the top, but were driven back by superior numbers and mortar fire. At 0750 hours, the Commander of the Fusiliers was wounded and the second-in-command was sent up to take over and make a final effort for the capture of Sanchil. At 0015 hours, he reported that the Fusiliers were unfit to put in an attack on Sanchil as they had suffered heavy casualties, and the strength of the battalion at the time had fallen down to less then ninety men. Thus the Fusiliers had failed to drive out the Italians from Sanchil.
4/6 Rajputana Rifles attack on Brig’s Peak was also not successful. This battalion had been relieved by 3 Royal Garhwal Rifles and had concentrated at Rajputana Hill for an attack on Brig’s Peak at 0430 hours on 16 March. The plan was for B Company less one platoon to capture Brig’s Peak. D Company was to secure Middle Bump and A Company to capture Sugar Loaf (the peak at the north-west end of Brig’s Peak). Advanced Battalion Headquarters with C Company and one platoon B Company in reserve was to follow as soon as possible in the rear of the forward companies. The artillery support arranged for this attack was defensive fire to be put down on previously registered lines on Brig’s Peak and Saddle, at half-hourly intervals from 0300 hours to 0500 hours, by which time it was hoped the leading troops would be nearing the objectives. However, the attack did not make much progress. Italian opposition was very strong and the Indian troops suffered heavy casualties. The leading elements could not get nearer than two hundred yards from the peaks, by 0800 hours. Another attack was put in at 0830 hours, using the reserves of the forward companies, but was no more successful. A further attack was arranged to take place at 1015 hours with air, mortar and machine gun. At 1005 hours, information was received that there would be no air co-operation, but that the attack was to go in at 1030 hours. It
was, then, too late to change the original orders. Therefore, the attack was put in at 1015 hours, without support of any kind. It had not made much progress when it was brought to a halt by machine gun fire.
At this stage the 10th Indian Infantry Brigade was placed under the command of the 4th Indian Division for exploitation into the plain west of Keren. This brigade was ordered to move up to Cameron Ridge area in readiness for an attack starting from the line of the col between Sanchil and Brig’s Peak. The attack was to start at 2100 hours. In view of this the 11th Indian Infantry Brigade was told to hold on to the ground gained and to continue the forward pressure.
On the 5th Indian Infantry Brigade front, no operations were undertaken on 16 March. 4/11 Sikh consolidated its position on Left Bump. It was subjected to intermittent mortar and artillery fire.
5th Indian Division Operations
On the 5th Indian Division front, on 16 March, the 9th Indian Infantry Brigade consolidated the ground gained. As mentioned earlier, Fort Dologorodoc had been occupied at 0615 hours on 16 March by 2nd West Yorkshire Regiment. The Italian reaction to this success was violent. The first counter-attack on the Fort came at 1005 hours. Defensive fire was called for; artillery engaged the Italian assembly area and the attack was broken up. The next attack came not long after. At about 1150 hours, a large number of Italians were observed to be forming up to the east of the Fort, evidently for a counter-attack. Two field regiments engaged the target and the Italians, estimated at three battalions, were scattered. In view of the impending counter-attack, air support, in the form of two fighter aircraft for strafing ground targets outside three hundred yards radius from the Fort, was arranged and the guns of both divisions were laid on. When, after all, the attack did develop at 1330 hours, it was repulsed. Although there were no further counter-attacks during the day, the troops holding the Fort were constantly shelled and sniped by the Italians who had complete observation of the area from Sanchil, Zeban and Falestoh.
Estimate of the Progress of Operations (15-16 March)
During these two days of fighting British and Indian troops had made some important gains. On the 5th Indian Division front, Fort Dologorodoc had been captured and held against persistent Italian counter-attacks. The capture of Fort Dologorodoc was
of great importance since it afforded, for the first time, observation on to the Keren plain. On the 4th Indian Division front, the British and Indian troops, in spite of strenuous efforts, had failed to drive out the Italians from Sanchil and Brig’s Peak. Further to the west, however, Hog’s Back and Flat Top had been captured and held against strong counter-attacks. On Samanna, the Left Bump had been captured and held, though efforts to capture Middle and Right Bumps had been unsuccessful, and had finally been abandoned. The Italians still held all the dominating features and, while this state of affairs lasted, the British and Indian troops were exposed to heavy machine gun, mortar and artillery fire.
The Italians had offered stout resistance and inflicted severe casualties on the British and Indian troops with the result that some of the units were rendered unfit for immediate action. In addition to the determination shown by the Italians in the fighting, the failure of the British and Indian forces in gaining objectives, was due to the unfavourable weather and physical conditions. During the two days of the hard fighting, the weather was extremely hot and oppressive. Speaking of the operations on 15 March General Platt observed “Some of the efforts of the troops that day were defeated almost as much by heat and heat exhaustion as by hostile opposition”.
Operations on 17 March
As the British and Indian troops in the forward line had suffered heavy casualties it was necessary to employ fresh troops for launching another attack. An attack on both the divisional fronts to break through to the Keren plain was now undertaken. On the 4th Indian Division front, the 10th Indian Infantry Brigade was ordered to break through between Brig’s Peak and Mt. Sanchil and advance as far as the line of the water course running west from the railway and water course junction at 378883. This attack was to start from the line of the col between Sanchil and Brig’s Peak at 2100 hours on 16 March. The Commander of the 10th Indian Infantry Brigade planned to carry out the operation in two phases. In the first phase, 3 Royal Garhwal Rifles was to capture Sanchil and 4/10 Baluch on the left was to capture Brig’s Peak. In the second phase, 2nd Highland Light Infantry was to attack the col between Sanchil and Brig’s Peak and break through on to the Keren plain and secure up to the line of the water course running west from the railway crossing over the water course at 378883.4
On the 5th Indian Division front, the 9th Indian Infantry Brigade was to consolidate its position in the Fort area and the 29th Indian Infantry Brigade was to attack forward of the Fort and capture Falestoh Ridge—Pt. 1552– Zeban—cross roads 402883. The attack was to start from the Fort and the time for it was to be approximately 2200 hours on 16 March. The actual time was to be decided by the Commander of the 29th Indian Infantry Brigade, after reconnoitring the approach and considering the state of the moon.5 This operation was also conceived in two phases. In the first phase, the 1st Worcestershire Regiment on the right was to capture Falestoh Ridge up to Pt. 1552, and 3/2 Punjab on the left was to capture Zeban Minor up to Pt. 1717. The attack of the 1st Worcestershire Regiment was timed for 2230 hours on 16 March and that of 3/2 Punjab for 2245 hours. In the second phase, 6 Royal Frontier Force Rifles was to capture the remainder of Zeban and cross roads 402883. This attack was to start at 0300 hours on 17 March.
Attack by the 29th Indian Infantry Brigade (17 March)
The concentration of the 29th Indian Infantry Brigade in the area of the Fort prior to the attack was very seriously delayed. The climb up the Hill was very difficult, the track being narrow and having large quantities of cable laid across and along it. The last battalion did not reach the Fort area until 0100 hours on 17 March. The zero hour for the attack was, therefore, changed to 0230 hours. The artillery fire in support of the attack opened at 0230 hours on 17 March. The delays in this attack, however, were not yet over; 1st Worcestershire Regiment miscalculated the time needed to get to its start line and was one and a half hours late. However, once it had crossed the start line, it made good progress and by 0730 hours had established itself on a little feature, a hundred yards to the south of Pt. 1552, on Falestoh Ridge. All attempts to get to the top of Mt. Falestoh were, however, unsuccessful and the battalion suffered heavy casualties—23 killed, 55 wounded and 7 missing.
On the left, 3/2 Punjab made some progress. The plan was for D Company to move north of the Fort track and secure Zeban Minor. C Company following D Company in the rear was to secure Pt. 1717. A Company following C Company in the rear was to secure the col north of Pt. 1552 on the left flank of 1st Worcestershire Regiment. Battalion Headquarters and B Company were to move behind A Company. The attack took place according
to plan and D Company crossed the start line at 0230 hours on 17 March. D Company, not being fired at from M.G. ridge (a small feature immediately below the Fort), moved on towards its objective. Hardly had it gone 800 yards when it met the Italians in a strong position just east of a small nullah. This position was attacked at once by D Company from the front and by the two other companies following (C and A Companies) from the right and the left. Although Italian machine guns on the flanks caused heavy casualties, the attack was pressed home with determination and the position was captured.
At 0600 hours, the Italians put in a counter-attack on the forward positions. This was repulsed. In order to help in repulsing this counter-attack, B Company 6 Royal Frontier Force Rifles was placed under the command of 3/2 Punjab and was ordered to move up on the left flank. The ground over which it had to pass was swept by machine gun fire from Sanchil and Railway Bumps. The company, however, rushed across this area and eventually captured forty prisoners. Its own losses were three killed and five wounded. At the same time some Italian troops were seen creeping up the northern slopes of the Fort. They were engaged by fire and forced to withdraw. The advance of the forward companies was held up by heavy machine gun fire from M.G. ridge. B Company, in reserve, engaged the Italians in position on M.G. ridge and the machine gun fire from this ridge was neutralised by Bren and mortar fire. The advance on Zeban was resumed again. By 0730 hours, the forward troops had reached the bend in the track. Further advance was held up by heavy fire from Zeban Minor and col. This situation remained unchanged until 1300 hours. Then the Brigade Major was sent forward to get exact information about the situation. The weather continued to be hot and the maintenance of the forward troops with water and ammunition was found difficult. The forward troops had been moving and fighting for nearly twenty hours, and their positions were very exposed. The Commander of the 29th Indian Infantry Brigade appreciated that all the above factors had combined to break the impetus ‘of the attack. As no fresh troops were available to carry on it was decided to withdraw the forward troops to less exposed positions after dark.
At 1600 hours, British aircraft dropped supplies of food and ammunition on the two forward battalions. A great volume of hostile fire from the ground greeted the aircraft and the supply drop was not a success. Owing to faulty packing the ammunition was bent and many of the supplies fell so far away from the battalion areas that they could not be recovered.
At 1900 hours, B Company 6 Royal Frontier Force Rifles was counter-attacked again. This was a very strong effort by the Italians, but the Company fought gallantly and held its ground at the cost of over a third of its total strength. Heavy casualties were inflicted on the Italians also, and the attack was finally repulsed. During this attack two platoons from C Company 6 Royal Frontier Force Rifles reinforced B Company. Captain Anat Singh Pathania displayed great courage in this keenly-contested engagement. Although wounded in the face and both legs he rallied his men to a final charge and pushed out the Italians at the point of the bayonet from his company’s position where they had succeeded in penetrating.
The withdrawal started at 2300 hours on 17 March and the 1st Worcestershire Regiment moved back to a position on the slope south-east of the Fort (Big Rock area). The movement was covered by 3/2 Punjab, which retired to a position about 800 yards in front of the Fort.
Attack by the 10th Indian Infantry Brigade
To conform with the 29th Indian Infantry Brigade operations, the attack by the 10th Indian Infantry Brigade was so timed that the leading troops would reach their objectives about 0330 hours on 17 March. The two leading battalions, 3 Royal Garhwal Rifles and 4/10 Baluch, therefore, moved from their assembly areas at 0130 hours. 3 Royal Garhwal Rifles was led by guides provided by 1st Royal Fusiliers to within one hundred and fifty yards of the top of Sanchil. The attack was launched at 0300 hours with D Company on the right and B Company on the left, C Company being in reserve. Although the troops fought well the advance was held up by heavy machine gun fire from Brig’s Peak and by grenades and mortar fire. A dogged fight continued until 0700 hours but no progress was made. The Garhwalis suffered heavy casualties.
Meanwhile 4/10 Baluch too had not made much progress. The battalion moved off from Granite Peak (3585) behind the Garhwal Rifles, crossed the col and reached the lower slopes of Brig’s Peak. The attack was launched with C Company on the right and B Company on the left, D Company being in reserve. The attack was met by heavy machine gun and mortar fire and could not get nearer than three hundred yards from the objective. At 0530 hours, the Italians put down defensive fire, artillery and mortar, and inflicted severe casualties. Under their accurate fire it became difficult to get the wounded away. The forward companies were withdrawn to about a third of the way from the Brig’s Peak feature at 0700 hours.
Throughout the day the two forward battalions, 3 Royal Garhwal Rifles and 4/10 Baluch were subjected to heavy fire. By the evening of 17 March, it was clear to General Platt that the attack had failed and that the 10th Indian Infantry Brigade would have to be withdrawn. The Italian strength on Sanchil–Brig’s Peak had been underestimated. The forward troops had suffered heavy casualties. They could also not be maintained due to heavy fire. Success was not likely to be gained even if the weak 2nd Highland Light Infantry (the only remaining battalion of the 10th Indian Infantry Brigade) was committed to battle. A further assault, in the face of strong opposition, would have probably resulted in the destruction of the 10th Indian Infantry Brigade, the only reserve force available. He, therefore, decided to withdraw the 10th Indian Infantry Brigade, leaving the 11th Indian Infantry Brigade to hold on to Hog’s Back and Flat Top. The 10th Indian Infantry Brigade was to be concentrated again as Force Reserve.6 The withdrawal was carried out during the night of 17/18 March without incident (2nd Highland Light Infantry remained on Cameron ridge until withdrawn on the night of 18/19 March). The 10th Indian Infantry Brigade had suffered heavy casualties in the operations of 16/18 March. The casualties of 4/10 Baluch were 123—16 killed, 105 wounded and 2 missing. The casualties of 3 Royal Garhwal Rifles were 193—10 killed, 174 wounded and 9 missing. These figures are indicative of the intensity of the struggle.
The attacks on both the divisional fronts had thus spent themselves and the British and Indian troops were still in the hills with a hostile force, severely mauled but unbroken, between them and Keren. The attack by the 10th Indian Infantry Brigade on Brig’s Peak–Sanchil had left no reserves with which to make further advance, once the 29th and the 10th Indian Infantry Brigades had been held up. A period of reorganisation was therefore necessary. A week passed during which the British and the Indian troops held the ground gained, while the Italians counter-attacked a number of times to recapture Fort Dologorodoc.
5th Indian Division Front
Between 18 and 22 March the Italians attacked Fort Dologorodoc no less than seven times. These attacks were beaten off and the British and Indian troops fought with courage and determination. On 19 March Italian General Lorenzini was killed on this front.
He was respected by his troops and his death was a severe blow to them. Active patrolling was carried out during this period and efforts were made to start work on the road block to open the road to Keren for the passage of mechanised forces.
The 29th Indian Infantry Brigade had withdrawn from the area of Falestoh and Zeban early in the morning of 18 March. At 0230 hours, the Italians made a counter-attack from the direction of Railway Bumps and Falestoh. It was directed on the Fort and 2nd West Yorkshire Regiment had to bear the brunt of the attack. By first light, the attack had been beaten off and the Italians suffered several casualties in the fighting.
Again at 1645 hours, the Italians launched another attack on the Fort. It was preceded by heavy artillery concentrations, but was repulsed without difficulty.
At 0400 hours on 19 March, the Italians again made an attack. It was carried out by 10th Alpini Battalion which had assembled in the depression of the valley to the west of the Fort. From there, two companies moved direct towards the Fort while one went round the north to the Hill (367860). They could get to within seventy yards of the Fort and were then driven back. The Italians reformed and made a more determined effort. They were repulsed again, and this time pursued with bayonets and grenades. They abandoned two pack guns, some mortars and machine guns.
A regrouping of British and Indian forces on Mt. Dologorodoc was ordered on 19 March. It was to be completed by the midnight of 19/20 March. The various features in the Dologorodoc area were to be held by two brigades. A forward brigade was to be responsible for holding the Fort and ridges four to six hundred yards north of it. In the south, its area was to extend as far as, but excluding the features at 382856 and 376860. It was also to be responsible for the protection of the working parties engaged in clearing a way through the road block. The 9th Indian Infantry Brigade was to take over this area.
The rear brigade was to hold the area 382856–376859–Pinnacle 375857. It was to be responsible for the protection of both flanks. It also had the role of operating astride the railway in the event of the Italians attacking in force from that direction. The 29th Indian Infantry Brigade was ordered to pull back and take over this area.
The relief was completed without incident. 3 Royal Frontier Force Regiment, less one company, relieved 3/2 Punjab on the features to the north of the Fort. The company of 6 Royal Frontier Force Rifles which was under the command of 3/2 Punjab passed to the
command of 3 Royal Frontier Force Regiment. 3/5 Mahratta took over the Fort and 2nd West Yorkshire Regiment came out of the Fort to the area between the Fort and 376859.
After the relief, the dispositions of the 29th Indian Infantry Brigade were as follows:–
Brigade Headquarters—Pinnacle
1st Worcestershire Regiment—Area Pinnacle–376859–382856
3/2 Punjab—Area Pinnacle
6 Royal Frontier Force Rifles—South of the peak.
The Italian counter-attacks had not exhausted themselves yet. On the night of 20/21 March, a patrol from 3 Royal Frontier Force Regiment found a party of Italians collected in a water course preparing for an attack on the left flank of the battalion area. The patrol attacked this party and dispersed it, capturing thirteen prisoners. At 2300 hours, a party of the Italians attacked the left forward company of 3 Royal Frontier Force Regiment. The attack was preceded by a very heavy artillery and mortar concentration. This attack was beaten off, but was soon followed by a battalion attack on the right forward company of the same unit. This larger attack was supported by three light tanks and was pushed home in a very determined manner. After a sharp action lasting about twenty minutes, the Italians were again driven back at the point of the bayonet. They were pursued with grenades, and artillery fire took a heavy toll of them as they withdrew.
On 18 March, the 5th Indian Division planned an operation to make a way for ‘I’ tanks and carriers over the road block. The plan was to lay explosive charges and blow them up on the night of 18/19 March. During the night of 19/20 March, the maximum number of working parties was to be used to clear the debris and make a way for the tanks and carriers.7 On the completion of this task a force, consisting of B Squadron 4th Royal Tank Regiment less one section, and with carriers in support, was to pass over the road block and exploit to Keren.
On 18 March, the sapper demolition party, with an infantry escort, went out after dark to work on the road block. The party contacted the Italians near the road block and had to withdraw.
However, it was reported that these Italians were only part of a counter-attacking force which was forming up in the area for attacking Fort Dologorodoc. Therefore, it was decided to repeat the attempt the next night.
During the night of 19/20, the Sappers were escorted by a platoon of 6 Royal Frontier Force Rifles. Some Italians were met with in the area of the road block again and the escort suffered nineteen casualties. The operation was, therefore, abandoned until such time as an attack could be arranged to clear the Italians from the ground from which small arms fire could be brought to bear on the road block.
At 1130 hours on 20 March, two “I” tanks reconnoitred along the road as far as the road block. The Italians opened with artillery and mortars, covering the demolition on both sides of the road.
Operations on the 4th Indian Division Front
After the withdrawal of the 10th Indian Infantry Brigade during 17/18 and 18/19 March the dispositions of the 4th Indian Division were as follows:–
11th Indian Infantry Brigade
Cameron Ridge—4/6 Rajputana Rifles (less two companies)
Excluding Cameron Ridge to Near Feature 353877—2 Camerons
Excluding Near Feature to Hog’s Back—1/6 Rajputana Rifles plus two companies 4/6 Rajputana Rifles
Excluding Hog’s Back to including Flat Top—2/5 Mahratta
In reserve—1st Royal Fusiliers
5th Indian Infantry Brigade—
Left Bump—4/11 Sikh
Pt. 1710—3/1 Punjab and Brigade Headquarters
At 0440 hours on 19 March, 4/11 Sikh put in an attack on Middle Bump preceded by an artillery concentration. The attack was made on a two-company front. Some of the Italian machine gun posts on top held on in spite of the heavy artillery fire and barred the advance of the infantry when about two hundred yards from the objective. Italian troops on the feature were then reinforced. At 0800 hours,
when the failure of the attack was apparent, the Commander of the 5th Indian Infantry Brigade ordered a withdrawal, which was completed by 0910 hours. 4/11 Sikh had eleven men killed and sixty wounded.8
On 19 March, two men of 3 Royal Garhwal Rifles, who had not received the withdrawal order on the night of 17/18 and had got left behind in the area of Sanchil, were brought in by an officer’s patrol of 2 Camerons.
On 21 March, 3 Royal Garhwal Rifles was ordered to move into Happy Valley to achieve the following purposes:–
a. to secure the flank of the 5th Indian Division,
b. to protect the artillery in Happy Valley,
c. to persuade the Italians to believe that an attack on Acqua Gap was being planned.
No other major events occurred before 24 March and the Italians continued to enjoy the advantage of complete observation over British and Indian positions held by both the divisions. The forward troops were shelled, machine gunned and sniped constantly. On the night of 19/20 March, the 11th Indian Infantry Brigade had arranged a programme of harassing artillery fire to cover the movement of the 5th Indian Division troops in the Dongolaas Gorge, but the Italian fire in return was so intense that the programme had to be cancelled.
As the time passed the weather warmed up and became very unpleasant for the troops in the valleys. As a result of preparations, however, during this period the administrative position improved considerably. There were more mules and more tracks for them
to use than before; still there was a good deal of manhandling to be done though the problem had ceased to be serious.
Air Situation
During this period of reorganisation, the Italian Air Force became active after a long spell of inactivity. Their fighters carried out a large number of patrols but were unwilling to engage British Hurricanes, unless in superior numbers and when operating from a position of initial advantage. British aircraft kept up their attacks on Asmara in addition to the standing patrols over the battle area. These patrols performed offensive, air photo and reconnaissance work.
During this period too the Royal Air Force received its first call for artillery reconnaissance. The first attempts were not successful owing to the lack of experience of pilots and gunners and some equipment difficulties. But within a few days very successful shoots were conducted.
5th Division Plan to break through the Road Block
From Mt. Sanchil a spur ran to the north-east. The railway ran along the east side of Sanchil and, after going round this spur, it turned west. At the level of the railway this spur flattened out into small broken hills, which were called Railway Bumps—which ended at the junction of two dry stream beds. The main stream bed was that of a water course which ran down the Dongolaas Gorge. A subsidiary one came in from the north-west. At the junction, the banks of the latter were very steep, the south-west bank being the Railway Bumps and the north-east one Railway Ridge. Machine guns on Railway Bumps and Railway Ridge commanded Dongolaas Gorge, the east side of Sanchil, the west side of Mt. Dologorodoc and the road block.
The attempt to secure protection for the Sappers working on the road block (380868) on the nights of 18 and 19 March had failed because of Italian positions in the area Railway Bumps–Railway Ridge–spur 384871 (East Gate Spur)–Hillock ‘A’ 377863–Hillock ‘B’ 380866. An operation was, therefore, planned,
first, to secure ground from which close range small arms fire might be brought to bear on the road block area, next to prepare a way across the road block for the passage of tracked vehicles; and finally, to exploit towards Keren.
All these operations were to be carried out by the 5th Indian Division which had under its command B Squadron 4th Royal Tank Regiment (less one troop), ten carriers of 3/1 Punjab and
one Field Company Royal Indian Engineers. In addition, the 4th Indian Division artillery was to fire in support of the 5th Indian Division and to distract Italian attention from the latter by sending fighting patrols in Brig’s Peak area.
The divisional plan was to carry out the operation in four phases with some preliminary moves, and finally to exploit with a mobile force. The preliminary moves were to consist of:–
1. Concentration of the 10th Indian Infantry Brigade less 3 Royal Garhwal Rifles in the area of Cameron Tunnel on 24 March.
2. Sending of reconnaissance patrols on the night of 23/24 March to the area of Hillocks ‘A’ and ‘B’, and East Gate Spur.
3. Despatch of fighting patrols by 3 Royal Garhwal Rifles on the nights of 23 and 24 March towards Acqua Gap.
The main operation was to be carried out in four phases. In the first phase, the 9th Indian Infantry Brigade with 28 Field Regiment in support was to capture Hillock ‘A’ by 0430 hours on 25 March. In the second phase at the same time, the 10th Indian Infantry Brigade less 3 Royal Garhwal Rifles was to advance on and capture Railway Bumps. It was then to exploit to hill 376882, if the situation so demanded. Simultaneously, the 9th Indian Infantry Brigade was to capture Hillock ‘B’.
At 0445 hours, Sapper working parties were to advance to the area of the road block and commence work on clearing a way through it. It had been estimated that this task would take thirty-six to forty-eight hours.
In the third phase, the ground captured was to be consolidated. If necessary, for the protection of the right flank of the 10th Indian Infantry Brigade, the 9th Indian Infantry Brigade was to be prepared to secure the ridge west of 385876 (Railway Ridge).
In the fourth phase, the 29th Indian Infantry Brigade was to capture Zeban Minor. This was not to be executed before 26 March. Fire programme for this attack was to be arranged mutually between the brigade commander and the commander Royal Artillery.
Exploitation by a Mobile Force
A mobile force called Fletcher Force9 was detailed for exploitation. The task allotted to this force was to advance down the main road to Keren in co-ordination with an attack by the 29th Indian
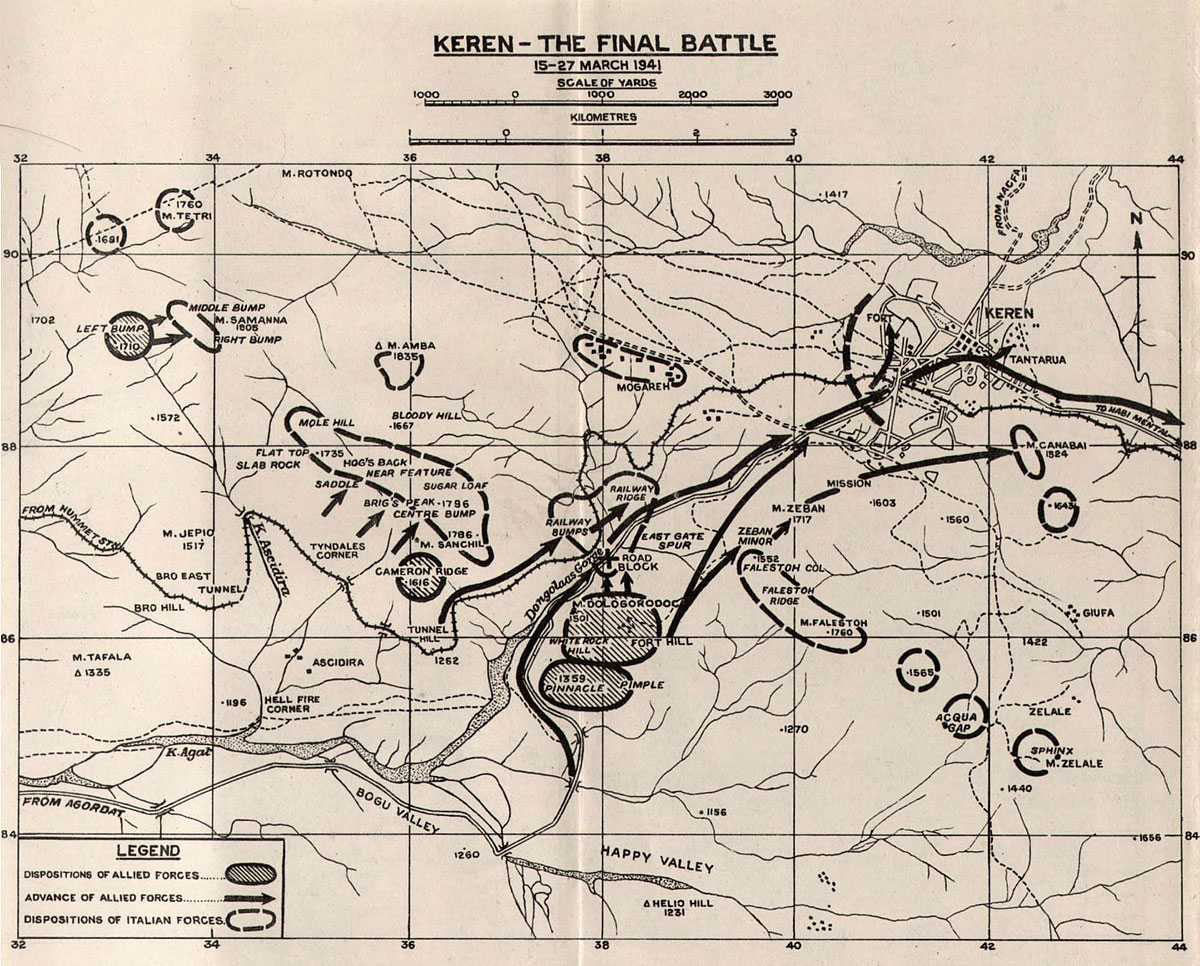
Keren—The Final Battle, 15-27 March 1941
Infantry Brigade on Zeban Minor. It was to cut. Italian communications and destroy guns, headquarters, rearward services and capture or destroy Italian forces in the Keren area.10 During the exploitation phase, the 10th and 29th Indian Infantry Brigades were to co-operate in accomplishing the above tasks as opportunity offered.
The 4th Indian Division was to hold its positions and try to distract Italian attention from the operations of the 10th Indian Infantry Brigade by active patrolling and harassing the Italians. It was also to be prepared to exploit towards Sanchil–Brig’s Peak-hill 358880, when ordered.
The 7th Indian Infantry Brigade was to co-operate, to the full, by exerting pressure on the Italians from the north.
The Attack
At 1745 hours on 24 March, 3 Royal Frontier Force Regiment reported that Italian artillery was registering Hillock ‘A’ (377863). At 2330 hours that night, a patrol from 2nd West Yorkshire Regiment occupied the feature and by 0430 hours two companies were established on it without the pre-arranged artillery support. Following this, 3/5 Mahratta advanced at 0430 hours and captured Hillock ‘B’ (380866) against strong opposition. By 0655 hours, it had taken a part of East Gate Spur. This came as a surprise to the Italians who retaliated by heavy and accurate shelling and mortar fire on 3/5 Mahratta and the road block, where the Sappers were already at work.
The attack by the 10th Indian Infantry Brigade started at 0430 hours on 25 March according to the plan and made good progress. The Italians had been expecting an attack from the direction of the Dologorodoc Fort, hence they were completely taken by surprise. Although they fought hard their opposition was overcome easily.
The objective of Railway Bumps had been divided into six separate points called ‘A’, ‘B’, ‘G’, ‘X’, ‘Y’ and ‘Z’. Going from west to east, ‘A’, ‘B’ and ‘C’ were along the southern edge and ‘X’, ‘Y’ and ‘Z’ along the northern edge. By 0700 hours, 2nd Highland Light Infantry had captured ‘A’, ‘B’ and ‘C’ and 4/10 Baluch ‘Y’ and ‘Z’.
3/2 Punjab had been placed under the command of the 10th Indian Infantry Brigade and was directed to capture Railway Ridge
(383876), starting at 0945 hours. By 1025 hours, it had secured that objective.
The situation on East Gate Spur remained unsatisfactory for some time. 3/5 Mahratta reached its objective but was forced off it by enfilade fire which inflicted heavy casualties. The battalion put in another attack at 0945 hours, in conjunction with an attack by 3/2 Punjab. By 1045 hours, the situation had improved with 3/5 Mahratta consolidating on Red Hill, a part of East Gate Spur. In all, this battalion was counter-attacked four times but held its ground in spite of heavy losses.
Work on the Road Block
The tasks allotted to the Sappers during this operation were:–
a. To clear mines from the road and railway as far as the forward troops might advance.
b. To construct anti-tank obstacles and mine the road north of the road block to cover the troops working on the demolition.
c. To clear a way for “I” tanks and carriers across the road block as soon as possible.
d. To send a Sapper party with the mobile force to assist in removing obstacles and mines during the exploitation phase.
The Sapper plan was for the 2 Field Company to advance at 0445 hours behind the artillery barrage and start work on the block as soon as possible. The first task on the block was to demolish the large boulders. At 1830 hours, the 20 Field Company was to relieve the 2 Field Company on the block and carry on work until 2330 hours when it would be relieved by the 21 Field Company. An officer from B Squadron 4th Royal Tank Regiment was detailed as liaison officer with the commander Royal Engineers 5th Indian Division to advise him on the extent of work required to make a way for “I” tanks and carriers to pass.
The 2 Field Company advanced at the fixed time and commenced work on the road block. Although the Italians kept up a heavy fire on the road to the south of the block, the work on the actual site proceeded without much interference, and satisfactory progress was made throughout the day. Italian shelling on the road block increased in the evening, but work continued throughout the night and, by 1430 hours on 26 March, a way for “I” tanks and carriers had been cleared.
The Operations
At 1350 hours on 25 March, the Commander 10th Indian Infantry Brigade reported that the Italians were massing for a counterattack at 390877 and asked for artillery to engage them. Thereupon the artillery engaged the Italian force and dispersed it. At 1340 hours, white flags were reported on Sanchil. Forward troops asked for artillery fire to be stopped but the General Officer Commanding 5th Indian Division ordered the fire to continue until the fire from Sanchil on the road block had stopped. The reports about the white flags, however, did not seem to be correct as the Italians continued to hold out. There were also reports of white flags on Zeban Minor but they were not confirmed.
During the night of 25/26 March, minor counter-attacks were put in by the Italians against 4/10 Baluch, in the Railway Bumps area, but were easily repulsed. Another counter-attack had been planned by the Italians to take place on the 3/5 Mahratta positions on Red Hill at 0500 hours. While the counter-attack troops were assembling the Mahrattas got scent of them and the attack was broken up by artillery and machine gun fire.
Also Italian movement eastward across the Mogareh plain was detected. All this seemed to indicate that they were preparing to withdraw. At 0725 hours, a patrol from 4/10 Baluch met a party of Italians who put up their hands. But on the approach of the patrol, they threw bombs at it and then ran away into the hills.
In planning for attack on Zeban the Commander of the 29th Indian Infantry Brigade had suggested that it would be best to attack at dawn on 27 March to save the troops from exhaustion from the stiff climb up to the objective. General Officer Commanding the 5th Indian Division, however, decided that, if the way across the road block was cleared, the 29th Indian Infantry Brigade was to be prepared to move at 1200 hours on 26 March. In his opinion a delay of several hours was likely to affect the subsequent operations adversely and the mere danger of the troops being exhausted was not enough justification for postponing the attack till the 27th.
It was however finally decided to start the attack at 0430 hours on 27 March. 3 Royal Garhwal Rifles was placed under the command of the 29th Indian Infantry Brigade for the operation. 3 Royal Garhwal Rifles had been relieved in Happy Valley on 25 March by the Central India Horse, which had, on that date, been placed under the command of the 5th Indian Division. The Commander of the 29th Indian Infantry Brigade had planned to attack on a two-battalion front. 1st Worcestershire Regiment was to capture
Zeban Minor and 3 Royal Garhwal Rifles, on the left, to capture the cross roads at 402883 and then to secure the line of the road Mission—Mogareh to the west of the main road. This would allow the main road to the north of the road block to be cleared of the mines. 6 Royal Frontier Force Rifles was to be in reserve.
The attack started at 0430 hours on 27 March with artillery support. When the infantry went in, very slight opposition was encountered and both the battalions had captured their objectives by 0600 hours. 6 Royal Frontier Force Rifles was ordered to advance through 1st Worcestershire Regiment and capture Mt. Zeban. This was done without opposition at 0730 hours.
It was now clear that the Italians had evacuated Keren. 6 Royal Frontier Force Rifles was ordered to exploit up to Mt. Canabai which was occupied at 1030 hours. Patrols were then sent out to round up the stragglers.
On the 4th Indian Division front, patrols, out during the night of 26/27 March, reported that the Italians were still holding their positions. At 0540 hours, 3/2 Punjab reported white flags on Sanchil. This was confirmed from more than one source by 0600 hours and arrangements were made to take over the positions. They had all been taken over by 1000 hours.
Operations of Fletcher Force
Fletcher Force was composed of following troops:–
B Squadron 4th Royal Tank Regiment (less one troop) (eight tanks)
Carrier Squadron Central India Horse—(seventeen carriers)
Carriers 9th Indian Infantry Brigade—(thirteen Brigade carriers)
Carriers 10th Indian Infantry Brigade—(thirteen Brigade carriers)
Carriers 3/1 Punjab—(ten carriers)
At stated above, the task allotted to this force was to break through in conjunction with the 29th Indian Infantry Brigade attack and destroy all Italian communications, headquarters and guns in the Keren area. Fletcher Force’s plan was to move with an advanced guard of one carrier Central India and one troop “I” tanks directed on to cross roads at 402883 as first objective and area 410895 as second objective. Of the main body, two troops carriers of Central India Horse were to move at the head and join the advanced
guard on the second objective. Two “I” tanks and one light tank were to go to the Mission. Two Central India Horse troops carriers were to go to the area 410895 and thence to the Nacfa Road. The 9th Indian Infantry Brigade carriers were to go to Tantarua in the north-east quarter of the town, while the carriers of 3/1 Punjab were to remain at the cross roads at 402883.
Crossing the start point at the bridge at 377846, at about 0500 hours on 27 March, the advanced guard got as far as the road block. In trying to cross it the leading carrier got stuck on an incline where the engine failed and it had to be cleared back. The “I” tanks then tried and the leading one got across at about 0600 hours, and the second at 0620 hours, while the third and last of the advanced guard crossed at 0640 hours. At 0700 hours, orders were issued to Fletcher Force stressing the importance of advancing up the Nacfa road and trying to cut the retreat of Italian troops in that area, opposing the 7th Indian Infantry Brigade. It was also told to try to advance on Habi Mantel from the north.
The 10th Indian Infantry Brigade was allotted the responsibility of looking after Keren.
At 0730 hours, Sudan Defence Force armoured cars were sent forward with orders to follow up the withdrawal of the Italians along the road. They were to be launched under orders of the General Officer Commanding 5th Indian Division as soon as he could get them across the road block.
By 1000 hours, the mobile force had got across and was well on the way in pursuit of the Italians. At 1230 hours, the leading elements of this force were reported to be about one mile*west of Habi Mantel. All the available aircraft had been put on to harass the Italians in their withdrawal.
7th Indian Infantry Brigade Operations
Owing to repeated delays in obtaining air photos it was not possible for the 7th Indian Infantry Brigade to attack until 27 March. In the intervening period continuous artillery fire was kept up on the Italian positions on Engiahat. Finally, an attack on Engiahat was planned in conjunction with the operations of the 5th Indian Division. Because morning mist prevented artillery observation, this attack could not be timed to start before 0730 hours. 4/16 Punjab pressed this attack with great vigour, the Chad Battalion co-operating on the left flank. The Italian resistance, however, was slight and it was soon clear that they had withdrawn the bulk of their forces during the night of 26/27 March. The Foreign Legion
Battalion was therefore immediately directed to advance into the Anseba valley to cut the retreat of the Italians and to establish contact with the 5th Indian Division. This was accomplished before dark and many prisoners were taken. 4/16 Punjab was ordered to advance to Mt. Gubcub and join up with 1st Royal Sussex, which was told to open the road to Keren.
Thus, after a siege of fifty-three days British and Indian troops entered Keren. The strategic possibilities of this position had been appreciated by the Italians for many years, and it was here that they had decided to make their main stand. They had concentrated the bulk of their forces in Eritrea in this area. From the build up of their forces and the statements of their prisoners it was clear that they were staking a great deal on holding this fortress. They feared that if Keren fell, Asmara, the capital of Eritrea, would also be lost. The selection of Fort Dologorodoc as an objective was very sound. Its capture put British and Indian troops in a strong position. Although it was overlooked by Sanchil and Falestoh, and was a very difficult position to hold, it was a key position in the system of the Italian defences. They wanted it back and their keenness was so great that, during the days following its capture, they made repeated efforts to take it and wore themselves out in a series of unsuccessful counter-attacks. In all, the Italians were estimated to have employed at Keren a total of thirty-nine battalions and thirty-six batteries. During the whole battle they used over thirty thousand infantry and one hundred and forty-four guns. Many of these were fresh troops.
General Frusci in his reports, admitted to having lost three thousand men at Keren including General Lorenzini. The total Italian losses probably were about ten thousand. He made much of the fact that he had managed to withdraw from Keren the bulk of his infantry and guns; but the fall of Keren had finally shattered the morale of the Italian Army. At the end of the battle of Keren there were only three battalions and few batteries uncommitted between Keren and Asmara. Practically all had been staked on holding Keren.
The British and Indian troops had fought hard and won. The battle was described by General Platt as “a ding-dong battle, a soldier’s battle, fought against an enemy infinitely superior in numbers, on ground of his own choosing which gave him every bit of observation against the movement of our troops, the positions of our guns and the approaches of our transport”. And it was won by “the tenacity and determination of commanders and troops, by
whole-hearted cooperation of all ranks, whether forward or back, of whatever race or creed, and by the continuous support given to infantry by the Royal Artillery...”. The British casualties were not light. Some 500 officers and 3,000 men had been killed and wounded. The 4th Indian Division was particularly hard hit. Yet the determination of the British and Indian troops to fight to victory was to leave its mark upon the Italians and to affect their conduct in the subsequent operations. They were never really to stand to fight again in the same spirit. The outcome of the contest in Italian East Africa was no longer in doubt. There were to be more battles and more victories before Italian East Africa was conquered, but Keren had broken the back of Italian resistance and subsequent operations were easier.
The conduct of the 4th and 5th Indian Divisions won them ready applause from several quarters. “The whole Empire”, wrote the British Prime Minister to the Viceroy of India shortly after the victory at Keren, “has been stirred by the achievement of the Indian forces in Eritrea.........”. He also congratulated Generals Platt and Cunningham upon “this timely and brilliant culmination of your memorable and strenuous campaign”.11 Lord Wavell, who had been awaiting the outcome of the battle with anxiety and had flown to the Sudan on 26 March to confer with General Platt, was evidently relieved. He found the victory “a fitting climax to the great work in Eritrea of the 4th and 5th Indian Divisions ably commanded by Major-General N. M. de la Beresford-Peirse and Major-General L. M. Heath respectively”. He could now well think of transferring some of the forces from this theatre to the more important areas of war. Eritrea had ceased to present a military threat to the Allies.