Chapter 10: SUPERCHARGE – a Victory
IN the early afternoon of 24 March General Freyberg received proposals from the Army Commander, first by message, and then in outline by liaison officer, for a large-scale attack on 25 March to blast a way through Tebaga Gap and allow armour to deploy in the open country beyond. Montgomery’s plan included a bombing attack heavier than usual on the enemy on the night 24–25 March, and preliminary low-level attacks for two or three hours to disorganise the defence. This would require maximum assistance with guiding lights for the air force. Zero hour would be about 3 p.m. so that the westering sun would be shining behind the attacking troops. (The enemy on the north-east and Eighth Army on the south-west was something new in desert fighting.) Montgomery asked for an immediate reply as to whether Freyberg agreed in principle, and said that in the meantime he was going ahead with all preparations at his end.
To this Freyberg replied that a night landmark would be arranged and that there would be no difficulty in staging an attack, but he would signal at length on the general situation and would suggest alternative plans. While he was in the course of preparing this full reply Lieutenant-General Horrocks arrived.
The change in command upset General Freyberg. He thought that in every way the correct answer would have been to leave him in command, even if it was necessary to send him a fresh corps headquarters. He was senior to Horrocks.1 But from Montgomery’s viewpoint the problem was straightforward. Tenth Corps was the Army Reserve. The Corps was complete with commander and staff, was fully briefed, and one of its divisions and some of the corps troops were to move with it, so that it was obvious that the simplest thing to do was to allow it to absorb the troops already on the spot and proceed with the battle, to which it would give fresh impetus. It will be remembered that NZ Corps had no separate corps headquarters, and it has been suggested that a bare
divisional headquarters might be tried too hard if suddenly it had to control double its existing force. In fact Horrocks said after his arrival that it was the headquarters staff of 10 Corps that was wanted more than the Corps Commander.
There is some evidence that Montgomery knew that there might be difficulties, and certainly both Horrocks and de Guingand were aware of the prickly nature of the situation. Between them all they did their best to make things easier. Horrocks and de Guingand agreed that all messages sent from Army Headquarters should go to both commanders, and Montgomery was careful in the wording of his various telegrams and letters. But it is small wonder that Horrocks sensed a frigid atmosphere when he arrived. One must have sympathy with him, for he was innocent of any offence. Freyberg was determined to make sure that no newcomer should intrude in the handling of 2 NZ Division, and was grim, firm, and not at all forthcoming.
In his message early on 23 March Montgomery laid down that 10 Corps was to take over when 1 Armoured Division arrived, probably in the afternoon of 25 March. After some discussion between the two commanders, they agreed that Horrocks should assume command at 6 p.m. on 25 March, that Freyberg should be responsible for the detailed planning of the forthcoming operation, and that, to all intents and purposes, Horrocks’s command would be effective after the break-in.
There is a difference of opinion between Horrocks and Freyberg over the responsibility for the message later sent to Montgomery, numbered 503, a draft of which was already in existence when Horrocks arrived. It had his concurrence, and it must be assumed that he agreed with it, although it is not difficult to see that the commander on the spot had for the moment the advantage. The message was sent ‘From Generals Freyberg and Horrocks’.
It described the bottleneck at PLUM, and said that hitherto the policy of NZ Corps had been to work along the high ground on the flanks and reduce the enemy’s observation over the gap. Alternative courses for future action were then given:
1. Carry on as we are going until we can force gap and pass 1 Armd Div through. This should be possible in from 5 to 7 days.
2. Carry on as at present and pass 1 Armd Div round Kebili to attack Hamma from west, thus further stretching enemy. This could probably develop night 27/28.
3. Carry out blitz attack by daylight with 8 Armd Bde supported by maximum air and five arty regts. This would be very costly but might break through.
In our opinion second course is far the best and is most certain to produce quick results and minimum losses.
Of these three possibilities, the first would obviously take too long. The second plan has an air of unreality, for it meant a further 60 miles’ march for 1 Armoured Division and would interpose an impassable range of mountains between the two wings of the outflanking force, and lose the virtue of concentration and of taking full advantage of a preponderance in tanks, guns, infantry, and air support. Moreover, a fresh line of communications round the west end of Djebel Tebaga could only add to the difficulties of supply, for when 10 Corps did arrive on the Tebaga front it had not completed its administration arrangements and leant heavily on NZ Corps for its first issues of supplies and ammunition. The third course more accorded with the Army Commander’s suggestion.
There is difficulty in determining the exact order of the communications which passed at this time, for it appears that Montgomery’s next letter was in fact written before he had received message 503, but after the return to Army Headquarters of his liaison officer. These liaison officers were all specially selected by him and formed a corps d’élite. They brought to him the atmosphere they found in the formations they visited as well as battle reports, and in this case it is possible that the liaison officer sensed that there was still a reluctance on NZ Corps’ front to thrust with full force. Whether or not that is the case, the fact remains that the letter given below shows that Montgomery was several laps ahead of anyone else in his thinking about the future. The relevant parts of the letter are as follows:
I want to speed up your thrust as much as possible, and I think we can do a great deal to help you by heavy air bombing all night and day. To take full advantage of this you would have to do an afternoon attack with the sun behind you. The plan would be as follows: –
a. Continuous bombing by Wellingtons and night bombers on night D-1/D.
b. Intensive artillery shelling for say one hour before zero. Smoke etc on high ground on flanks and/or to cover mine lifting.
c. Air cover and attacks by fighters on any movement to and from the battle area.
I do not believe that any enemy could stand up to such treatment, and you would, after it, burst through the defile quite easily and get to El Hamma and Gabes.
I believe it would be another SUPERCHARGE which would do the trick like we did it with SUPERCHARGE at Alamein. The army and air staffs are working it out and we can lay it on if you agree you will accept it. Date: the earlier the better. I would like D day to be tomorrow 25 March, 1 Armoured Division to be up by then, ready to exploit success on 26 March.
I think you would get surprise, as the enemy thinks we always attack at night. ... The RAF will play 100%. Let us call it SUPERCHARGE, and give me a date for D Day.
Enclosed with this letter was one from de Guingand, written after a conference with the AOC. After saying that the night strafe was to be intensified, he went on:
...
b. The Kittybombers will now carry out an intensive bombing and strafing period for about two hours before your attack goes in and will also operate during the attack itself dealing with any movement in the battle area and on the roads leading to the battle area.
c. By keeping quiet in the morning we have a better chance of obtaining surprise and if we do not start the Kittybombers sooner than zero minus two hours the enemy should not have time to withdraw his air forces from the central Tunisia front. We would be grateful if you would let us have the most complete picture of the enemy defensive lay-out as you see it, and any details of your plan, start line etc.
When message 503 did reach Montgomery, he cannot have found it at all helpful, and must have been confirmed in his view that he must take a firm grip2 of the forthcoming battle himself. In the event the outline plan was his alone, although the detailed planning of the break-in was Freyberg’s, a situation which does not support Freyberg’s later view that Montgomery went into too much detail and interfered with the freedom of action of his subordinates.
Generals Freyberg and Horrocks then replied, first, that they were considering SUPERCHARGE, but that it could not be carried out before 26 March as 1 Armoured Division would not be ready until then; and then later that SUPERCHARGE would definitely take place on 26 March. Air communication and adequate signal arrangements enabled all these messages and letters to pass during the afternoon of 24 March. Montgomery’s acknowledgment to this last telegram from Freyberg and Horrocks is the first to be dated 25 March. In it he expressed his delight at the news and, inter alia, said that he did not like their second course as it would split the outflanking force.
This exchange of telegrams and letters was in effect summarised in a letter sent by de Guingand on 25 March. It reads in part:
My Dear Generals,
(I feel as if I am writing to the old combination Hindenburg and Ludendorff!) This letter gives you the Army Commander’s views as to future operations.
1. Supercharge is virtually your course No. 13 with stronger and more intimate air support than we have ever tried before.
2. The Army Commander wants you to go 100% for Supercharge and produce a simple cut and dried plan and we will give you the maximum air support possible.
3. The Army Commander stresses the need to keep your joint resources concentrated and not dispersed; that is why he did not like the Kebili project as it placed a mountain range between the two divisions.
4. He feels sure that if we break into this front facing you, you can take considerable risks and, by pushing on deep, the enemy will be forced to pull back from the hills.
5. {Omitted – estimate of enemy morale, believed low.}
6. {Omitted – estimate of enemy morale, believed low.}
7. We are sending over Darwin. ... to help you tie up the air support for Supercharge. The RAF have ordered an armoured car to report to NZ HQ and it is proposed that Darwin should be located ‘cheek by jowl’ with comd 8 Armd Bde or whoever else is in a position to get the latest information as to how the air support is working. It is important that he should be able to see the battle area from a good OP, and he will then be able to give the pilots the low-down as to how they are doing. It is important of course that he does keep in the closest touch with one of our commanders as he must have an up-to-date picture. Sitting back here it would look as if 8 Armd Bde is the right location.
8. (a) Omitted – list of Spitfire and Kittyhawk squadrons.
(b) The length of time they can operate over area continuously depends on the Spitfire Sqns. These can operate continuously for two hours. Therefore you can expect continuous Kitty-bomber attacks throughout this two-hours period at the density of two squadrons.
(c) The important thing will be to decide on the correct timing. We feel that it might be best to start this intensive air effort about zero minus 30 minutes. This should thoroughly disorganise the defence at the psychological moment and allow the fighter bombers to continue supporting the attack during the most difficult period. You may, however, feel you would like a longer preparation beforehand but it is probable that your artillery will be able to deal with this.
(d) It will be most important to give the air force as soon as possible the maximum information as to your plan of attack and the areas and centre of enemy resistance guns etc that you wish to be attacked.
9. The Air Force are going flat out on this low strafing. It may be very expensive owing to flak and enemy opposition, but they have agreed to cooperate wholeheartedly because the Army Commander has told them it is the big thing in this stage of the campaign. They will not be able to stage such an intensive effort two days running.
It will be seen from the above that the air forces intended to make an all-out effort for a low-flying blitz, something new to Eighth Army. The risks were great, but the results might be immense.
Years later de Guingand pointed out that although Broadhurst had willingly taken on the assignment, there were those, some of high rank, who did not agree that he had been correct in doing so. The accepted doctrine was that the primary task of the
Air Force was to defeat the enemy air force, and that too close co-operation with the ground forces would impede this task, particularly if risk of losses was high.4
Preparations on 25 March
March the 25th was a day of conferences both formal and informal, and of planning on every level. The first formal conference was held with brigadiers and heads of services at 7.30 a.m., with General Horrocks present. All the details which later appeared in the operation orders were discussed, but two decisions were made for activities preceding the main attack. First, 5 Infantry Brigade was to capture Point 184 that evening (25 March), as the feature overlooked the lying-up area for the infantry; and secondly, all rearrangements of the existing front, including 5 Infantry Brigade’s taking over a sector of the front, were to be completed during the forthcoming hours of darkness. The troops were then to dig in and lie up in concealment all day on 26 March until zero hour. The tanks of 8 Armoured Brigade were also to lie up on that day, concealed in low ground running across the Gap behind the Roman Wall.
There was considerable discussion on the most suitable time for zero hour, which was chosen at the request of General Horrocks and of Major-General Briggs, commander of 1 Armoured Division. It was the latest hour possible which would give 1 Armoured Division time to pass through the forward troops before dark and reach an area in which to lie up until the moon rose, at 11 p.m. The timings for the whole operation were fixed with the intention of obtaining the maximum benefit from the sun, which would greatly limit enemy observation, consistent with the estimated times for the NZ Corps break-in and the move of 1 Armoured Division. Zero hour for NZ Corps was settled for 4 p.m., and the final objective was to be reached two hours later. At this point, 6 p.m., 1 Armoured Division would begin to move up through the battlefield, and by last light, about 7.30 p.m., would be in its lying-up area some five miles from the start line. Here it would laager until the moon rose and then continue on to El Hamma.
General Freyberg thought at the time that 1 Armoured Division fixed a late timing for its moonlight move, and events were to lend some support to this view, but there were difficulties in moving across country at night over unknown going, and an earlier start might have led to a general mix-up in the dark. On the whole it is probable that Horrocks and Briggs were right in deciding to wait until the moon rose.
Following this conference Kippenberger, together with the COs of 23 and 28 Battalions and their intelligence officers, made a reconnaissance from the high ground between Hir Benia and Zemlet el Madjel, and had what the brigadier later described as ‘the best view of an enemy position I have ever had’. The usefulness of the hills flanking the gap for observation was thus shared by both sides, although the enemy had the advantage in this respect.
In the afternoon of 25 March Freyberg held another conference attended by COs and above, by heads of services, by RAF liaison officers and by Generals Horrocks and Briggs, at which he reviewed the whole position and explained the details of the NZ Corps plan, which was the first stage of the full plan for the attack on and disruption of the enemy lines at Tebaga and beyond. New Zealand Corps would make the gap, 1 Armoured Division would then go through, and as soon as NZ Corps could clear its flanks it would follow to El Hamma and Gabes. It was firmly intended that, provided the NZ Corps attack was not a complete debacle, 1 Armoured Division would go through. General Horrocks has since said that General Freyberg was most insistent in asking for assurances that the tanks would go through, to which he replied, ‘They will go through and I am going with them’.5
The combined plan was sent to Army Headquarters by liaison officer in the afternoon, with Freyberg ‘s concurrence that the air-support programme should start half an hour before zero hour. The plan received unstinted approbation from the Army Commander, who signalled to both generals on the 25th that the plan was first class and, on 26 March, wrote to General Horrocks as follows:
Have seen your LO with plan. It is very simple and first class. The weather forecast is not too good. But dust and smoke and sun in his eyes will make it quite impossible for the enemy to see anything.
The more dust the better – provided that the RAF can see the battle area from the sky.
Am sending you and Bernard one bottle of brandy each. Good luck to you and the whole party. My very special regards to Bernard.
Orders for supercharge
Whatever Freyberg ‘s feelings may have been in the preceding forty-eight hours, he must have been relieved at the arrival of additional strength at the switch line, for a new vigour became apparent in the conduct of operations. The combination was now irresistible – Montgomery’s conception of a blitz attack to take place in the afternoon, Broadhurst’s readiness to provide overwhelming air support with new techniques, Freyberg ‘s plan for a set-piece attack to break through, and Horrocks’s determination that the armour would carry on relentlessly.
The actual plans are best explained by two orders issued during the night of 25–26 March.
The first is 10 Corps Operation Order No. 14, of which extracts follow:
INFORMATION
1. The enemy is now believed to be at full stretch and the only reinforcement on 10 Corps front which seems possible, is that 15 Pz Div might be extracted from Mareth to support 21 Pz Div. ...
INTENTION
2. 10 Corps will seize HAMMA.
METHOD
3. The operation will be divided into two phases.
Phase 1. The rupture by 2 NZ Corps of the enemy’s present line in the area Y.9009 [north-east of Point 201 ].
Phase 2. Exploitation by 1 Armd Div to include the capture of Hamma.
4. Phase 1
2 NZ Corps will advance astride the main road for a distance of 4,500 yards from the ROMAN WALL. Details of this operation are in process of production by 2 NZ Corps now.
ZERO HOUR will be 1600 hrs 26 Mar 43.
1 Armd Div will follow up the advance of 2 NZ Corps.
5. Phase 2.
1 Armd Div will pass through 2 NZ Corps at Z plus 200 minutes and will be concentrated NORTH-EAST of 2 NZ Corps final objective by last light 26 Mar 43.
When the moon is up i.e. approx 2315 hrs 1 Armd Div will move with centre line Main Road and capture HAMMA.
Subsequent to inception of Phase 2, 2 NZ Corps will destroy the enemy in the hills on either side of the centre line of the advance. This will be completed with the greatest possible despatch in order that 2 NZ Corps may rejoin 1 Armd Div in the HAMMA- GABES area earliest.
7. ARTY
1 Armd Div Arty (less 11 H.A.C.) and 69 Med Regt will be in support of 2 NZ Corps for Phase 1 of this operation. ...
8. AIR
For Phase 1 of this operation ALL air will be in support of 2 NZ Corps. During this Phase 2 NZ Corps will deal direct with Air Support Control on all matters affecting this Phase, HQ 10 Corps listening only. This support has been arranged to take the form of: –
(1) Night 25/26 Mar heavy night bombing of enemy forward areas on Corps front.
(2) P.M. 26 Mar until zero hour concentrated light bomber, fighter bomber and tank-buster attack on enemy troops, tanks and guns in the forward area.
From 1900 hrs 26 Mar air support will be controlled and arranged by HQ 10 Corps.
12. LOCATION HQS
G.O.C. 10 Corps Recce HQ will be established initially in the area of Tac HQ 1 Armd Div. By the beginning of PHASE 2 it will be located with Main HQ 1 Armd Div. Main HQ 10 Corps will remain present location until mopping up operations by 2 NZ Corps to the HAMMA area.
13. Code name of operation is SUPERCHARGE.
The second relevant order is NZ Corps Operation Order No. 2, of which extracts follow:
4. Air
From 1530 hrs for a period of two hours RAF is providing continuous fighter cover and direct air support for this operation. The following forces will be employed on this task: –
Sixteen sqns fighter-bombers
One sqn tank-busters
One sqn spitfires
INTENTION
5. NZ Corps will attack and capture the enemy position between Djebel Tebaga and Djebel Melab [map references given.]
METHOD
6. General
The attack will be made on a two bde front with 5 NZ Inf Bde on the right and 6 NZ Inf Bde on the left, 8 Armd Bde superimposed on the whole front. It will be supported by RAF and Arty
8. Start Line Boundaries etc.
See Trace ‘A’ attached.6
(a) ...
(b) Axis of advance: rd KEBILI – HAMMA.
(c) ...
(d) Boundaries
Inter-bde: rd KEBILI – HAMMA incl to 5 NZ Inf bde.
(e) Objectives
First: [2000 yards from start line]
Second: [2500 yards beyond first]
(f) Rate of advance
To first objective: 100 yds in 1 min
From first to second objective: 100 yds in 2 mins
9. Timings
(a) 8 Armd Bde cross ROMAN WALL at 1600 hrs at same time as arty bombardment commences.
(b) 5 and 6 NZ Inf Bde[s] cross inf start line immediately behind 8 Armd Bde at 1615 hrs.
(c) There will be no pause on First Objective.
10. Arty
(a) In addition to arty of NZ Corps, the attack will be supported by two fd regts and one med regt of 10 Corps
(b) Arty will support attack by a creeping barrage with timed concentrations on known enemy localities and hostile batteries.
(c) Timings for arty barrage are shown in Trace ‘A’.
(d) To indicate final objective has been reached arty will fire smoke for 4 minutes, 200 yds ahead of objective.
11. Special Tasks
(a) KDG: will maintain patrols as at present and be prepared to concentrate at short notice and pass through the bridgehead and exploit NE.
(b) Div Cav: In support 6 NZ Inf Bde to move NE and assist in mopping up in foothills on western flank.
(c) 8 Armd Bde: move in advance of inf during attack with heavy sqns leading, and regulating pace to the arty barrage. Regts will support bns as under:
Notts Yeo: 28 NZ (Maori) Bn
Staffs Yeo: 23 NZ Inf Bn
3 R Tanks: 24 NZ Inf Bn.
(d) Corps Res Gp: protection of Main NZ Corps
(e) ‘L’ Force: Maintain present tasks.
12. Action on Capture of Final Objective
(a) 8 Armd Bde: rally and form bridgehead and exploit to east and NE.
(b) 5 NZ Inf Bde: reorganise and exploit high ground to the east.
(c) 6 NZ Inf Bde: reorganise and complete mopping up of enemy pockets in foothills DJEBEL TABAGA.
17. Recognition signals
(a) Ground to Air
(i) Forward line of inf will burn orange smoke at the following times: –
1530 hrs
1540 hrs
1550 hrs
It is essential that orange smoke be shown ONLY BY FORWARD LINE OF TPS in order that RAF will see continuous line of smoke indicating FDLs.
(ii) Arty will fire smoke, rate one round per minute in general area of hostile batteries from 1530 hrs to 1730 hrs.
(iii) To assist RAF, 5 NZ Inf Bde will establish a landmark letter ‘A’ at [point one mile east of Pt 201] by 0700 hrs and will burn RED and BLUE smoke on the site on approach of our own aircraft. Between 1530 hrs and 1600 hrs the smoke will be shown every 60 seconds.
(b) Ground to Ground
Tracer fired vertically.
18. Zero Hour
Zero hour will be 1600 hrs, and is the time at which fire commences on the arty opening line.
19. Security
It is imperative that NO mention of this operation be made by wireless, other than in high-grade cipher.
20. Codewords
This operation will be known as SUPERCHARGE
21. Synchronisation
By BBC time signal.
Groupings for the attack were much as usual, the field artillery remaining under the CRA until after the barrage. The brigade groups each had two machine-gun companies attached instead of the normal one, and 5 Brigade Group had two anti-tank batteries.
Starting Positions for supercharge
Considerable rearrangement of battalion sectors was involved in the preparations. Fifth Infantry Brigade was to take over the front east of the Kebili – El Hamma road, and 6 Infantry Brigade intended to reorganise its remaining portion of the front. But the first essential was the capture of Point 184, for it completely overlooked the proposed start line, which for most of its length was in front of the existing FDLs. There could be no move until this feature was held securely.
In view of the previous failure to capture this point and of the absolute necessity of its capture, Brigadier Kippenberger entrusted the task to a whole battalion. The CO of 21 Battalion (Lieutenant-Colonel Harding) was given orders for the attack at 10 a.m. on 25 March, and spent the rest of the morning and the early afternoon on reconnaissance with his company commanders, and in arranging artillery support through Brigade Headquarters. All instructions were verbal, as there was no time to prepare written orders. At this time – about midday 25 March – 5 Infantry Brigade was still in the position taken up on 23 March as a counter to possible action by 10 Panzer Division.
The first objective was Point 184, known as Objective ‘A’, to be attacked by C Company (Major Laird7) with A (Captain Bullock-Douglas8) in support. The second was another knoll 1000 yards farther north, known as Objective ‘B’, to be attacked by D Company (Captain Murray9). The 4th and 6th Field Regiments
were to concentrate for fifteen minutes on both objectives and then for another five on ‘B’ only. One medium battery was to fire on ‘B’ for the full twenty minutes. The start line was at right angles to the Roman Wall and faced east towards the objectives.
The 21st Battalion began to move up at 6.30 p.m. and debussed at the Roman Wall south-east of Point 201. The companies formed up on the start line just before midnight, the artillery opened fire at 1 a.m. on 26 March, and the companies advanced and, despite some close fighting, captured both objectives by 2.50 a.m. A Company, in reserve to C Company, was not called on. The artillery preparation appears to have demoralised the enemy, so enabling our infantry to follow up quickly with the bayonet before they could recover. Enemy losses on Objective ‘A’ appeared to be only six killed, but thirty-seven were taken prisoner, all from 104 Panzer Grenadier Regiment of 21 Panzer Division. One truck, eleven heavy machine-guns, two mortars and much personal equipment was captured. On Objective ‘B’ twelve dead were counted, and eight were captured together with two mortars and one antitank gun. Here the enemy had fought harder; and shortly after D Company had consolidated, there was much noise from tanks and vehicles, and a counter-attack was suspected. Artillery support was called for at 3.15 a.m., and a concentration put down within nine minutes. It was effective in stopping any counter-measures.
The total casualties in 21 Battalion were four killed and seventeen wounded. Altogether it was a quick and clean operation. Before first light supporting arms – machine guns, mortars, and antitank guns – were in position, augmented by the mortars of 28 Battalion, which were to be on loan until that battalion advanced later in the day. There were distinct signs of an enemy attack about 8 a.m., but nothing happened, and no counter-action was taken, as it was not desired to alarm the enemy at that time.
Both the companies and their supporting weapons found great difficulty in digging in on the rocky ground, and had to build up rather than dig down. Enemy fire, heavy on occasion, made conditions most unpleasant up to the time the NZ Corps ‘ attack began. In this attack, 21 Battalion took no part, remaining in a right-flank protection role.
The brigade reorganisation could now go on without enemy observation from close at hand. Sixth Infantry Brigade had all three battalions in the line – 26 on the right, stretching out towards Point 184; 25 in the centre, mainly east of the El Hamma road, but with one company on the west; and 24 Battalion on the left, entirely west of the road. The brigade was now to attack with 24 Battalion only, with its right flank extended to but excluding the road.
A sequence of moves was now to take place in the following order – 28 Battalion to relieve 26 Battalion; 26 Battalion to occupy all 25 Battalion positions east of and including the El Hamma road; 25 Battalion moving out to relieve the Buffs battalion on the foothills on the extreme left. The 24th Battalion was to move forward to 1000 yards beyond the Roman Wall, with its right flank verging the road; 23 Battalion was then to move up between 28 and 24 Battalions. The final state of the line, in preparation for the attack, would then be 28 Battalion on the right, 23 in the centre, and 24 on the left. All the above moves were to be complete before first light on 26 March, for all movement after dawn was to be kept to the absolute minimum. Only troops whose training was thorough could have attempted such a reshuffle at night. In addition, patrols from 24 and 26 Battalions were to go out up to 1200 yards beyond
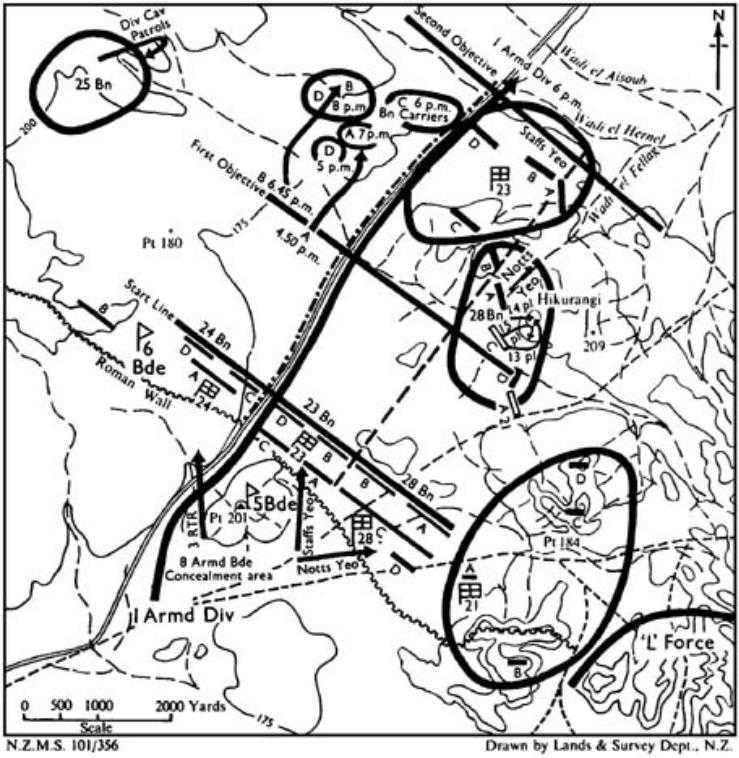
Operation SUPERCHARGE. the breakthrough at Tebaga Gap, 26 March
their new FDLs to discover if there were any minefields which might hinder the advance of the armour. Detachments of engineers moved with the patrols for mine-clearing. No incident occurred and no mines were reported.
The Maori Battalion moved early on 25 March, but did not occupy its forward position until after dark, initially relieving the forward companies of 26 Battalion. After a hot meal at 3 a.m., companies moved forward to the start line, except for B Company, on the extreme right, which was to be relieved by a company of 21 Battalion. This relief was delayed, and so B Company dug in some distance short of the start line, with orders to move off twenty minutes before zero hour so as to catch up. The battalion was dug in and out of sight by first light. Under command were one troop of six-pounders and one section of 17-pounders, a detachment of 7 Field Company and one platoon from 4 Machine-Gun Company. In addition, 28 Battalion was allotted temporarily the 21 Battalion carriers to protect its exposed right flank during the advance. The 28 Battalion mortars, on loan to 21 Battalion during the attack on Point 184, were to rejoin as soon as the advance started.
The 23rd Battalion moved off after dark and went as far as a lying-up position south of the Roman Wall. There the men bedded down until 3 a.m., when after a hot meal the advance to the start line commenced. Support arms were on the same scale as for 28 Battalion except for the exchange of mortars and carriers. Again, all were in position before daylight.
The 24th Battalion had only to move forward from its old positions. It had under command one machine-gun platoon and two sections of 8 Field Company, but no anti-tank guns, which for the time being were kept in brigade reserve.
After 23 Battalion had passed through, 26 Battalion took up a more concentrated position in rear. The 25th Battalion was withdrawn and at 2 p.m. moved across to relieve 1 Buffs of 8 Armoured Brigade on the foothills on the left flank, where that battalion had been since 24 March.
Artillery
Engineers from 7 Field Company conducted a mine reconnaissance of proposed artillery positions during 25 March, and made additional gaps through the minefield to allow regiments to get forward. In the afternoon 36 Survey Battery surveyed new forward positions for 4 and 5 NZ Field Regiments, 111 Field Regiment, RA, and 64 Medium Regiment, RA.
The artillery of 1 Armoured Division made a forced march and, except for one medium battery lost in a dust-storm, arrived after dark on 25 March and was deployed by the CRA NZ Corps in the
moonlight. By the morning of 26 March six field regiments and two medium regiments were all ready. It had been exhausting work, involving much digging and dumping of ammunition in the midst of a khamsin, which raised the dust and limited visibility to 100 yards.
The three New Zealand field regiments were to fire a barrage, 4 Field Regiment covering the right sector of the two into which the front had been divided, 5 Field Regiment the left, and 6 Field Regiment the whole front. From the artillery opening line to the finishing line was 4200 yards, divided into forty-two 100-yard lifts, all at right angles to the axis of advance. The opening line was to have twenty-three minutes’ shelling at a mixture of rates: the first ten lifts were each to last a minute at normal rate, the tenth lift coinciding with the first objective. There was no pause on this objective, and from then on the barrage was to lift 100 yards every two minutes.
During the barrage 2 and 4 Field Regiments, RHA, from 1 Armoured Division, 111 Field Regiment from 8 Armoured Brigade and 69 Medium Regiment from 10 Corps were to fire tasks, while 64 Medium Regiment (under command NZ Corps) was to fire a counter-battery programme. The task tables for all regiments included firing smoke at selected targets which were also to be attacked from the air, and this proved of much assistance to the RAF. The artillery firing the barrage was finally to fire smoke for four minutes, two hundred yards beyond the final objective, to indicate that it had been reached.
Rate of Advance
The rate of advance to the first objective, 100 yards in one minute, was a fast one for infantry and normally could not be maintained for very long. The reason in this case was that no enemy posts had been located between the start line and the first objective, and therefore no fighting was expected. Moreover, this was the area over which enemy defensive fire was expected, and which should be crossed quickly. Thereafter the rate fell to 100 yards in two minutes, which is still a fast rate.
Air Support
It has been seen above that great care was to be taken to indicate the leading wave of tanks and infantry, and it was hoped that the orange smoke would appear from the air as a continuous line.
The air attack was to open with simultaneous bombing by three squadrons of escorted light bombers, approaching at low level to achieve surprise. Thereafter two and a half squadrons of Kittyhawk
bombers would enter the area every fifteen minutes to bomb selected targets, including gun positions. Throughout the period Hurricane tank-busters were to break up enemy tank concentrations. The normal night heavy bombing would continue, and was directed against El Hamma for the night 26–27 March.
The following extract from de Guingand’s account of the campaign explains the genesis of this new departure in North Africa:10
We in the Army had always wanted to try out what is generally called a ‘Blitz’ attack. The Germans...used their dive bombers for that very close and intimate air support which we felt would prove very effective. Hitherto the close support given to the attack had always been by bomb from the light bomber, and the fighter bomber. The RAF had for very good reasons been against the dive bomber, but we felt the cannons from the fighter bomber with their bombs dropped from comparatively high the fighters might prove more deadly and disrupting to the enemy than altitudes. In view of the importance of this attack, and the narrow frontage to which we were confined, this did look to be the right occasion for trying out this type of attack. Using the fighter in this low-flying role over the immediate battle area was a considerable risk, and it was possible that the casualties would prove very severe. On the other hand, we felt that, from our own experiences from low-flying attacks, the defence took some time to recover equilibrium, and that some sort of temporary paralysis often set in.
The Commander of the Western Desert Air Force, Air Vice-Marshal Broadhurst, agreed to give full co-operation and supply ‘the whole boiling match’, and both commander and pilots entered into the plan with an enthusiasm that guaranteed success.
Brigade Operation Orders
Fifth Infantry Brigade operation order was received by battalions early on 26 March. The order largely recapitulated what has been said above in relation to 10 Corps and NZ Corps orders, but the following paragraphs applied particularly to the brigade:
8. The attack will be made on a two bn front, 28 NZ (Maori) Bn on right, 23 NZ Bn on left, supported by RAF, Arty, and with two regts hy tanks (Notts Yeo and Staffs Yeo) superimposed on Bde front.
...
17. Carriers
(a) Two secs carriers from 21 NZ Bn will report forthwith to 28 NZ (Maori) Bn and will come under comd on arrival.
(b) Carriers universal and mortar will move behind by tanks and ahead of light flanks with special tasks of: –
(i) Protecting flanks
(ii) Attacking and neutralising enemy A Tk guns
(iii) Covering exploitation and consolidation.
18. Special task: 21 NZ Bn will remain in present area and will assist adv by
(i) Giving protection to right flank
(ii) Neutralising all enemy fire possible.
19. Action on capture of final objective
(a) Exploitation
(i) 23 NZ Bn will exploit to limit of high ground on axis of adv.
(ii) 28 NZ (Maori) Bn will exploit to limit of high ground on axis adv and to high ground on EAST.
(b) Reorganisation: will proceed under unit direction on final objective.
20. MMGs: 2 NZ MG Coy will remain in present posn until further orders and maintain liaison with Bde HQ.
{This was the additional MG Coy in the Group.}
On 5 Brigade front, 28 Battalion, holding a frontage of 1400 yards on the exposed right flank, had the most difficult task, namely the capture of Point 209.
The 6 Brigade operation order was a simple one, as the brigade was attacking on a one-battalion front only. Special points were that 24 Battalion was to follow behind the Crusader tanks of 3 Royal Tanks as they crossed the start line. On the final objective the battalion was to reorganise on a 2000-yard front. The 25th Battalion was to support the attack with observed fire from its position on the left flank, and was to assist Divisional Cavalry in mopping up. The battalion was to be prepared to move forward and reorganise on the left of 24 Battalion once the final objective had been reached.
By dawn on 26 March the infantry was lying up in slit trenches, well camouflaged.11 Fires were forbidden and the men rested, for little sleep had been possible during the night. The forward positions, except those of 21 Battalion, obvious on Point 184, were not subjected to any increased shellfire in the period before zero hour, which is a tribute both to the success of the concealment, and to the battle discipline of the troops.
The plan for NZ Corps ‘ part in SUPERCHARGE had been prepared speedily, and was simple and clear. It showed the GOC and 2 NZ Division at their best, and could be taken as a model of its kind. The preliminaries to the attack were also much to the credit of the Division and of the commander who trained it – the decisive attack on Point 184, and the amazing rearrangement of units during the night 25–26 March, all showing good staff work and good training.
While this activity was going on at Tebaga, far away in the rear the road from Medenine via Hallouf Pass was open for mechanical transport by nightfall on 25 March, the advance of
4 Indian Division having uncovered the approaches. Contact between the two wings of Eighth Army was by that amount closer, but it does not appear that in the end much use was made of this route. New Zealand Corps did not use it, but continued to use the route via Wilder’s Gap to Gabes. Shortly after the attack an Army Roadhead was opened near Gabes, and NZ Corps wound up its administrative tail on the old route and commenced drawing from there.
The Enemy
It will be remembered that one of Montgomery’s reasons for changing his plan was that the enemy had committed his reserve (15 Panzer Division) to the Mareth front. By 24 March, however, 15 Panzer was withdrawn to a central position ready to reinforce either front, and was watching closely the situation at Tebaga. Tenth Corps was now moved to the Tebaga front and SUPERCHARGE was launched before 15 Panzer moved a second time. Despite the check at Mareth Montgomery kept the initiative.
During 25 March the enemy formations at Tebaga reported no special activity, except the Allied mastery of the air and vast superiority in ammunition. They comment ruefully that bombers were over their lines without a break all night. The 21st Panzer Division seems to have been disconcerted by the attack on Point 184, and soon decided that all it could do was to seal off the penetration.
The front opposite NZ Corps was still divided between 164 Light Division and 21 Panzer Division, with the dividing line the road running through the gap to El Hamma, but with tanks from 21 Division across the whole front. The 164th Division’s sector included the slopes of Djebel Tebaga, while 21 Panzer Division had its left flank on Djebel Melab. There were odd Italian groups of men – one can hardly call them units – interspersed along the front. The Germans merely mention ‘remnants of Mannerini Group’.
German documents record that on 25 March 21 Panzer Division had forty-four tanks, and 15 Panzer Division twenty-nine. But the number of tanks with these two divisions fluctuated widely from day to day. Twenty-four hours later 21 Panzer had only twenty-five tanks effective after our offensive, and on 27 March 15 Panzer had only nineteen. A report of 30 March shows 21 Panzer with thirteen runners and forty-five in workshops, while 15 Panzer had ten runners and twenty-five in workshops. The German repair system was good, and low numbers on one day did not mean that the numbers would not be high the next. All that can be said by way of generalisation is that the two divisions together did not have as
many tanks as 8 Armoured Brigade, which left 2 Armoured Brigade of 1 Armoured Division as clear profit – a very substantial profit of 67 Shermans, 11 Grants, and 60 Crusaders.
The enemy’s appreciation of Allied intentions was quite firm. The move of 10 Corps from Mareth had been observed late on 23 March, and continued movement was reported on the following day. His immediate reactions have been related,12 and although no orders appear to have been issued to units before the attack was launched, the probability of early withdrawal may have had some effect on dispositions, particularly those of 15 Panzer Division.
An Outline of supercharge II
Precisely at 3.30 p.m. the Air Force appeared, and for half an hour bombed and strafed enemy positions and gun emplacements. Then the guns opened and the heavy tanks of 8 Armoured Brigade moved forward from their concealed positions ready for the attack, followed by the first line of carriers. The sun shone behind the tanks as they moved forward, and the strong wind which had been blowing all day carried the stirred-up dust into the enemy lines; thus the enemy was not only looking into the sun but into dust and haze with the sun behind it. Moreover, the enemy was by now accustomed to the usual night attack, and was probably ill-prepared for a daylight assault. It was not until the first line of armour reached the start line at 4.15 p.m. that the enemy reacted, and it is not known whether this was due to the element of surprise, the poor visibility, or because the fighter-bombers kept the enemy crews away from their guns, but probably it was the result of all three.
When the leading tanks on the right flank ran into shellfire on the start line the tank commanders must have thought that they had caught up with the barrage, for the tanks halted. This was quickly noticed and the tanks were told to move on, after a pause of only a few minutes. The second wave of armour, Crusader tanks followed by carriers, had probably closed up a little, for at 4.20 p.m. the first wave moved on, closely followed by the second wave. Almost immediately afterwards the infantry moved into position approximately 200 yards behind the armour and the whole force was in motion. The Shermans and carriers, followed by Crusaders and carriers, followed by the lines of infantry of the three battalions, all advancing behind the fire of six field and two medium regiments, while overhead fighter, light-bomber and tank-buster aircraft flew in constant procession, represented the closest co-operation between land and air forces that the war in the desert had seen: it was the
perfect blitzkrieg. Behind the front line the tanks and lorried infantry of 1 Armoured Division waited, ready to move up and exploit success when the gap had been breached.
The advance to the first objective was accomplished without serious opposition, and for the infantry it was largely a matter of following the tanks. The enemy was obviously not prepared for a daylight attack, infantry and artillery positions being sited with a view to night defence.
The smoothness of the advance was interrupted beyond the line of the first objective. On the right flank the tanks were held up by the difficult, heavily defended feature Point 209, and forced by the going to bunch to the west. The 28th Battalion was halted and deployed to attack Point 209 and its western extremity, the underfeature later called Hikurangi.
In the centre momentum was not lost, although tanks and carriers met determined opposition on the reverse slopes of the feature between the first and second objectives. Opposition to 23 Battalion in the centre was chiefly on its right flank, where German infantry put up a determined, but short-lived, defence from well entrenched positions. This opposition was largely overcome by the carriers. The tanks, closely followed by carriers and the leading infantry companies, reached a line slightly short of the second objective at 5.56 p.m., twenty-three minutes after the barrage had lifted 200 yards to fire smoke as a guide to the infantry.
On the left sector, west of the road, the tanks were not far behind those in the centre. Here the advance had lost the precision shown earlier because of an unsuspected minefield supporting dug positions on the left flank. The tanks lost formation, and then advanced too quickly for the infantry; 24 Battalion encountered very stiff resistance from German machine-gun posts bypassed by the tanks, posts which were still being dealt with when 1 Armoured Division began to move up the El Hamma road. But, despite heavy casualties, the leading infantry company reached its final objective within five minutes of the tanks.
At 6 p.m. 1 Armoured Division passed through the forward positions to laager in its forward staging area until the moon rose to light the remainder of the advance to El Hamma. The gap had been won.
8 Armoured Brigade
While the regiments of 8 Armoured Brigade each operated on the front of one battalion, and were ‘in support’, the fact that they were advancing in front of the infantry gave them almost an independent role, and on the whole they adhered to their advance
without conforming to the varying fortunes of the infantry. It had been impressed on all the regiments that the important thing was to break through, and that they should not delay on account of individual battles or delays on the flanks of their advance.
Each regiment advanced with its heavy squadron of Shermans and Grants in front, following which came the carriers of the battalions, and then the Crusaders in the second line of tanks followed by the carriers of the armoured regiments. At this point the leading foot soldiers joined the advance. Notts Yeomanry had a rough passage round Point 209, but their war diary cheerfully reports that in the end they got to their objective. Staffs Yeomanry in the centre had the clearest run, and reached Wadi el Aisoub in advance of the final objective. Similarly 3 Royal Tanks on the left reached the same wadi, but only after some difficulty. None of the regiments lost touch completely with its affiliated battalion, although there was a period when the tanks were forging ahead on their own.
In this attack 8 Armoured Brigade lost twelve Shermans, one Grant and three Crusaders, but claimed the destruction of sixteen enemy tanks and sixteen guns. It took 130 prisoners. Of the three regiments 3 Royal Tanks had the heaviest losses, due partly to minefields and partly to enemy tanks.
28 (Maori) Battalion
The 28th Battalion advanced with A Company (Major Porter13) on the right and B Company (Captain Sorensen14) on the left; C Company (Captain Awatere15), 300 yards behind, covered both these companies, and D Company (Captain Matehaere16), another 300 yards in the right rear of C, had the special task of watching the exposed right flank. Two sections of carriers operated some two miles to the east as right-flank guard.
For three-quarters of the way to the first objective the battalion had few casualties, for enemy shelling was directed mainly at the tanks. But nearer this objective there were signs that stiffer opposition lay ahead. Point 209 was clearly held strongly, and already four tanks of Notts Yeomanry had been knocked out after pushing their attack with vigour. The tanks bunched to the left away from
Point 209 and advanced up a small wadi, and 28 Battalion also edged off to the left and finally was somewhat concentrated well to the west of Point 209.
Lieutenant-Colonel Bennett then went forward to the tank commander. The essential task was to clear the high ground on the right, with its many anti-tank guns, mortars and machine guns. Accordingly Bennett ordered C Company to swing right and capture Point 209, while the other three companies were to dig in where they were and so establish a firm base. It was then 5 p.m. and still light. A and B Companies were about 1000 yards beyond the first objective, but were still 1500 yards short of the final objective, while D Company faced right to the south of Point 209.
Topography now played a part, for the hill immediately to the right, C Company’s objective, was not in fact Point 209, but a steep underfeature west of and separated from it by a saddle almost 1000 yards long. There is some doubt whether anyone realised this at the time, but certainly both battalion and later brigade headquarters thought for varying periods that C Company’s attack was being made on Point 209 proper. Bennett was not certain when he visited the feature after dusk, and in the confusion of battle the point was not cleared up at that time. Brigade Headquarters had been informed that 209 had been captured and did not realise the mistake until the brigade commander went forward in the morning to see for himself. This meant that in the evening and during the night there was no artillery fire in immediate support of the attackers, and what fire there was came down on the reverse slopes of Point 209, in the belief that the summit of that feature had been captured. Had the true situation been known, Brigade Headquarters could have arranged for heavy artillery support.
The sub-feature was later called Hikurangi, after a mountain in the East Coast district of New Zealand from which C Company was drawn. The defenders came from II Battalion, 433 Panzer Grenadier Regiment, of 164 Light Division. C Company attacked Hikurangi with great dash, Captain Awatere working his three platoons with whistle and arm signal in a manner that was most impressive. No. 13 Platoon (Lieutenant Jackson17) worked round the hill on the right, 15 Platoon (Lieutenant Haig18) in the centre, and 14 Platoon (Second-Lieutenant Ngarimu19) on the left. No. 15 Platoon was pinned to the ground near the foot of the hill and could not get forward till after dark: 13 and 14 Platoons reached a point
near, but not actually on, the crest. The enemy, above them on the reverse slope, counter-attacked repeatedly, supported by intense machine-gun and mortar fire, but was gallantly withstood, although with severe losses to C Company. By nightfall when Lieutenant-Colonel Bennett visited Hikurangi, both Captain Awatere and Second-Lieutenant Ngarimu had been wounded. Awatere refused to go until his wounded leg had swollen so much that he could only crawl, and the command of the company passed to Lieutenant Jackson. Ngarimu asked to be allowed to stay, and was given permission. Bennett gave instructions that the hill was to be held at all costs, while the remaining companies were to be ready for counter-attacks. Battalion headquarters was established a few hundred yards from the foot of Hikurangi.
Lieutenant-Colonel Bennett was not at the time aware that the main attack had reached the final objective, and that a gap had been made through the enemy position. The capture of Hikurangi and Point 209 had now in effect developed into a private struggle between 28 Battalion and II/433 Panzer Grenadier Regiment, to be fought out with all the gallantry that grim determination can produce.
The battalion support arms came forward after dark and were deployed, and the mortars, now rejoined from 21 Battalion, were concentrated at the foot of Hikurangi; and equally acceptable was the arrival of a hot meal about 8 p.m. This was distributed throughout, even to the men of C Company who were within earshot of the enemy. The dead and wounded were removed from the top of the hill and signal lines laid to all companies from battalion headquarters.
However, there was no communication with Brigade Headquarters, and the brigade commander in some concern instructed 21 Battalion to send a patrol from Point 184 to make contact. This was duly done, but as it happened 28 Battalion was finally in touch by wireless with Brigade Headquarters about the same time. The report was then made that Point 209 had been captured. The battalion appeared to be in good order, but Bennett was concerned both about his open right flank, and in having all four companies committed. He tried to arrange for tanks to be placed on his right flank, but without success. His only reserve was the carrier platoon. Brigadier Kippenberger then instructed 21 Battalion to move one company forward to the right of 28 Battalion, and after sundry adventures, including an alarming encounter with a patrol from 23 Battalion, A Company of 21 Battalion (Captain Bullock-Douglas) arrived in position to the right of D Company, 28 Battalion. It was then 3 a.m. on 27 March. There was still a gap
between A Company’s position and that of D Company, 21 Battalion, on the northern hillock of Point 184.
About this time also, 23 Battalion on the other flank made contact with 28, and the latter’s brief isolation was at an end. The battalion was now in good heart for whatever the morning might bring.
23 Battalion
The 23rd Battalion advanced with B Company (Captain Robertson20) on the right and D (Captain Black21) on the left, with A (Captain Thomas22) behind B, and C (Captain Slee23) behind D. The battalion had comparatively easy going, for the ground was good for tanks, which advanced steadily in line, drawing most of the artillery fire. Lieutenant-Colonel Romans travelled well forward in a jeep, within speaking distance of the RSM of Staffs Yeomanry, who moved in a rear tank and was in wireless touch with the regimental commander. Romans was lucky, for a jeep amongst armour is a risky vehicle. His water bottle was shot from his side and several bullet-holes were drilled in the jeep’s seat.
The first objective was passed about 4.40 p.m. almost unnoticed, but more shell and machine-gun fire marked the advance to the final objective. However, many enemy defensive positions were now overrun, and Germans surrendered in dozens. Enemy tanks were driven off by Staffs Yeomanry and four destroyed. But touch was lost with 28 Battalion, the ground caused the tanks to bunch towards the left flank and the companies lost their precise formation. D Company on the left, for instance, drew additional support from the tanks on its front and got ahead of the others. There was increasing enemy fire as the troops reached the crest of a low rise (which was in fact the watershed of Tebaga Gap), but the momentum of the advance was enough to keep it going, and co-ordinated attacks dealt with some annoying anti-tank guns which had accounted for six Staffs Yeomanry tanks. The battalion carriers here did noble work, armed not only with Brens but with captured enemy weapons, and there were occasions when they engaged enemy anti-tank guns at close range.
During the advance down the northern slopes of the rise, there was increased fire from enemy positions which had already been
overrun by tanks. Many prisoners were disarmed and sent back but enemy fire increased. The tanks were by now under heavy antitank fire from the north side of Wadi el Hernel, and from enemy tanks there and in Wadi el Fellag, but were fast nearing the final objective. B Company on the right front was forced to go to ground, so Captain Thomas brought A Company forward to the right of B, and sent a section against the enemy in Wadi el Fellag, disorganising them and even inducing enemy tanks to withdraw.
About 6 p.m. both A and B Companies were dug in just south of Wadi el Hernel and D Company was on their left close to the El Hamma road, all only slightly short of the final objective. Staffs Yeomanry had by then cleared the area up to Wadi el Hernel, and 1 Armoured Division was beginning to pass through towards Wadi Aisoub. Patches of resistance on the right flank were soon cleared up, firing died down, and the battalion consolidated with the tanks laagered behind the forward companies. There was still, however, no link with 28 Battalion, and finally Lieutenant-Colonel Romans sent out a patrol from A Company, which met A Company from 21 Battalion advancing to support the 28th, and very nearly started a private war.
Battalion headquarters was set up well forward of the rise between the two objectives, but owing to a breakdown in the wireless set was not in touch with Brigade Headquarters until nearly midnight. The night proved uneventful.
The battalion war history records that ‘practically everything in this battle went according to plan for the battalion’, and it had scored a clear-cut victory on the vital sector of the front. The total casualties were 11 killed and 30 wounded, but over 400 prisoners were taken. The battalion had the highest praise for the Staffs Yeomanry.
24 Battalion
The 24th Battalion was delayed on the start line for almost ten minutes because 3 Royal Tanks mistook the enemy’s artillery fire for the supporting barrage and waited for it to lift. This rectified, the initial advance proceeded smoothly, but the delay caused the battalion to fall well behind the barrage. Twelve of the tanks paused briefly to embark two men each as ‘tank-riding crews’, one man with a sub-machine gun, and one with a bag of No. 36 grenades. This was the first time such action had been taken and, in fact, 24 Battalion was the only one to try the practice. The experiment was not a success.
C Company (Captain Seal24) on the right and D (Captain Dew25) on the left advanced behind the armour, with A (Captain Aked26) in support. B Company (Major Andrews27) was 600 yards behind in the left rear with orders not to become involved, but each of the forward companies had a section from B Company to help collect prisoners, and all companies had 3-inch mortars under command.
The advance to the first objective was uneventful. Lieutenant-Colonel Conolly, travelling in a carrier, moved forward to contact the tanks and try to speed up the advance, but enemy opposition became so strong that there was no question of catching up with the barrage. A ridge sloped down into the battalion sector from the west about midway between the two objectives, with a minefield on its southern slopes leaving a gap near the Hamma road. The top of the ridge was heavily defended by anti-tank guns. The defenders were from 125 Panzer Grenadier Regiment of 164 Light Division and some Italians supported by tanks from 21 Panzer Division.
Some tanks and carriers tried to burst through the minefield, but several were blown up, and others bunched towards the road to move over the ridge at the road end, where the enemy had placed his strongest anti-tank defences. Only on the extreme right of the sector did the advance proceed satisfactorily, and here the tanks reached the final objective shortly before 6 p.m. The delays at the minefield caused those tanks which cleared the area to speed up to catch the barrage, but thereby they left many enemy positions unattacked, and as their aim was to break through to the final objective they were of little assistance to the infantry. After the battle, Lieutenant-Colonel Conolly spoke strongly about the need for a better system of communication between battalion and regimental commanders, the only method open to him being to climb into a tank and use the regiment’s internal link. The battalion was now confronted with an enemy which was probably numerically stronger and was firmly entrenched. C Company passed just to the east of the minefield and continued to advance, but with its left flank in the air, as D Company on its left was faced with stern opposition from the ridge in front of it. It was during this progress almost across the enemy’s front that C Company suffered its heaviest casualties. Many posts were mopped up but others had to
be left, and it was now that the men riding on the tanks were sorely missed. Prisoners were merely disarmed and sent back as there were no spare men for escorts despite the extra section from B Company. But Captain Seal kept the company going, and alone among the companies of 24 Battalion it reached the vicinity of the final objective by 6 p.m. Later some carriers, sent forward by Lieutenant-Colonel Conolly after he had visited the company, were used to fill the gap caused by the absence of D Company. Thus C Company’s success, plus that of 23 Battalion and 8 Armoured Brigade, cleared a sufficient gap in the centre of the enemy line for 1 Armoured Division to progress astride the vital axis of advance.
In the rear of C Company the position was not good, and among other complications, unguarded prisoners picked up abandoned weapons and resumed hostilities. In this confused situation some of our wounded were killed. On the left, D Company reached the first objective without difficulty, and then arrived at the minefield from which the tanks had swerved away. By now the barrage was lost, but Captain Dew had been told that the infantry attack must continue, and all three platoons crossed the minefield and advanced under heavy fire against the ridge beyond, capturing some twenty prisoners who were sent to the rear without escort. The commander of 16 Platoon, Second-Lieutenant Cater,28 was killed and gradually every man in the platoon became a casualty; 17 Platoon was finally pinned to the ground in front of an enemy strongpoint and its commander, Lieutenant Friend ,29 was wounded; and 18 Platoon reached the crest of the ridge and was closing with the enemy when, among other casualties, its commander, Second-Lieutenant Woodcock,30 was killed. The company had maintained its offensive till the last but was by now exhausted of manpower and incapable of further effort.
A Company in support then became involved, and was held up behind the minefield, where it found several tanks knocked out as well as the mortars of D Company. No. 7 Platoon was sent round the western end of the minefield, and 8 and 9 still farther to the left, in an attempt to outflank the strongpoints at the top. They managed to move forward for a while, but it was slow progress. For the moment Captain Aked refrained from launching any stronger attack until he could discuss the situation with the battalion commander, and he withdrew 7 Platoon which was making no progress.
Now B Company, the reserve, came into the picture. The company commander, Major Andrews, could see the trouble ahead, and leaving his company under cover went to battalion headquarters, soon to be joined by Captain Aked. Lieutenant-Colonel Conolly was at the moment away in his carrier with C Company, and the adjutant, Captain Boord ,31 had been wounded some time before; and so Major Andrews was left to make his own decision, which was to attack farther on the left, where there was a chance that he would outflank the enemy and even link up with 25 Battalion.
Unknown to him, however, Lieutenant-Colonel Conolly sent back a radio signal to B Company ordering it forward on C Company’s axis, with the idea of taking the enemy strongpoints from the rear – in other words exploiting success. But B Company’s signal arrangements had broken down and the message was never delivered.
So B Company moved off to the west and then advanced in extended order across the minefield, but as soon as it emerged from a patch of dead ground it was faced with heavy small-arms fire and was gradually forced to ground. After a while Andrews thought it was serving no useful purpose to stay there in daylight – it was about 6 p.m. – and so withdrew the company and re-formed, reporting back at once to the battalion commander.
At Headquarters it was found that the position had improved. There had been a conference between Lieutenant-Colonel Conolly, Captain Aked and Captain Dew, the last-named describing the losses of D Company and the obscure position on his front, where, however, the company had now made some progress. So Conolly ordered A Company to carry on with its attack, and Aked decided to go on in one line with the two platoons left to him. No. 7 Platoon had not yet reported back. With mortar support A Company charged forward, withheld their fire until at short range, and then closed with the bayonet. The verve of this attack at the double overwhelmed the enemy and all the enemy troops not killed surrendered at once. The company advanced down the northern slopes of the ridge for 300 yards and then reorganised, having taken ninety-two prisoners. A surprising reinforcement to this attack came from seven men of 3 Royal Tanks whose vehicles had been knocked out, but who had joined A Company in its last assault.
So with this foundation Conolly ordered B Company to renew the attack wide on the left, and the advance was resumed at 9 p.m.; but the enemy had retired. Later about eighteen survivors from D
Company were added to B, and the company advanced steadily and consolidated on the left of C, a little short of the final objective. This move concluded 24 Battalion’s attack, and by 10 p.m. the sector was stable. Expected counter-attacks did not eventuate, and by 2 a.m. on 27 March the whole area had been combed for enemy troops, and all companies were reorganised and dug in. One company from 26 Battalion was standing ready to help with mopping up, but this assistance was not required.
Casualties in 24 Battalion were fairly heavy – 49 killed and 58 wounded, a much higher proportion of killed to wounded than is normal. The medical records show that the proportion of killed to wounded all across the front was higher than usual, owing possibly to the fact that this attack was made in daylight.
The battalion had captured between 400 and 500 prisoners, and another 150 were rounded up in the morning; and enemy casualties in killed and wounded were high also. Inspection of the enemy position disclosed just how strongly it had been prepared and fortified, but a sustained offensive by 24 Battalion, combined with success elsewhere, had overcome all opposition.
Flanking Units
The 21st Battalion on Point 184 continued to be shelled throughout the Corps’ attack, but as the advance progressed the shelling came from the east only. Any movement from the hastily constructed slit trenches was almost impossible, and for the moment the battalion was held down to its defensive role.
The 28th Battalion had sent two sections of its carriers to operate up to two miles on the east of the battalion, with the task of stopping interference from that area. Both sections drew a considerable amount of fire, but they ranged far and wide and engaged anything that showed signs of movement.
On the left flank of the Corps 25 Battalion made a diversionary attack to draw enemy fire away from the left of 24 Battalion, distant about 2000 yards. No definite objective was given the battalion, the governing factor being the amount of opposition encountered. There was some progress on the right, an enemy position was captured, and after dark about fifty Italians surrendered. On the left the companies ran into heavy opposition from tanks, and were in the end pinned down and surrounded. The situation was saved by the battalion anti-tank platoon under Lieutenant Williams.32 It destroyed one tank, and then in turn pinned down the others, until finally they withdrew. After dark,
when it was known that the main attack had been successful, all companies were withdrawn.
Divisional Cavalry patrolled all day in the foothills of Djebel Tebaga without any serious engagement. KDG and ‘L’ Force remained on Zemlet el Madjel and Djebel Melab, where ‘L’ Force worked towards Point 242.
Throughout the action there was practically no enemy counter-battery activity or air interference. Only one unit mentions the appearance of enemy aircraft and it refers to one ‘very slight fighter-bomber raid’. The only trouble came from a Kittyhawk fighter-bomber which attacked a Divisional Cavalry carrier and caused two casualties, and also strafed 6 Brigade Headquarters three times. The pilot was apparently badly briefed for this was the only case where our aircraft made a mistake, a tribute to the system of marking ground positions which had been evolved.
1 Armoured Division
Although 28 Battalion had not captured Point 209 by nightfall, the result of the attacks of 23 and 24 Battalions was to open the gap for 1 Armoured Division, which advanced at the appointed time, and by last light was some four miles beyond the final objective. The appearance of the mass of tanks and other vehicles moving steadily forward was a very comforting sight.33
The 1st Armoured Division halted until the moon rose (about 11 p.m.) and then continued its advance towards El Hamma, disregarding the scattered fighting still going on in NZ Corps ‘ area, and disregarding also the German troops and their defences still in position between NZ Corps ‘ final objective and El Hamma. The division was thus passing through the remnants of 164 Light Division, and even more spectacularly was passing through 21 Panzer Division, which although only a shadow of its former strength was still a foe to be respected. During its advance the division charged through the headquarters of both the German divisions, so increasing the confusion.
For the moment, however, the activities of 1 Armoured Division had ceased to be the concern of NZ Corps.
The Enemy
During the morning of 26 March the enemy plans for the formal withdrawal from the Mareth Line were settled, although apparently the Italian formations in the line made it more difficult by beating
the pistol and then demanding that the Germans cover their withdrawal. (Memories of the retreat from Alamein were still bitter ones.) There had been some idea of taking up an intermediate position on Wadi Zerkine, some six miles in the rear, but the final decision was to go straight back to a line in front of Gabes, the first stage to be on the night 26–27 March.
The loss of Point 184 early on 26 March was enough to cause part of 15 Panzer Division to be sent forward to strengthen the German left flank, but while the enemy was still taking steps to remedy this defeat, the afternoon attack burst on him with staggering force, and for the first time in the period covered in this volume there are clear signs of disorganisation and even panic. The opening air attacks were in themselves most effective. On the front of 21 Panzer Division traffic to and from the fighting line became impossible, and the artillery of 164 Light Division lost more than half its guns. There was a frantic appeal for help from the air, but by 6 p.m. not a single Axis aircraft had been seen by 21 Division.
On that division’s front the position at dark was not bad, as it had not been directly attacked, and Point 209 on its right was still holding out. The strength of the NZ Corps’ attack came as a surprise to 164 Light, whose communications had already been dislocated by the blitz attack; but despite the knowledge that a
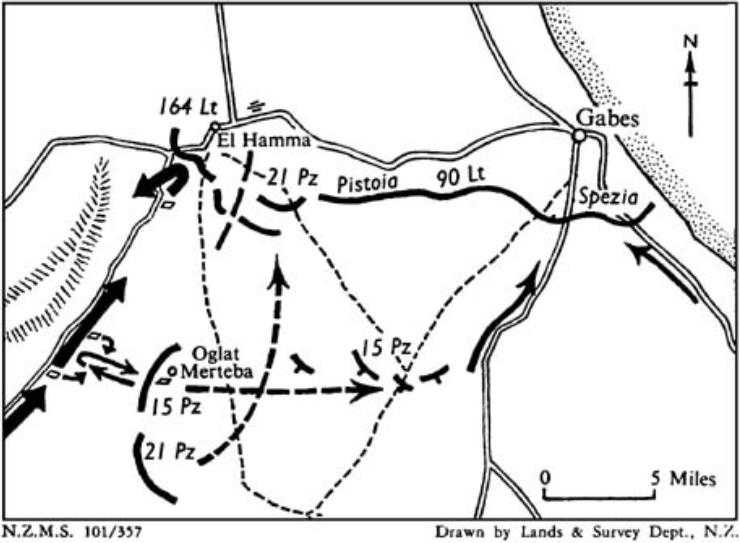
Liebenstein Group positions, 27 March, showing advance by 1 Armoured Division and counter-attack by 15 Panzer – a trace from enemy records
wide penetration had been made on its front, its commander, von Liebenstein – who also commanded the whole Tebaga front – took steps to restore the situation, including bringing the engineer battalion into the firing line. He then decided that 164 Light would fight it out on the right, while a combination of 15 and 21 Panzer Divisions on the left counter-attacked against the right flank of the advancing NZ Corps.
But the results of 1 Armoured Division’s penetration at midnight and later were catastrophic, and the whole front, at least as far as 164 Light Division was concerned, collapsed. But again von Liebenstein did all he could to restore the situation by placing a large concentration of anti-aircraft guns astride the track to El Hamma to stop the British tanks. These guns did not open fire, because they had never expected tanks to push ahead in the dark and took them for German. Had they opened fire, it might have seriously affected 1 Armoured Division’s advance, but on the other hand might have only increased the confusion in the German ranks – a confusion that was certainly made no less by the appearance of British tanks passing through the divisional headquarters. One enemy battery was actually overrun by our tanks and was wiped out.
After what must have been a period of great tension among the various commanders and staffs, it became obvious that 164 Division was in no state to stand and fight any further, and must break clear; so an immediate withdrawal was ordered to the south-west of El Hamma, where a centre of resistance would be organised to cover the withdrawal of forces from Mareth. The 3rd and 33rd Reconnaissance Units, which all this time had been north-west of Djebel Tebaga, were ordered to move at once to the defile south-west of El Hamma, and a garrison which surprisingly was still at Kebili was withdrawn. From far and near the various commanders – Bayerlein at Liaison Headquarters and von Liebenstein at 164 Light Division – began to collect units and bits of units to form a new line. It was a remarkable effort of improvisation and of restoring order out of near-chaos – particularly as 164 Division was short of MT, and some of the troops had to walk back across Djebel Tebaga.
One ripple of the disorganisation was that II/433 Panzer Grenadier Regiment on Point 209 was cut off from communication with its own division, and was transferred to the command of 21 Panzer with which it had kept touch. The 21st Panzer Division was not much affected on its own front by the general upset, but its tanks were well spread and the breakthrough threatened to surround and cut off much of the armour remaining to it. What can only be called a sauve-qui-peut instruction was sent out to the tanks, but in the end some sort of order was restored.
The following is an extract from 21 Panzer Division’s war diary for 27 March:
0001 hrs {i.e., midnight 26–27 March}: Report received that enemy tanks were advancing 2 km south of Div Battle HQ.
0015 hrs: The G 1 decided to move battle HQ. The move had to be made in a hurry, as the enemy tanks had advanced to a point level with Div Battle HQ and were spraying the area right and left of the track with fire. The Ops staff like many other German units, took advantage of the heavy sand-storm and disengaged from the enemy unseen, moving parallel to the enemy advance.
The only hope was that at first light 15 Panzer Division, now complete after its move, would be able to counter-attack and relieve the pressure, but at what must have been a tense conference at 8 p.m. the commander of 8 Panzer Regiment of 15 Panzer Division reported that he had only ten runners.
Strangely enough, 21 Panzer Division reported that it was 4 Indian Division that had attacked – possibly the Maoris were mistaken for Indian troops. At this time 4 Indian Division was no farther north than Toujane.
Point 209
For NZ Corps the full capture of Point 209 had never been of the first importance. It was enough to blanket it and prevent the enemy from interfering with the move of 1 Armoured Division and the later follow-up by the Corps. In the end the move forward of NZ Corps commenced before Point 209 was finally subdued, and the struggle there thus remained an isolated one between two fairly equal infantry units, one of which had great resources to support it, while the other was in effect abandoned by its parent formation and left to its fate.
During the night 26–27 March the struggle on the top of Hikurangi continued, the enemy launching repeated counter-attacks. The enemy battalion disposed two companies on and around Hikurangi, headquarters and one company on Point 209, and one company behind 209. The Maoris and the Germans on Hikurangi were only about twenty yards apart, and each time the sound of footsteps gave warning of another attack the men of 13 and 14 Platoons threw hand grenades. When the enemy once broke into 14 Platoon’s sector Ngarimu moved there, killed some Germans with his Tommy gun, and scared others away by throwing stones as if they were grenades. ( No. 7 Company of II/433 Regiment also used stones on occasion.) C Company’s casualties gradually mounted. The hill was held, but by morning Lieutenant Jackson reported that it was doubtful if the company could hold out much longer, as only about twelve men were left, so two sections from D Company were sent up as reinforcements.
The last counter-attack came while this decision was being made, 7 Company having been reinforced by two other platoons. It was watched anxiously from the foot of the hill. Ngarimu was seen waving his men on, Tommy gun in hand, and then at last was shot down on the crest of the hill. For a moment it looked as if the enemy would regain Hikurangi, and the battalion carriers were brought forward to cover the area; but this was the enemy’s last effort, and they shortly afterwards withdrew to Point 209. We know today that in this last attack all the enemy platoon commanders and half the men became casualties.
D Company under Captain Matehaere was now ordered to take over the defence of Hikurangi.
The brigade commander was at this time with Lieutenant-Colonel Bennett. He had first visited 21 Battalion and then moved north to 28 Battalion. Only then, from the profile of the feature thus presented, was it realised that Point 209 proper was still in enemy hands. He telephoned the Brigade Major (Major Fairbrother34) and ordered heavy ‘stonks’35 on Point 209, saying that it was perfectly safe for 28 Battalion for they were well short of that point. The artillery complied with alacrity and with great effect. The first concentration was fired at 8.42 a.m. by two field and two medium regiments, and was repeated several times, causing devastating damage.
Brigadier Kippenberger impressed on Bennett that the offensive must be maintained, but was content to leave it to 28 Battalion as he was sure the feature must sooner or later fall by the weight of events. He then moved on to 23 Battalion, told them of the position, and gave orders for help to be given to 28 Battalion if asked for.
Meanwhile Matehaere’s company relieved the remnants of C Company. There was considerable enemy activity on the Corps’ right flank, but despite one or two indications, including the movement of tanks, no counter-attack developed and the impression gained ground that the enemy was withdrawing – but not yet from Point 209.
The first signs of weakness came at 10 a.m. when two Germans tried to surrender, but not making this obvious enough they were shot down. Then about 11 a.m. four Germans, a doctor and three
medical orderlies, came over under a Red Cross flag. The doctor asked in fluent English for assistance for ninety badly wounded men, as they had run out of medical supplies. With the permission of Brigade Headquarters it was arranged that the wounded should be brought to 28 Battalion Regimental Aid Post, stretchers being lent for the purpose.
At midday the doctor was back again with a long column of wounded and with twenty others who had come to surrender. From interrogation it was clear that the enemy could not resist much longer, and Bennett decided that the time had come to deliver a final blow. D Company was warned to be ready to attack at 3 p.m. Bennett then made local arrangements with a nearby British field regiment (unidentified) for a concentration on the top of Point 209 at 3 p.m., and also arranged for the 23 Battalion mortars to fire concentrations on the reverse slopes.
As it happened the artillery concentration was of no use, as the fire came down not on Point 209 but away to the north on B Company, 28 Battalion, and even on A Company, 23 Battalion. The guns were stopped, and Matehaere asked whether or not he was to go on. He was ordered to proceed, and D Company advanced over the top of Hikurangi and as far as the foot of Point 209, but was then forced to ground by machine-gun fire.
This was the critical moment of the attack, but the CO detailed two carriers mounting heavy machine guns to go forward, and at the same time arranged supporting fire from two machine-gun platoons. The carriers moved in on Point 209, one from north and one from south, and the 23 Battalion mortars fired steadily. At the right moment Matehaere and his company rose and charged up the hill. Many men of the Maori Battalion were now standing on Hikurangi urging the attackers on with cheers and hakas – and the enemy collapsed and surrendered. By 5 p.m. the surrender was complete. A total of 231 Germans, including the commander, Major Meissner, his adjutant and three company commanders, were rounded up. They had put up a stout defence and their CO attributed their capture to their lack of transport. The culminating point for the enemy, the adjutant claimed, had been the appearance of the carriers, which were mistaken for tanks.
A report by a company commander, however, makes it clear that the battalion commander had decided to surrender soon after midday and that the period thereafter had been spent preparing for
this. The company commander would not accept the order to surrender, and in the end succeeded in getting some forty-two men from the battalion through to Gabes. Despite this achievement it seems certain that the battalion was in fact at its last gasp, having neither ammunition nor transport, with large numbers of wounded, and with no hope of relief.
The 28 Battalion casualties on 26 and 27 March were 22 killed and 77 wounded – again a proportion of killed to wounded slightly higher than normal.
For his outstanding service in this operation, Second-Lieutenant Ngarimu was posthumously awarded the Victoria Cross.