Chapter 4: Completing the Capture
Japanese Raids on Tarawa
The beach defenses manned by the victorious Marines at Betio were never tested. Although the Japanese had hoped to respond to an American invasion of the Gilberts with an interception operation—a combined attack by aircraft, submarines, and surface ships—the swift capture of the key atolls made the enemy plans obsolete before they could be activated. The most important element of the counterattack force, carrier air, was rendered impotent by losses of Rabaul early in November. Little choice was left the Japanese but to turn their attention from the Gilberts to the Marshalls.1 All that the enemy could send to aid the defenders of Betio and Makin was a few planes and submarines to stage harassing attacks against the task forces of Admirals Turner and Hill.
On the afternoon of D-Day at Betio, after the invasion ships had been alerted to expect an aerial attack, a single plane winged toward the fleet at an altitude of about 300 feet. Antiaircraft gunners opened fire, and the target settled toward the surface of the sea. The plane was not hit, fortunately in this instance, for it was an observation craft from the Maryland, carrying Lieutenant Colonel Jesse S. Cook, Jr., D-4 of the 2nd Marine Division. After drifting throughout the night, Cook’s pilot managed to taxi his plane back to the battleship.2
Just before dawn on 21 November, approximately eight enemy aircraft soared over Betio, dropped a few bombs, and returned to their base. Four planes bombed the island on the following morning, but again the Japanese aviators ignored Admiral Hill’s shipping. The task force, however, remained on the alert for a major aerial attack from either Mille or Maloelap in the southern Marshalls. (See Map 7.)
The gravest threat to the transports came not from planes but from submarines. At noon on 22 November, the destroyer USS Gansevoort reported a contact with a submarine to the west of the transports. Other contacts with this marauder were made during the afternoon, but not until 1627 was its position fixed. The destroyers Meade and Frazier took over from the Gansevoort, dropping depth charges until the enemy was forced to surface. Shells from the Meade and Frazier burst around the damaged raider. Finally, the impatient Frazier rammed the submarine, sending her plummeting to the bottom. The few Japanese who
survived to be taken prisoner identified the doomed vessel as the I-35.3
Aside from these few incidents of support, the enemy left the defense of Tarawa to the hopelessly cut-off garrison. What success the aerial and undersea counterattacks had was gained at Makin.
Makin Taken4
At Makin, the fire support ships began launching spotter planes at 0540 on 20 November, while Admiral Turner’s attack force was about three miles from the island. The transports carrying the 6,472 assault troops of the 165th RCT slipped into their designated area at 0601 and began lowering their LCVPs and debarking soldiers within a few minutes. While the landing craft were rapidly filling with men and weapons in the gathering light, carrier aircraft struck targets on Butaritari Island. At 0640, the naval support ships began firing a preparation that lasted until 0824, by which time the island was hidden in a haze of dust and smoke.
As the waves of assault troops of the 165th Infantry were forming off the western end of Butaritari, the only Marine unit to fight at Makin was making a preliminary landing. The 4th Platoon, VAC Reconnaissance Company, along with a rifle platoon and a machine gun squad from the 165th, occupied Kotabu, a reef-fringed islet that guarded the entrance to the atoll lagoon. Although this effort was unopposed, the Marines later saw action on 21 and 22 November when they assisted in the mop up on Butaritari.5 (See Map 4.)
General Ralph Smith had been able to obtain the LVTs he wanted to spearhead the assault landing at Makin, although they arrived in the Hawaiian Islands only 13 days before their LST transports were due to sail for the target. Forty-eight tractors, manned by a provisional company from the 193rd Tank Battalion, and loaded with men of the 3rd Battalion, 105th Infantry, made up the first wave. Off the western beaches, 32 LVTs, formed in two inverted Vs, led the landing craft carrying the 1st and 3rd Battalions of the 165th Infantry into the silent shore. The preliminary bombardment by air and naval guns had ripped apart the vegetation in the landing area and discouraged any attempt to meet the Americans on the beaches. Instead, the Japanese commander chose to remain in the area around King’s Wharf, guarded on each flank by a cross-island tank trap and barricade.
It was fortunate that the Japanese did not contest the landing. Although the LVTs carrying the assault detachments of 3/105 landed without undue difficulty, the following LCVPs and LCMs were often unable to reach the shore across the reef, which was studded with coral rocks and potholes. Many men had to wade to the beach, and

Map 4: Makin Atoll, Showing Landings, 20 November 1943
the waterproofed tanks which accompanied the infantry were taxed to their limit to reach land through the surging swells.
An innovation, rocket fire by some of the assault LVTs, was tried at Makin. Designed to neutralize beach defenses, the launchers mounted on the tractors were far from successful. Most of the rockets fell short, exploding harmlessly in the surf, and many never fired at all because of defects in their firing mechanisms caused by sea water. Machine guns on the tractors provided close-in suppressive fire as the first waves came ashore at 0832.6
Only scattered sniper fire met the first assault troops, and the confusion arising from the late arrival of infantrymen and tanks negotiating the rock-strewn reef and beaches had little effect on the course of operations. By 1000, the western end of Butaritari was secured, and the 1st battalion of the 165th advanced toward the western tank trap encountered increasing resistance as it approached the main Japanese position.
While 1/165 was moving toward the enemy, the second landing planned by Ralph Smith was taking place. Moving through the lagoon entrance in columns of LVTs and landing craft, 2/165, reinforced by a 3/105 assault detachment, turned and headed in for beaches which gave entrance to the heart of the Japanese prepared positions. Naval gunfire and carrier air hit the island where the 2nd Battalion was headed, and the 16 tractors made for shore with machine guns firing and landed at 1040. Behind them, the tanks and infantry in following waves found the water too shallow to proceed in boats and had to wade across the reef shelf about 300 yards to the beaches.
For the rest of the day, the troops which had landed on the lagoon side tangled at close quarters with small, determined enemy groups that held up any appreciable advance. Across the western tank trap, the men of the 1st Battalion of the 165th, whose regimental commander was killed in the fighting, were stalled by the fire of enemy machine gunners and riflemen. At nightfall, the troops dug in in close contact with the Japanese. What followed in the darkness was a harrowing experience for the American soldiers, as infiltrators and trigger-happy green troops filled the night with grenade explosions and rifle and machine gun fire.
Ruefully wiser in the ways of the Japanese in night combat, the men of the 165th spent most of 21 November consolidating their beachheads, all the while so closely enmeshed with the Japanese defenders that naval gunfire, air, and supporting 105s, which had landed on D-Day, could furnish little effective support. Much of the day’s fighting, during which the two elements of the RCT joined forces, was concentrated in efforts to reduce Japanese pillboxes and machine gun nests, much like those on Tarawa. Tank-infantry teams, working with flamethrowers and demolitions, cleaned out the stubbornly resisting Japanese naval
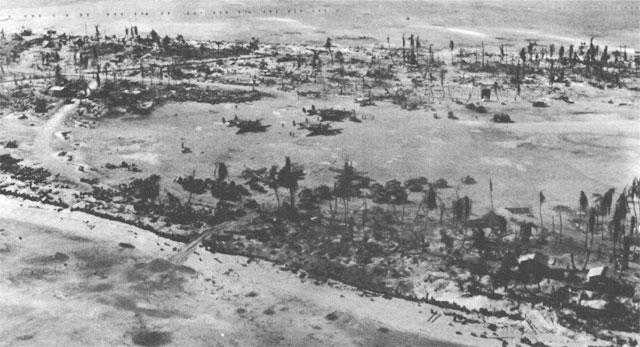
Light tanks and artillery wait their turn to leave Betio two weeks after the battle, while Marine transports and fighters use the rebuilt airstrip. (USMC 68045AC)
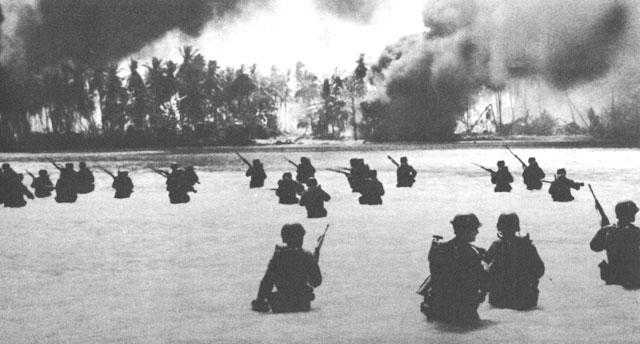
Soldiers of 2/165 wade toward the lagoon beach at Butaritari, as smoke rises from oil dumps hit by naval gunfire. (USA SC183574)
troops, but progress was slow. General Holland Smith, who landed to inspect the progress of the battle during the day, reported to Admiral Turner: “Enemy losses very heavy, own light. Consider situation in hand.”7 The Japanese, however, were still full of fight and those few that survived the first two days now withdrew across the eastern tank trap to take up positions in the heavy vegetation on the long, narrow tail of the island.
With the situation ashore rapidly clarifying and the destruction of the enemy garrison in sight, Turner gave Ralph Smith permission to land troops on Kuma Island north of Butaritari to cut off any Japanese attempt to retreat. On 19 November, the 27th Division commander had requested permission to make a landing on Kuma on D-Day, but on Holland Smith’s advice, the admiral denied the request for the last-minute change in the tactical plan. Neither of the senior officers wanted to make the subsidiary effort until the destruction of the Butaritari garrison was certain. On the morning of the 22nd, a detachment of the 105th Infantry rode LVTs ashore on the neighboring island and found no Japanese, only a welcoming party of natives.
On Butaritari, on 23 November, the main effort was made by 3/165, in reserve since D-Day. Crossing the eastern tank trap without opposition, the battalion moved quickly into the brush, flushing a few Japanese and maintaining a steady, continuous rate of advance that brought them up to a prepared line of enemy defenses by dusk. All night long, the Japanese tried to infiltrate the American positions and attacked in small groups to no avail. When morning came, there were 51 enemy dead in front of the lines of 3/165; the battalion had lost 3 men killed and 25 wounded. Sweeping on to the tip of the island on the 23rd, the soldiers encountered no further organized resistance. At 1130, General Ralph Smith signalled Admiral Turner: “Makin taken. Recommend command pass to commander garrison force.”8
Makin Atoll was captured at the cost of 218 Army casualties, 66 of whom were killed in action or died of wounds. Only one member of the 3rd Special Base Force Makin Detachment was made prisoner, but 104 Korean laborers surrendered to the assault force. The total number of enemy killed was estimated to be about 445, 300 of them Japanese combat troops.
The United States Navy suffered a far greater number of casualties in supporting the operation than did the Army units fighting ashore. On D-Day, an accidental explosion in a turret of the battleship Mississippi killed 43 sailors and wounded 19 others. Some 20 miles southeast of Butaritari on the morning of 24 November, the Japanese submarine I-175 torpedoed the escort carrier Liscome Bay. Bombs stowed in the vessel exploded, and in 23 minutes the carrier had perished, claiming the lives of 53 officers and 591 enlisted men.
The battle for Butaritari made veterans of the men of the 165th RCT. They had met the test of combat. Thanks to the experience gained at Makin, these troops could be expected to make a greater contribution to future victories in the Central Pacific.9
Other Tarawa Islands
The occupation of the less important islands in Tarawa Atoll began while the battle for Betio still was raging. On 21 November, elements of Company D, 2nd Tank Battalion, the division scout company, landed on Eita, west of Bairiki, and Buota, near the southeast corner of the atoll, where an estimated 100 Japanese were discovered. Another part of the scout company went ashore on an unnamed island that lay about one-fourth the distance from Buota to the northern apex of Tarawa. Two days later, while 3/10 was setting up its weapons on Eita to support the Marines on Betio, the Japanese on Buota escaped unopposed to the north. By 25 November, elements of Company D had scouted the southern half of Tarawa’s eastern side, but at this point the entire unit was recalled to Eita to prepare for a reconnaissance of three nearby atolls—Abaiang, Marakei, and Maiana.10 (See Map 1.)
In the meantime, Lieutenant Colonel Murray’s 2/6, which had overrun Bairiki, had undertaken the mission of clearing the enemy from the outlying islands. Murray’s men encountered no resistance until the late afternoon of 26 November, when the battalion reached Buariki, the northernmost of the larger islands of the atoll. At sunset on that day, a Marine patrol engaged in a fire fight with a small Japanese force. In spite of enemy harassment, the Marines held their fire throughout the night.
Murray resumed his advance on the following morning and soon located the enemy defenses, a haphazard arrangement of rifle pits and log barricades concealed in dense undergrowth. Because Company E had taken several casualties, the battalion commander ordered Company F to continue the attack while Company G maneuvered to strike the enemy on his eastern flank. Although Murray had a battery of pack howitzers at his disposal, poor visibility and the short range at which the infantrymen were fighting prevented the cannoneers from firing more than a single concentration. In spite of this absence of artillery support, Murray’s troops crushed the position, killing 175 and taking 2 prisoners. The Marines lost 32 killed and 59 wounded as a result of this fight.
Naa, a tiny island north of Buariki and the final objective of the battalion, was found on 28 November to be free of Japanese. The men of 2/6 then returned to Eita to rest from their mission. By boat and on foot, these Marines had covered a distance of about 35 miles in moving from Betio to Naa.11
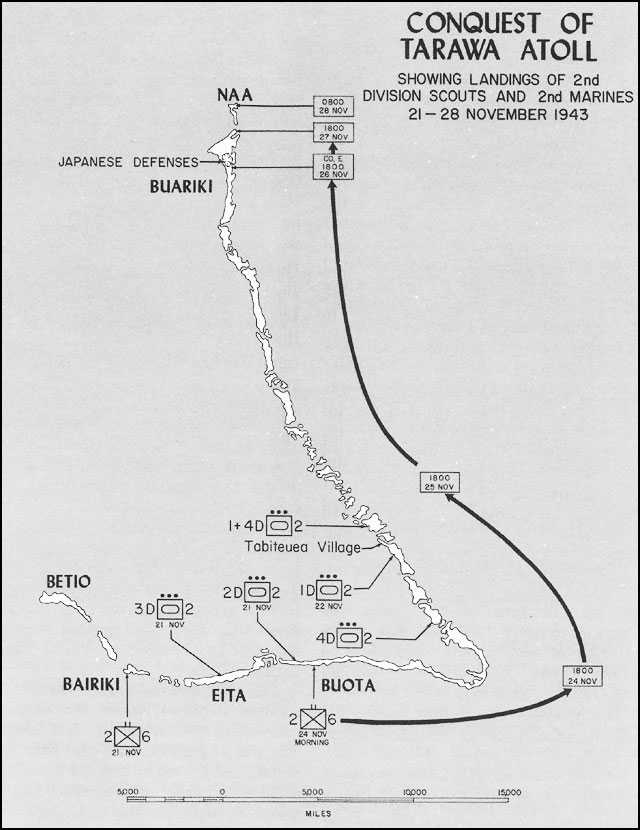
Map 5: Conquest of Tarawa Atoll, Showing Landings of 2nd Division Scouts and 2nd Marines, 21-28 November 1943
Apamama12
In operations to seize the third major objective of GALVANIC, plans called for VAC Reconnaissance Company, commanded by Captain James L. Jones, to sail to Apamama in the submarine USS Nautilus, land on the night of 19-20 November, and determine whether the atoll was as lightly held as aerial photographs had indicated. Should Jones’ Marines encounter any large number of the enemy, they were to break off the action and make their way back to the Nautilus. The objective which the company was to explore was a large atoll shaped like a partially inflated football and measuring 12 miles long by 5 miles wide. Abatiku island to the southwest, which might serve as the laces of the football, was bordered on either side by a passage into the lagoon. Beyond South Passage lay Entrance Island, then an expanse of reef, and finally Apamama island, which curved to the northwest then swung southward toward Western Passage and Abatiku. Apamama island was broken by shallow water into six segments, each of which had been given a name by the planners of the operation. Those of concern to Jones’ men were, in order of their separation from Entrance Island, JOE, JOHN, ORSON, and OTTO. (See Map 6.)
The Nautilus was to pick up the reconnaissance unit at Pearl Harbor, cruise for a time off Tarawa to observe Japanese ship movements, and then sail the 76 miles that separated Tarawa from Apamama. On 19 November, after departing from Tarawa, the submarine surfaced in order to increase her speed. The destroyer Ringgold, assigned to protect Task Force 53—which had received no word that the Nautilus was in the area13—spotted the submarine, scored a direct hit with a 5-inch shell, and forced her to crash dive. Luckily, the shell failed to explode and the minor damage it caused could be repaired once it was safe to come to the surface. The submarine arrived off Apamama on the afternoon of 20 November.
Before dawn of the following day, Jones and his men embarked in rubber boats for JOHN island. An unexpectedly strong current forced them to land on JOE, just to the west, but they later crossed to their original objective. On JOHN, the Marines collided with a 3-man enemy patrol, killed one of the Japanese, and prepared to move to the next portion of Apamama Island, the part called ORSON. After this crossing had been made, the troops encountered a group of natives who informed Jones that about 25 Japanese were entrenched at the southern tip of neighboring OTTO.
The company attempted on 23 November to move across the sandspit connecting ORSON and OTTO Islands. The fire of enemy rifles and light machine guns proved so intense that Jones decided to break off the action and attempt to outflank the defenders. On the following morning, while the Nautilus
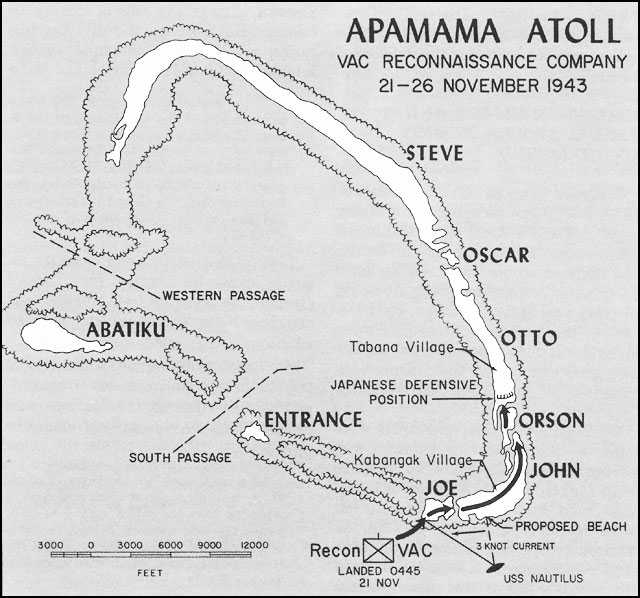
Map 6: Apamama Atoll, VAC Reconnaissance Company, 21-26 November 1943
shelled the Japanese position, the company commander tried to disengage so that his troops could enter the rubber boats, bypass the strongpoint, and attack it from the rear. The plan, however, could not be executed, for the Japanese kept firing steadily in spite of the bursting shells. Late in the day, a friendly destroyer arrived off the island to slam a few additional rounds into the stubborn emplacements.
A native reached Jones on the next morning with the startling news that all the Japanese were dead. Patrols soon discovered that this report was true, for 18 of the enemy had killed themselves after the other 4 had perished in the bombardment. Marine losses in the Apamama action were two killed, two wounded, and one injured.14 That afternoon, Brigadier General
Hermle, Assistant Division Commander, reached Apamama with 3/6 to assume responsibility for the defense of the atoll.
Abaiang, Marakei, and Maiana Atolls:, Mission Accomplished
Company D, 2nd Tank Battalion, which had begun securing the outlying parts of Tarawa Atoll, embarked in the minesweeper Pursuit on 29 November. The division scouts had been assigned the mission of reconnoitering Abaiang, Marakei, and Maiana Atolls. By 1 December, this unit had checked all three objectives without encountering opposition, thus completing the Marine contribution to Operation GALVANIC. (See Map 1.)
Even while these last operations were going on, the 2nd Marine Division was moving to Hawaii, there to prepare again for combat. The 2nd and 8th Marines went first on 24 November, followed in short order by the 6th, as garrison troops responsible to the area naval commander took over the defense and development of the islands seized by the Marines. On 4 December 1943, General Julian Smith turned over command of Tarawa to the Navy and headed for the new division base, Camp Tarawa, high in the hills of the big island of Hawaii. As the division historian recalled the 2,000-mile voyage, he described it as:
... a postscript to horror. The transports reeked of the awful smell of the island, of disinfectant, and of blood. There were no fresh clothes for unwounded Marines, and almost everyone had lost his gear in the shuffle of battle. Every day there were funerals aboard the transports, and flag-covered bodies slipping into the silent seas.15
The 2nd Marine Division casualty reports show the battle for Tarawa claimed the lives of 984 Marines and attached Navy personnel and that an additional 2,072 men were wounded.16 These harsh statistics serve as a lasting tribute to the courage, and self-sacrifice of the Marines who fought there. As a national magazine phrased it:
Last week some two to three thousand U. S. Marines, most of them now dead or wounded, gave the nation a name to stand beside those of Concord Bridge, the Bonhomme Richard, the Alamo, Little Big Horn, and Belleau Wood. The name was Tarawa.”17